This option is applicable when you click a datasource or a report file from the repository. It allows you to create job schedules that determine when the datasource or a report is to be run.
Through the Scheduler Web interface, triggers may be created, tested and modified, while calendars can be specified to exclude some dates such as public holidays from firing the job. Time zone can also be selected to ensure every trigger will be fired at a proper time, no matter where you are around the globe.
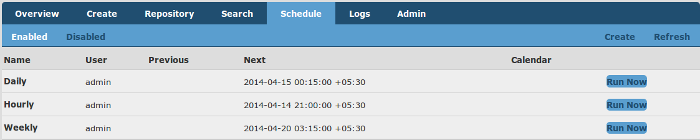
This tab page shows the jobs that are currently enabled in the Ambience system. It provides information including trigger name, job file path, previous running time, next running time and the calendar on which the trigger is based.
This tab page shows the triggers that are currently disabled in the Ambience system. It provides complete information including trigger name, job file path and the calendar on which the trigger is based.
This page allows you to create a trigger to schedule a job. A trigger is a mechanism for deciding when to invoke a job. Most commonly, triggers are time-based - for example invoke the job every Tuesday at 6am. All triggers have a name, an enabled/disabled flag and some specialised fields for identifying when to run.
All triggers have a Start and Stop time and can only fire between those times. It is possible to set the Stop to be Never, so that the trigger is always operational.
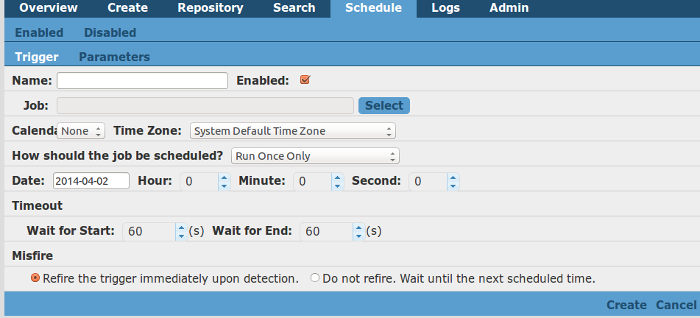
Enter the name of the trigger and select the job to be triggered.
Select the calendar and the time zone for the trigger.
With the correct time zone selected, job firing will be accurate, and follows the rules as stated below:
The time should always follow the changes of daylight saving time. Therefore 01:00 is the same whether Summer or Winter.
When a time does not exist (a gap due to the clocks moving forwards), job firing will choose the first valid time after the gap.
When the time exists twice, job firing will choose the first occurrence and ignore the second.
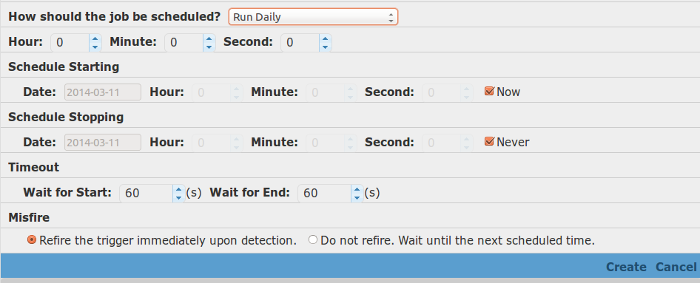
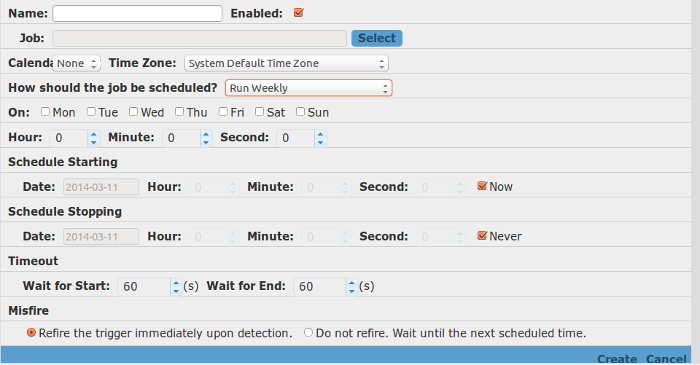
You can schedule a job to run once only, daily, weekly, monthly, at regular intervals or controlled by a CRON expression.
For daily events, you need to choose the time when the job should run.
For weekly events, you need to choose the day(s) of the week when the job should run.
For monthly events, you need to choose the day(s) and month(s) to run the job. You can also choose specific day(s) within each month.
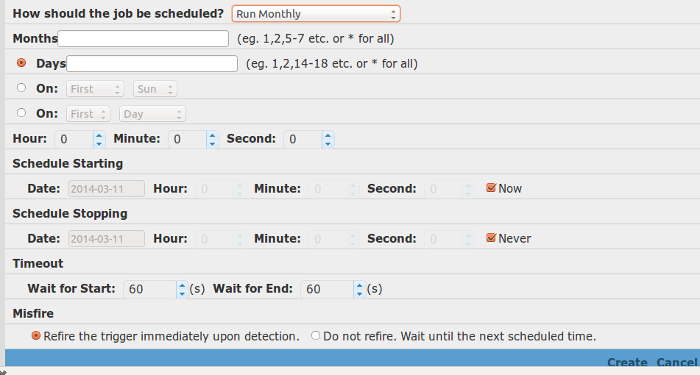
For jobs that run daily, weekly or monthly, the job will fire at the same time on the scheduled days.
You can also run the job at regular intervals.
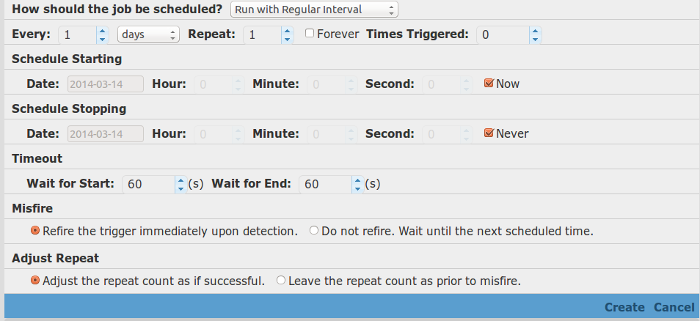
Select the number of days/hours/minutes/seconds the job should run. To repeat the job, set the repeat count to the number of times the job is to be repeated. The job is then repeated at the time the job first fires. For example, if the job is set to fire each hour, and the repeat count is set to 2, then the job fires once each hour, twice.
You can tick the Forever option to set the repeat count for ever.
The Times Triggered option keeps a track of the number of times, the job repeats. The job will repeat as scheduled if times triggered is <= repeat count.
The system allows you to schedule a job using a CRON expression.
Enter a CRON expression and click Validate to validate it.
The Schedule Starting and Schedule Stopping values define the "activity period" for the
trigger - the trigger can only fire between the starting times and the
stopping times. This does not necessarily mean the trigger will first
fire at the start time, just that it cannot ever fire before the start
time. For example, if the trigger has a start on 2014-04-01 (a
Tuesday) and the trigger is set for fire every Thursday, then it will
first fire on 2014-04-03.
Selecting Now indicates that the trigger may fire at any time from now on.
Selecting Never implies that the trigger will be active for ever.
Note
By default, a trigger becomes active on completion of the wizard and never stops. Also, when the trigger has completed the job run, it will be set to disabled automatically. If you would like to run the job again, you need to enable the trigger and make the relevant adjustments to theSchedule Starting and Schedule Ending values.Misfire allows you to override the default job timeouts by setting start/end timeout intervals, and choosing the action to be taken when a trigger fails to work the way it was supposed to.
Misfire Configuration
Wait for Start: Set the start timeout value for the job (in seconds). If the job does not get started within the start timeout value, the trigger will be considered misfired.
Wait for End: Set the end timeout value for the job (in seconds). If the job does not complete within the end timeout value, the trigger will be considered misfired.
Fire the trigger immediately when misfire is detected
Refire the trigger immediately upon detection: This option enables the trigger to fire soon after the misfire is discovered.
Do not refire. Wait until the next scheduled time: This option enables the trigger to fire in the next round.
Adjust the repeat count when misfire is detected
Adjust the repeat count as if successful: Adjusts the repeat count as if the job has run, even if it has been misfired.
Leave the repeat count as prior to misfire: Does not increment the repeat count if the job has misfired.
This page allows you to add, edit and delete trigger parameters, as well as view existing parameter information.
If the job requires parameters, you should enter them here. Parameters can be used by all the tasks within the job and it is useful to have a single point of maintenance. Parameters can either be hard-coded, for example User = Bill, or can be dynamic, for example, User = ${User Name##Bill}. This indicates that the triggering code should supply a value for User, by prompting for "User Name", and that the default value is Bill. Refer to the Repertoire User Manual for details of how dynamic parameters can be used throughout the Elixir Repertoire suite.
Complete the following steps to add a trigger parameter:
On the Schedule > Create > Parameter page, click Add. The Edit Entry panel displays.
Fill in the parameter name and value. Select the Enabled checkbox as needed.
Click OK. The trigger parameter is successfully added.
Complete the following steps to edit a trigger parameter:
On the Schedule > Create > Parameter page, select an existing trigger. The line of the trigger information becomes grey.
Click Edit. The Edit Entry Panel displays.
Change the parameter name or value. Select or deselect the Enabled checkbox as needed.
Click OK. The trigger parameter is successfully edited.