A Card Master provides reuse of a set of views that can then be shared by other cards. You can create a card with a logo, navigation etc. and set it as the Card Master for other cards.
The following example will make it clear.
- Create a new dashboard, and drag and drop a
Labelcomponent on to the default card (Card 1). - Right click the Label and select Properties.
- Navigate to the
typetab and enter some text for the label - for example,Card Master Example. - Click Apply to save the changes.
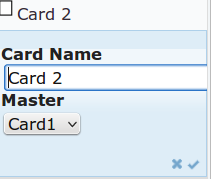
- From the Cards explorer, add a new card - Card 2 and set the Card Master as Card 1.
- Click the
OKicon .
. - Notice how the label from card 1 (Card Master) is displayed in Card 2.