
ETL Designer
Description
The ETL Designer allows users to customize, modify, and run ETL chains of a specific chainset. The ETL Designer loads one ETL chainset at a time.
There are 4 panels available at all times, each displays specific information related to the selected chainset. The following sections below describe each of the panels. 
- Chains - displays the list of chains in the chainset
- Steps - displays all steps of a selected chainset
- Output - displays the list of run logs for the chainset
- Results - displays the output of a specific run record
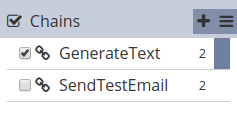
Chains Panel
This panel displays the list of chains in the chainset.
Below are the different components of the panel:
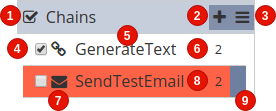
| No. | Description |
|---|---|
| 1 | Allows inverting selected and deselected chains. |
| 2 | Allows adding new chains. |
| 3 | Provides more actions that can be performed. Available options vary depending on the chains selected. |
| 4 | Checkbox indicating that the chain is selected. |
| 5 | Unique name of the chain. |
| 6 | Number of steps (both enabled and disabled are included in the count) in the chain. |
| 7 | Icon assigned to the chain for aesthetic purposes. |
| 8 | Color assigned to the chain for aesthetic purposes. |
| 9 | Indicates which chain is displayed on the Steps panel. |
On this panel, the following features are available:
- add a new chain
- cut, copy, and paste a chain
- modify a chain’s properties
- generate a consolidated short description of the chainset
- download a chain
- load a chain (to view its steps in the
Stepspanel) - delete a chain
- set a color and an icon for a chain
Add Chain
To add a new chain, click on the Add Chain button.
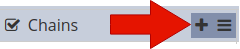
A dialog appears, prompting the user to enter the chain name. It also provides the option to copy the steps of an existing chain.
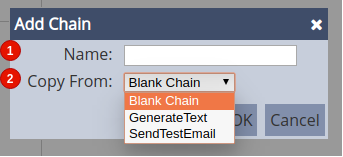
| No. | Field | Description | Mandatory | Input Type | Constraints | Default Value |
|---|---|---|---|---|---|---|
| 1 | Name | Unique name assigned to the ETL chain that would be used as its identifier. | Y | Text field | Any text. The value must not exist in the current list of chain names of the current ETL chainset. The value is case-sensitive. | Empty string |
| 2 | Copy From | The name of the chain of which the new chain would copy its steps from. Selecting “Blank Chain” results in using an empty chain as a starting point while selecting an existing chain would result in having the selected chain’s steps cloned as the starting point for the new chain. | Y | Select | 1 value can be selected. Options are: - “Blank Chain” - names of all enabled ETL chains in the chainset |
“Blank Chain” |
Once a chain is selected or added, the Steps panel would display all the steps in that chain.
Select Chain
Selecting a single chain and multiple chains are supported in the Chains panel.
To perform a single-value selection, tick on the checkbox on the left of the chain name and ensure that only 1 chain is ticked.

Another option is to click on any part of the chain’s row. This automatically removes the ticks on the checkboxes of all other chains, if any. The difference between ticking on the checkbox and the entire row is that the former does not change the chain displayed on the Steps panel, whereas the latter changes the steps displayed on the said panel to the ones corresponding to the selected chain. Note that performing the latter also adds a colored indicator on the right part of the selected row, specifying that the steps displayed on the Steps panel belong to the selected chain.
To select multiple chains, tick on the checkboxes on the left of the chain names. To deselect a chain, simply un-tick the checkbox corresponding the designated chain. To invert the selection, simply click on the checkbox on the panel header.

Modify Chain Properties
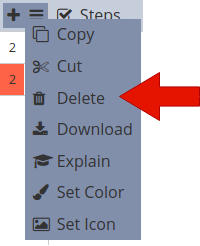
There are a few chain properties that can be modified. Some properties, like the chain name, can only be modified one chain at a time. There are other properties that can be changed in bulk as well. The options under the More Actions button depend on how many chains are selected.
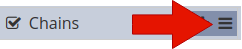
To modify a chain’s property or the same property of multiple chains collectively, start by selecting a chain or several chains. The option to modify a chain’s name is only available if only one chain is selected. Other properties, such as color and icon properties, are when one or more chains are selected.
To rename a chain, select one chain then click on the More Actions button. Select the Rename option.
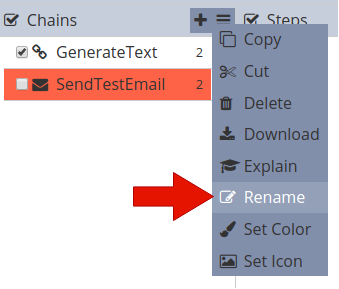
A dialog box appears, prompting to enter the new name for the selected chain.

Enter any text that does not yet exist in the list of chain names. The field is case-sensitive. Clicking on the OK button proceeds with renaming the chain. Entering a name already given to another chain would result in a notification stating that the name is already used. Clicking on the Cancel button aborts the action. Note that renaming chains does not update any references to it (e.g. in Chain Call steps).
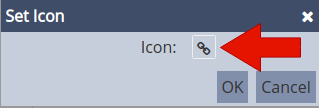
To change the icon assigned to a chain or several chains, simply select the chain/chains by ticking on their respective checkboxes. Click on the More Actions button then select the Set Icon option. A dialog box appears, prompting to select an icon. The “chain” icon is set as default for all chains. Click on the icon to change it.
This displays the available icons that can be selected from.
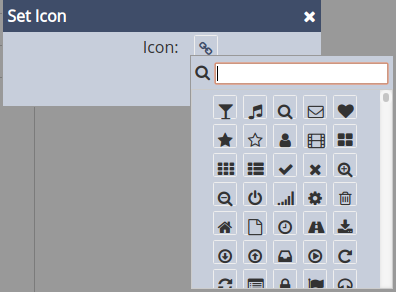
Entering the icon names on the search bar is useful to narrow down the options.
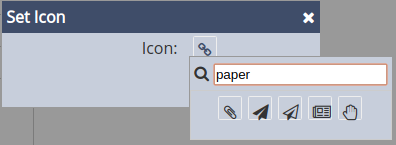
Select an icon then click on the OK button to set it.
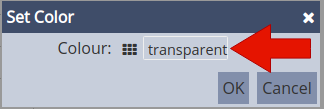
To change the color assigned to a chain or several chains, simply select the chain/chains by ticking on their respective checkboxes. Click on the More Actions button then select the Set Color option. A dialog box appears, prompting to select a color. “Transparent” is set as the default color for all chains. Click on the color to change it.
This displays the available colors that can be selected from.

Entering the color names on the search bar is useful to narrow down the options.
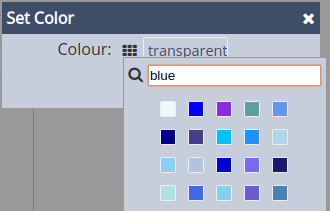
Select a color then click on the OK button to set it.
Delete Chain
To delete a chain or multiple chains, select the chain/chains by ticking on their respective checkboxes. Click on the More Actions button then select the Delete option.
The selected chain/s would then be removed from the list of chains.
Download Chain
To download a chain or multiple chains as a JSON file, select the chain/chains by ticking on their respective checkboxes. Click on the More Actions button then select the Delete option. A dialog box would appear, prompting to enter the file name of the JSON file.
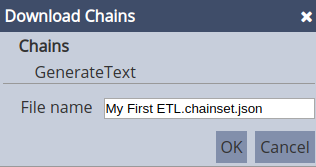
By default, the chainset name is used, per the format below:
<chainset name>.chainset.json
Click on the OK button to proceed.
Explain Chain
To generate a brief summary the chainset, click on the More Actions button then click on the Explain option. It opens another browser tab and displays descriptions of each step in each chain. It includes the parameters and values for each step, providing a narrative-like overview of the chainset.

Steps Panel
This panel displays all the steps of a selected chainset. This also allows the user to run the chain or partially run it up to a specific step. Below are the different components of the panel:
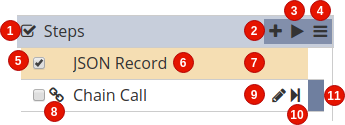
| No. | Description |
|---|---|
| 1 | Allows inverting selected and deselected steps. |
| 2 | Allows adding new steps. |
| 3 | Runs the entire chain. |
| 4 | Provides more actions that can be performed. Available options vary depending on the steps selected. |
| 5 | Checkbox indicating that the chain is selected. |
| 6 | Name given to the step. |
| 7 | Color assigned to the chain for aesthetic purposes. |
| 8 | Icon assigned to the step for aesthetic purposes. |
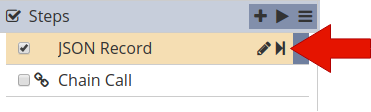
| 9 | Allows modifying a step’s parameter values and properties. |
| 10 | Runs the chain from the first step up to the step corresponding the this Run to Step button. |
| 11 | Indicates which chain is in focus. Selecting the step makes its Edit Step (9) button and Run to Step shortcut (10) button available. Also, the Run to Step option under More Actions (4) runs the entire chain up to this step. |
On this panel, the following features are available:
- add a new step
- move a step
- copy and paste a step
- modify a step’s parameters and properties
- run the entire chain
- partially run the chain up to a specific step
- disable a step
- delete a step
- set a color and an icon for an existing step
Add Step
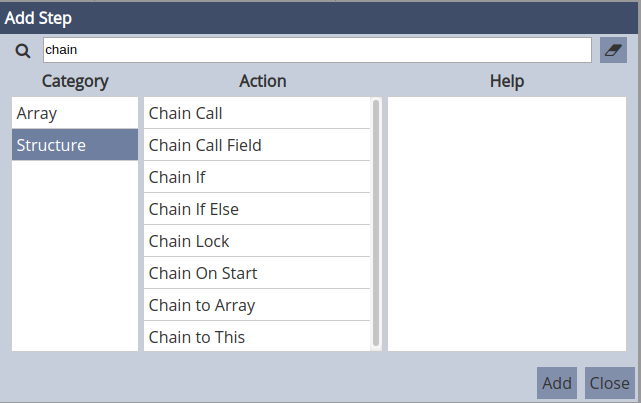
To add a new step, ensure that a chain is selected first. Click on the Add Step button.

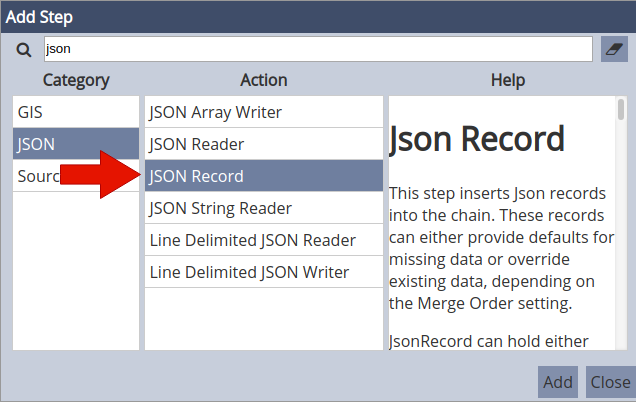
A dialog appears, prompting the user to select the step to be added. Steps are categorized into different step categories, which are located in the Category panel on the left. The Action panel contains the actual steps for the selected step category.
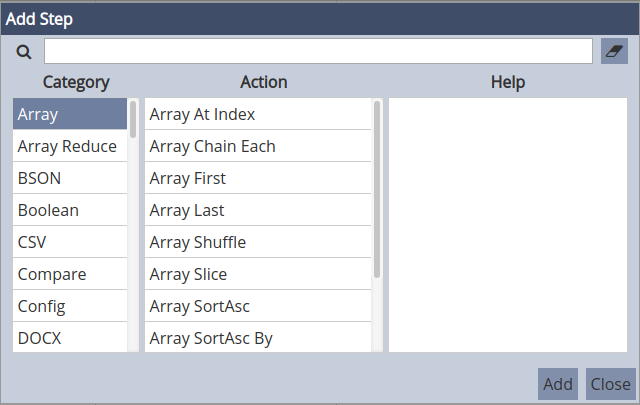
A search bar is available, allowing the user to select a specific step. Click on a step in the Action panel to select it. Documentation of the step is provided in the Help panel on the right. This includes detailed descriptions of what the step does. If applicable, other details such as step input parameters and acceptable values, output, notes, and other related steps are also included.
Alternatively, clicking on the Dictionary button on the top right corner of the ETL Designer interface opens the same descriptions on another browser tab.

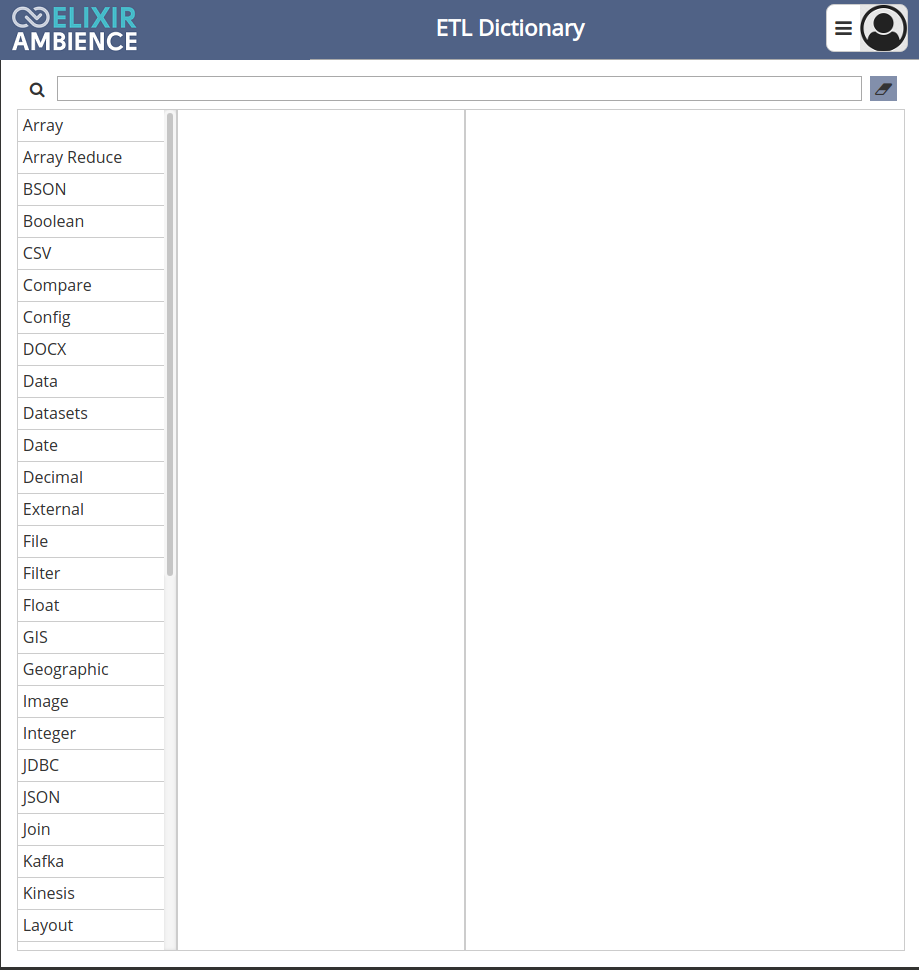
Click on the Add button to add the step to the chain.
If more steps are needed, simply continue selecting other steps then click on the Add button. Click on the Close button after adding steps. If any step was added, closing would instantly open the Edit Step dialog box corresponding to the last step added.
Configure Step
Several steps have require input parameters, which are crucial in configuring the steps to result in the desired outcome. Different steps also have different input parameters.
To configure an existing step, click on the Edit Step button corresponding the step.

The Edit Step opens and allows entering values for the step’s input parameters, as well as renaming the step. By default, the Step Type is set as the Step Name value. This value can be replaced with any text.
To save the changes, click on the Save button. To continue making changes on other steps in the chain without saving first, click on the Previous button to move one step up. Likewise, click on the Next button to move one step down the sequence. The Previousnavigation button is disabled for the first step. Similarly, the Next navigation button is also disabled for the last step. Clicking on the Cancel button discards the changes made.

Note that changes done would only be saved after clicking on the Save button. This means that if changes are made on several steps consecutively (i.e. using navigation buttons Previous and Next), then the Cancel button is clicked, all changes made since opening the Edit Step panel would not be saved.
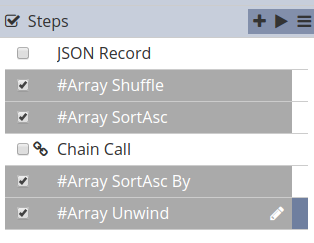
Chain Call Steps
There are special steps that run other chains within the same chainset. These steps, such as the Chain Call step, are found under the Structure step category.
The simplest of these is the Chain Call step.
In this example, there are two chains in the chainset:
- the
GenerateTextchain creates a text - the
SendEmailchain sends an email
The objective is to send the text out as the body of the email. This is a simple example that does not seem to benefit much from putting the email sending steps in another chain, but real world chains could be a lot more complex. The sample used intends to demonstrate how the data is passed from chain to chain during chain calls.
In this case, the Chain Call step is added to the GenerateText chain. The value of the Chain Name parameter is set to another chain, the SentEmail chain.
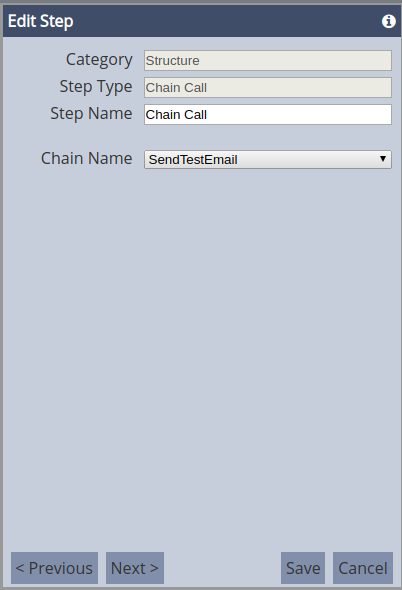
What it does is a straightforward call of another chain, as if the steps in the called chain are added to the chain doing the call. This means that the results of the sequence in GenerateText, before the Chain Call step, become accessible to steps in the called chain, the SendEmail chain.
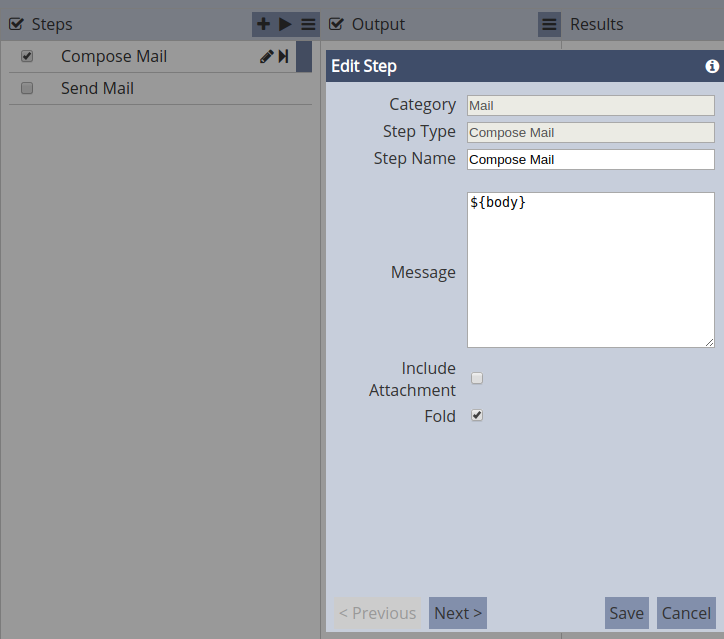
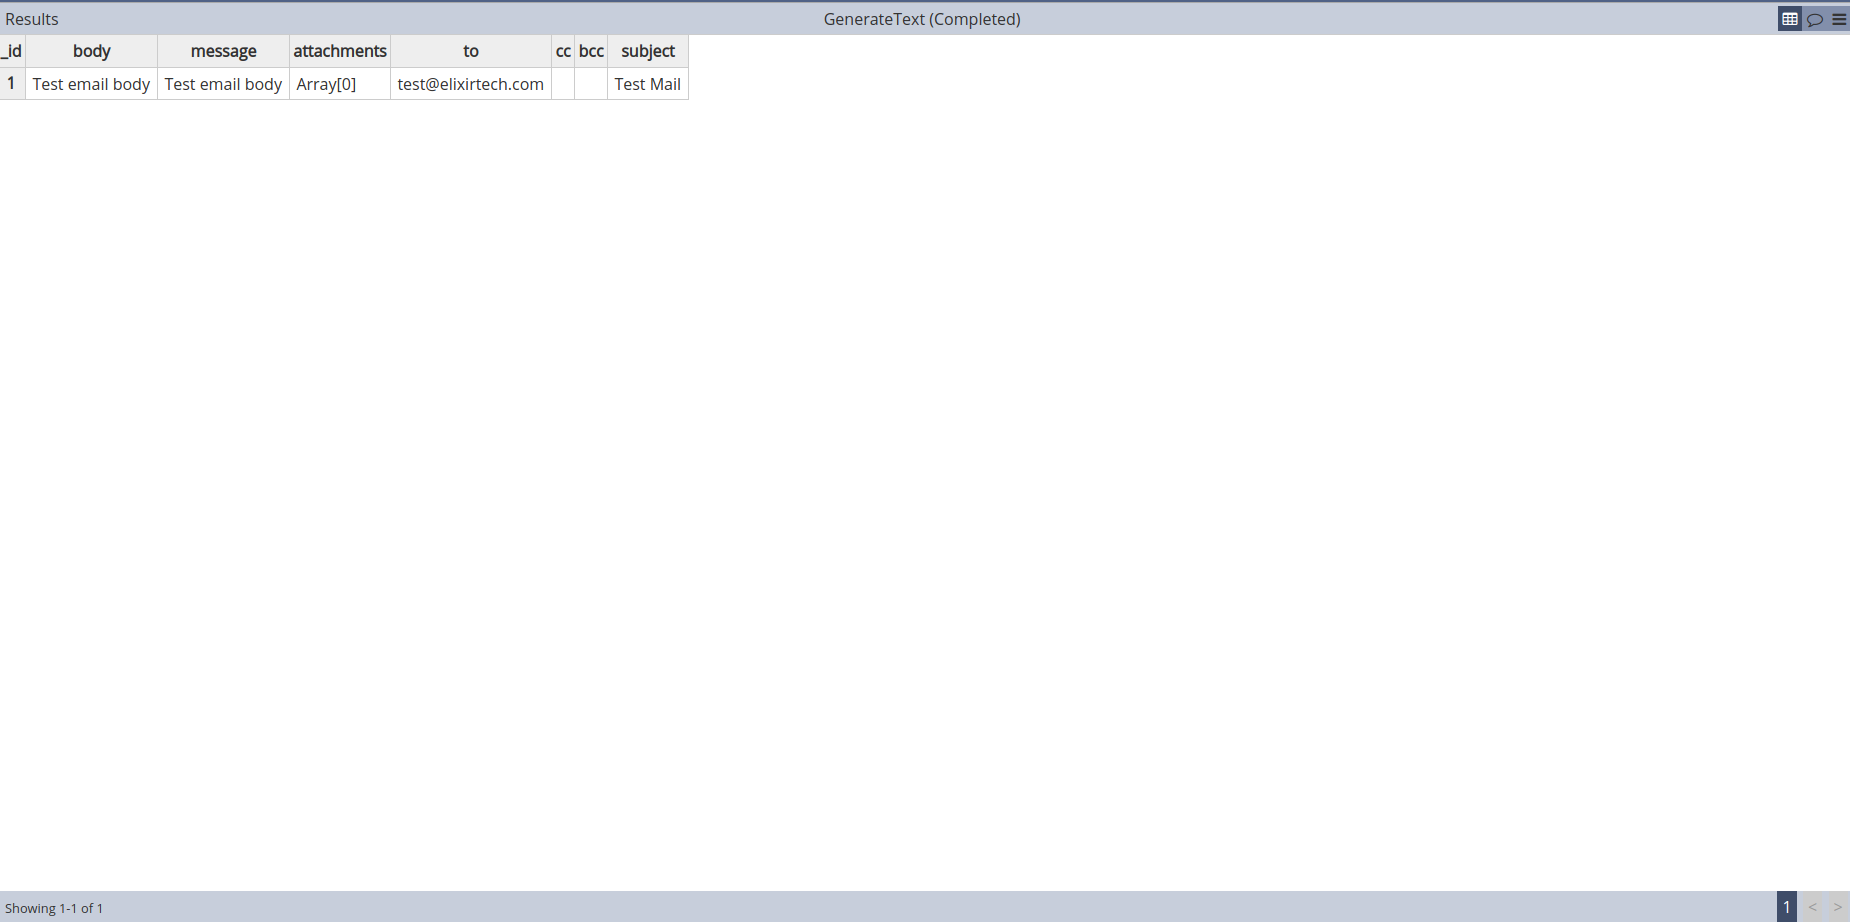
To demonstrate further, the JSON Record in GenerateText is set to contain a body tag.
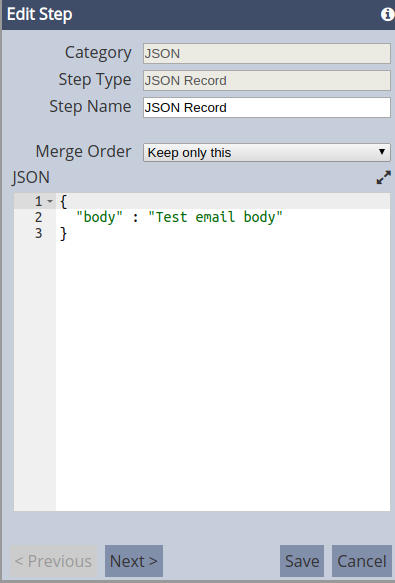
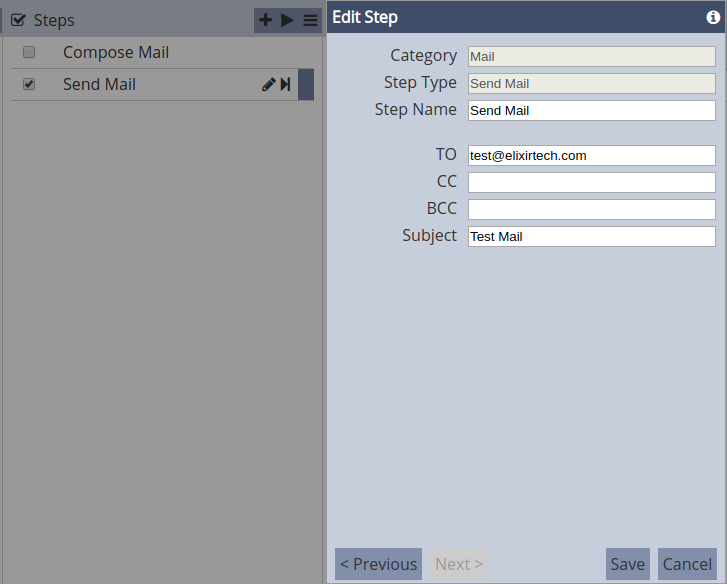
In the SendEmail chain, the Compose Mail step creates the document the body tag created can be referenced by tagging it as a variable ${body}.
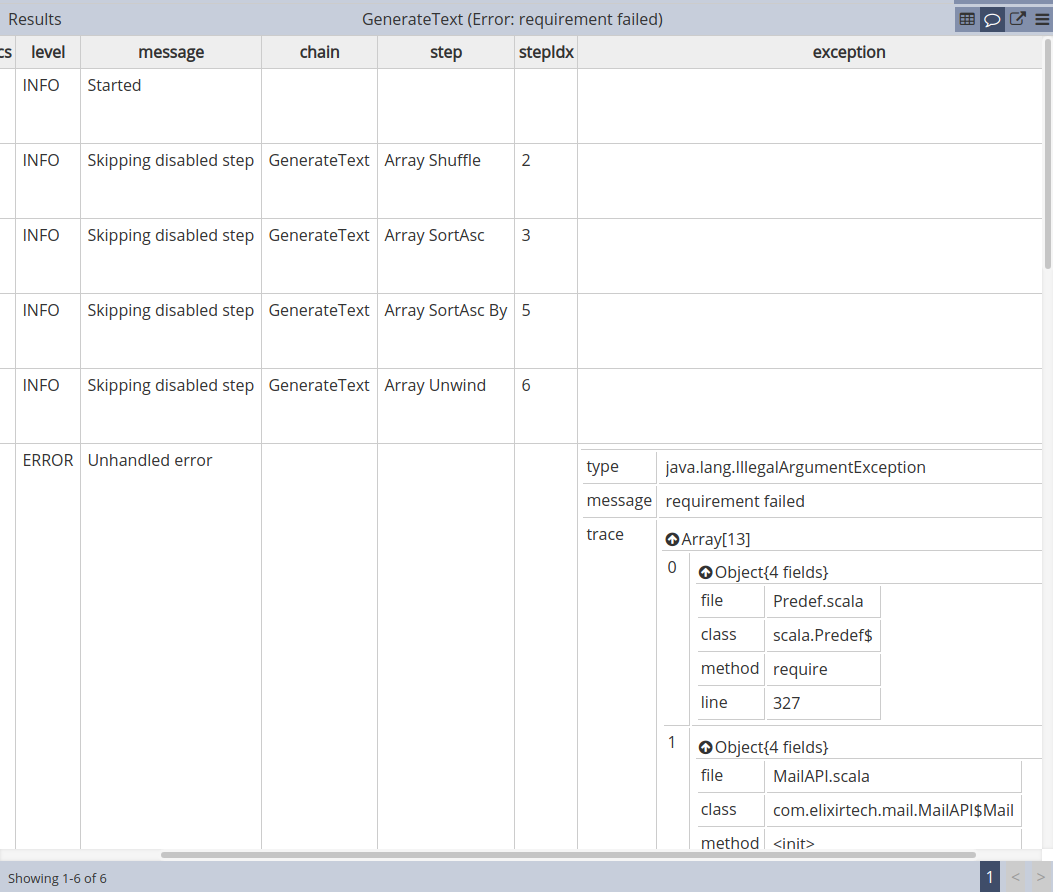
Assuming that the Send Mail step is configured properly (with at least 1 recipient), running the SendEmail chain alone results in an empty variable in the Compose Mail step, making the message (email body) empty.
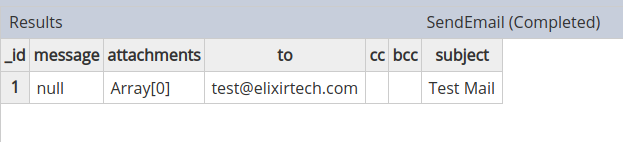
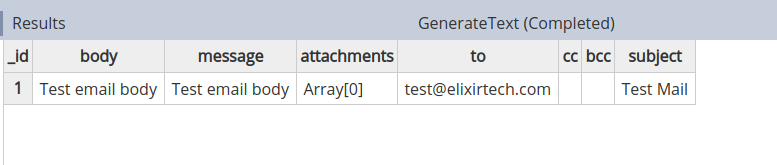
On the other hand, running the GenerateText chain alone passes the value assigned to the body field to the SendEmail chain, demonstrating how results can be passed to different chains through chain calls.
There are many other related steps, serving different purposes. For more information on these steps, refer to the Dictionary provided.
Run Steps
Chains can be executed manually on this interface one at a time. To execute all of the steps in the selected chain, click on the Run Steps button.

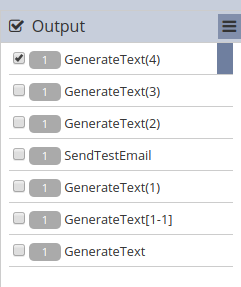
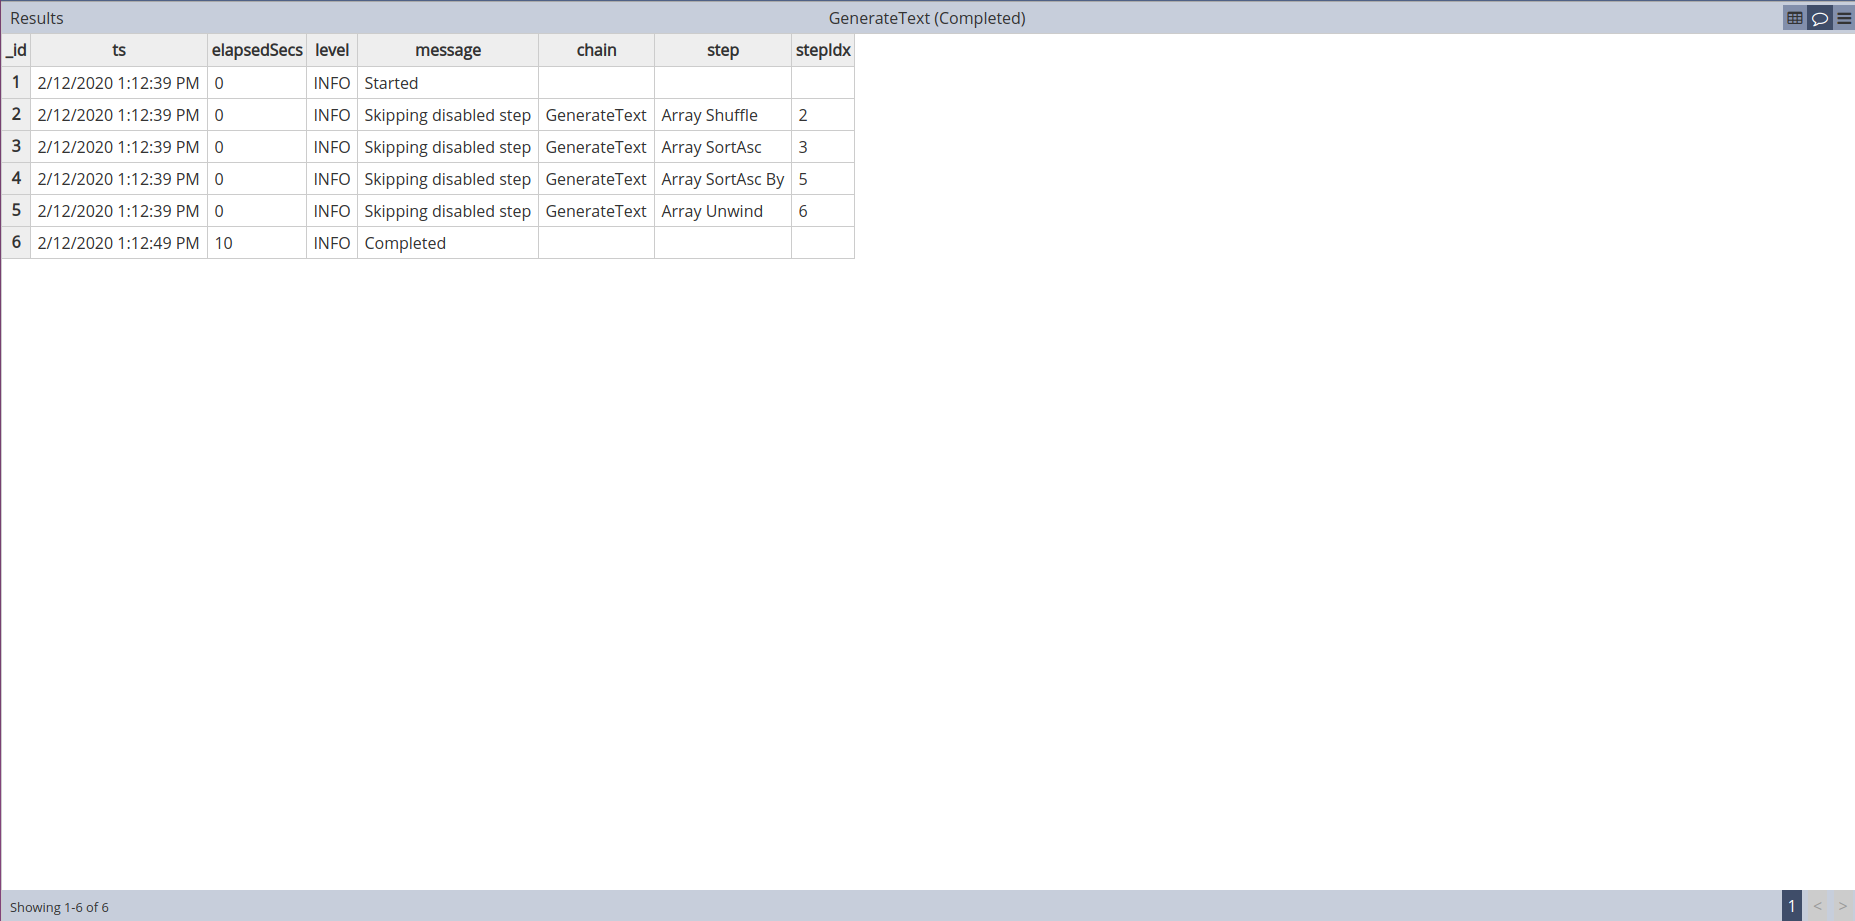
Right after triggering the chain to run, a record appears on the Output panel. Each run results in one record in the Output panel. The Results panel displays the actual results of the executed steps.
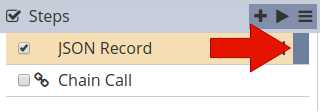
Running the chain partially is also available. Select a step by clicking on the row. An indicator appears on the right side of the row.
This can be done in two ways. Either click on the More Actions button then select the the Run to Step option, or click on the Run to Step button on the row.
Both would result in executing all steps between the first (top) and the selected step inclusively.
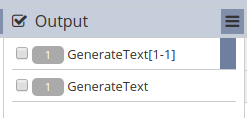
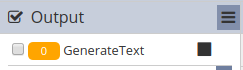
If the execution is ongoing, the result count is displayed in yellow, instead of gray.
If the same chain or chain subset has already been executed before and is still listed on the Output panel, new records are labeled with an iteration index appended after the chain or chain subset.
Modify Step Properties
Step properties, such as color and icon can be set through the options in the More Actions button. The process is similar to how these properties are changed for ETL chains.

To change the icon assigned to a step or several steps, simply select the step/steps by ticking on their respective checkboxes. Click on the More Actions button then select the Set Icon option. A dialog box appears, prompting to select an icon. By default, there is no icon set for all steps. Click on the icon to assign one.
This displays the available icons that can be selected from.
Entering the icon names on the search bar is useful to narrow down the options.
Select an icon then click on the OK button to set it.
To change the color assigned to a step or several steps, simply select the step/steps by ticking on their respective checkboxes. Click on the More Actions button then select the Set Color option. A dialog box appears, prompting to select a color. “Transparent” is set as the default color for all steps. Click on the color to change it.
This displays the available colors that can be selected from.
Entering the color names on the search bar is useful to narrow down the options.
Select a color then click on the OK button to set it.
Move Step
The order by which steps appear on a chain can be changed through the More Actions options.
Select a step or several steps by ticking on the checkboxes corresponding the step/steps. Click on the More Actions button.
There are 4 movements available:
| Option | Description |
|---|---|
| Move to Down | Moves the selected step down by one step, swapping with the next step. This option is only available if only one step is selected. |
| Move to Up | Moves the selected step up by one step, swapping with the previous step. This option is only available if only one step is selected. |
| Move to Bottom | Moves the selected step/s to the bottom of the sequence, making the selected step/s the last step/s of the chain. |
| Move to Top | Moves the selected step/s to the top of the sequence, making the selected step/s the first step/s of the chain. |
Disable Step
Disabling a step retains the step, its configuration, and properties, but excludes it from being executed in the chain. One or more steps can be disabled at once. To select steps, tick on the corresponding checkboxes. Click on the More Actions button then select the Disable option.
Disabled steps are grayed out. They can be modified even when disabled.
Delete Step
Deleting a step permanently removes it from the chain. One or more steps can be deleted at once. To select steps, tick on the corresponding checkboxes. Click on the More Actions button then select the Delete option.
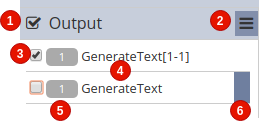
Output Panel
This panel displays the list of execution records of all chains in the chainset. Chains can be run in entirety or partially.
Below are the different components of the panel:
| No. | Description |
|---|---|
| 1 | Allows inverting selected and deselected output records. |
| 2 | Provides more actions that can be performed. |
| 3 | Checkbox indicating that the chain is selected. |
| 4 | The name of the chain that was executed is displayed. If chain was partially executed, the name of the chain would be appended with the range of steps that were included in the run (e..g. 1-1); the range of the included steps are referred to by the order by which they appear in the chain sequence. If the entire chain is executed, only the name of the chain is displayed. |
| 5 | Number of records resulting after the last step is executed. This corresponds to the number of records displayed in the Results panel. |
| 6 | Indicates which run is in focus. Selecting the step displays its results in the Results panel. |
On this panel, the following features are available:
- sort output/execution record
- delete record
- refresh list
Refresh Output
To refresh the list click on the More Actions button. Select the Refresh option. This is particularly useful when the step happens to be executed separately, in a different session, for instance. Doing so will make the results easily available to the current view.
Delete Output
One or more steps can be deleted at once. To select records, tick on the corresponding checkboxes. Click on the More Actions button then select the Delete option. This permanently deletes the execution record/s selected.
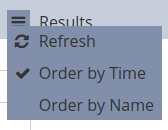
Sort Output
The execution records can be sorted according to time of execution in descending order or by name in ascending order. By default, the records are sorted by time, with the most recent record appearing on top. The current sorting method is also indicated by a tick as displayed in the sample below:
Results Panel
This panel displays the results of the selected execution record in the Output panel. The results are rendered in a table format.
Below are the different components of the panel:

| No. | Description |
|---|---|
| 1 | Name the row selected in the output panel. |
| 2 | Execution status of the chain or chain subset. Completed is labeled for successfully completed runs. If the last step results in a handled error, the error message is displayed as well. When the execution is still ongoing, the label is absent. |
| 3 | Navigates to the grid view, displaying the results. |
| 4 | Shows the event logs related to the execution. |
| 5 | Opens the Results panel in a separate browser tab. |
| 6 | Provides more actions, such as downloading the results in various formats. |
| 7 | Field names of the results. |
| 8 | Field values of the results. Results could have multiple rows. |
On this panel, the following features are available:
- view results
- view logs
- open results in a separate browser tab
- download results
Show Data
The data grid shows the results of the record selected in the Output panel. The Results panel has this view loaded by default. Results appear if the execution has already completed successfully.

No data appears if the execution is still ongoing.

Likewise, no data is also displayed if the last step results in an error.

Pagination is applied on the results in the view. 50 rows are displayed per page. Page navigation buttons are available on the footer.

Show Log
To view the event logs created by each step that was executed for the selected record in the Output panel. Similar to the view in Show Data, the logs are also displayed in a grid. Field names are displayed on the header. Logs are also displayed in 50 records per page. A log record is also created when skipping a disabled step.
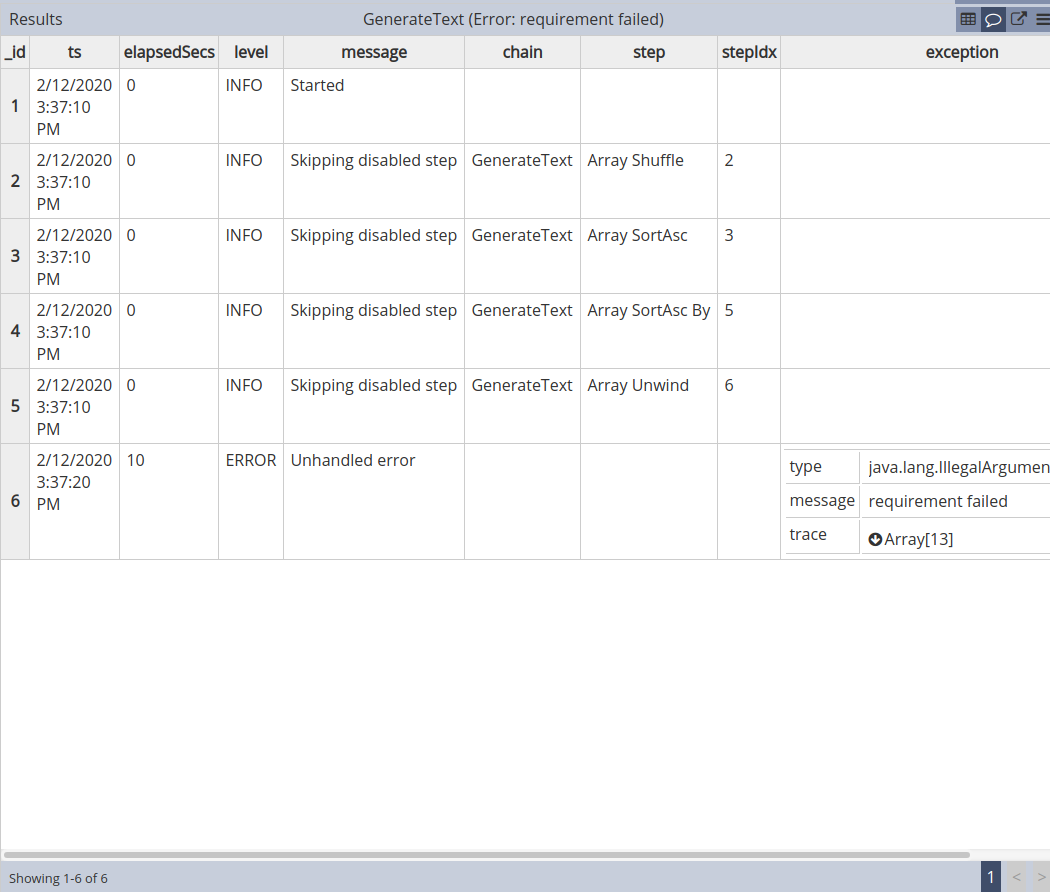
This is useful when troubleshooting steps that have resulted in errors. Most error messages could be nested. Clicking on the arrow button expands the document, displaying its nested contents.
Open Results in New Tab
Some results could have a lot of rows. This feature opens a new browser tab and loads the results. This makes it easier to view results.
On this view, the other features are still available. Logs can also be viewed.
Downloading the logs and results are also available.
Download Results
Downloading the currently loaded rows, either the data or logs, is available. Click on the More Actions button.

If the results of the chain or chain subset are displayed, the download options would export the displayed results into their respective formats. Likewise, if the logs are displayed, the download options offered would export the logs. What data be downloaded is also indicated in the option labels.
| Data Type | Download Options | File Name |
|---|---|---|
| Data | 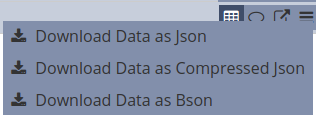 |
Data.<file extension> |
| Log | 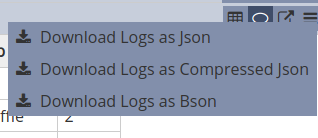 |
Log.<file extension> |
Supported formats are:
| Format | File Extension | Description |
|---|---|---|
| JSON | .json | Downloads the data in JSON format. |
| Compressed JSON | .json.gz | Downloads the data in JSON format and further compresses the file to make the total file size smaller when downloading. |
| BSON | .bson | Downloads the data in BSON format, commonly used in MongoDB. |