
Deep Learning
Description
Deep learning is a subset of machine learning in artificial intelligence (AI) that has networks capable of unsupervised learning from data that is unstructured or unlabeled. Machine learning uses algorithms to parse data, learn from that data, and make decisions based on what it has learned.
At a very basic level, deep learning is a machine learning technique. It teaches a computer to filter inputs through layers to learn how to predict and classify information. Observations can be in the form of images, text, or sound. The inspiration for deep learning is the way that the human brain filters information.
This module has a dependency on ETL. Ensure the ETL module is available and enabled in Ambience.
The Ambience Deep Learning module is not part of the standard modules in Ambience software suite. It is an extension library module that needs to be installed onto Ambience. It comes in different OSes (Windows, Linux and MacOS).
- elx-deep-learning_WINDOWS-x.x.x.zip
- elx-deep-learning_LINUX-x.x.x.zip
- elx-deep-learning_MACOSX-x.x.x.zip
The version number will typically change with each new release.
The module uses three types of model output format, h5, json and yaml.
Refer to Install Deep Learning on how to install the extension library.
Refer to Using ETL on how ETL chainset uses the models to perform prediction and/or forecast using input data.
Only the owner of the deep learning model can edit and delete the model. Other users can only download the model.
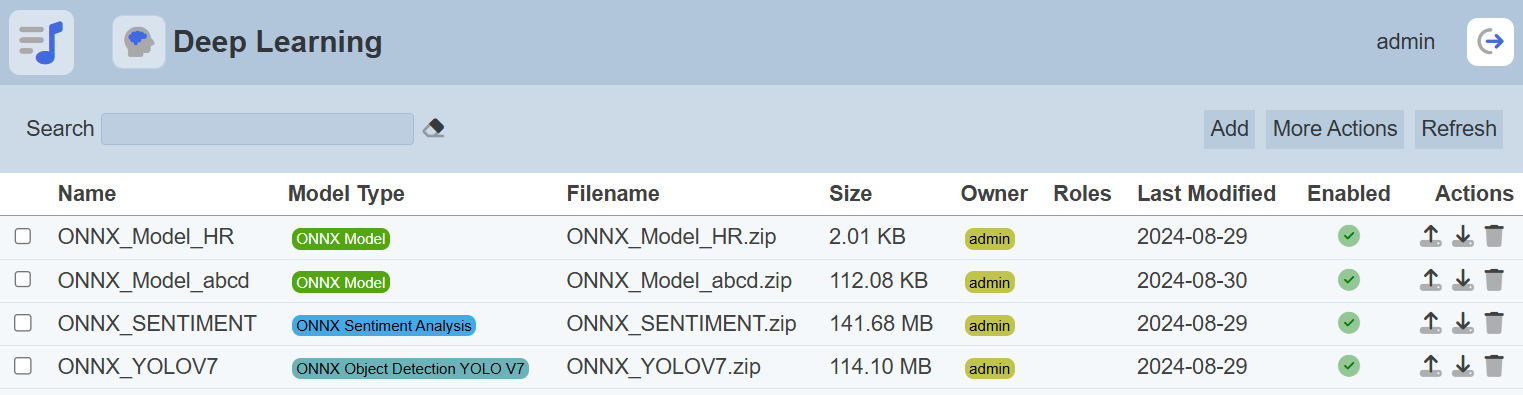
Module Interface
| Interface | Description | Required Privilege |
|---|---|---|
| Deep Learning | Allows Deep Learning module access | mod-deep-learning |
Add
To add a deep learning model, click on the “Add” button at the upper right corner of the page.

The “Add Model” dialog box will appear at the bottom of the page.
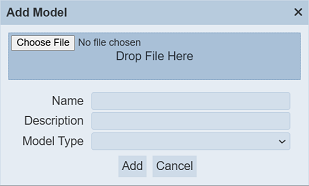
Click on the “Browse” button to browse to the desired model file or simply darg-and-drop the desired model file onto the “Drop File Here” area. The filename of the model selected will appear in the “Name” field. You can change the name to a more appropriate name if desired. Do note that the name need to be unique.
In the “Description” field, key in a brief description for the model. This is optional.
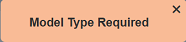
In the “Model Type” field, select the appropriate model from the drop-down list. Do note that this field is mandatory. If unselected, an error message will appear.
Lastly, click on the “Add” button to upload the model. Click on the “Cancel” button to abort the action.
If no file is selected, no name is provided or the name already exist, the relevant error message will appear.


If the model file size is large enough, you may see the progress message appearing in the dialog box.
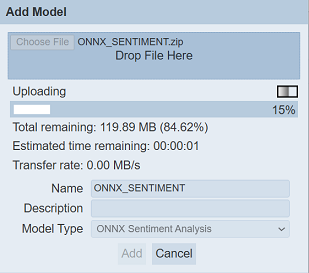
You may not see the progress message if the file size of the model is too small.
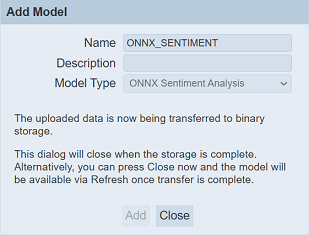
Once the upload is completed, the following message will appear in the dialog box, informing that the data is now being transferred to binary storage. To continue with the uploading, leave the dialog box as it is until the dialog box closes by itself once the conversion is completed. It may take a few seconds. To abort the uploading, click on the “Close” button.
Upon successful uploading, the model will appear in the Deep Learning management page.
Refresh
After performing actions on the browser/tab, the list is reloaded to display the list of models. The manual “Refresh” button is available and is particularly useful if there are others making changes on the same page.
The “Refresh” button is found on the upper right corner of the page. Clicking on it reloads the list of models.
Edit
To edit the properties of the model, click on the  “Edit” icon under the “Actions” column of the corresponding model.

The “Edit” dialog box will appear.

Edit the name, description in their respective fields. The name must be unique or error message will appear when attempt to save the model. You can also enable or disable the model by selecting or deselecting the “Enabled” field.
In the “Parameters” field, edit the defined parameters (if any). The default parameters are added during uploading. Different model types will have different set of parameters.
Click on the “Save” button to close the “Edit” panel or click on the “Cancel” button to abort the action.
Update Model
To update a new trained model into an existing record, click on the  “Update” icon under the “Actions” column corresponding the desired model.
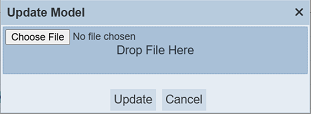
The “Update Model” dialog box will appear. Browse to the location of the file or simply drag-and-drop the file onto the “Drop File Here” area. Click on the “Update” button to update the model. Click on the “Cancel” button to abort the action.
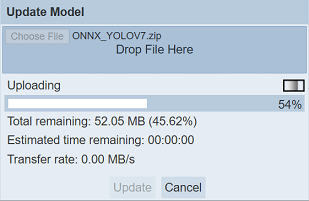
If the model file size is large enough, you may see the progress message appearing in the dialog box.
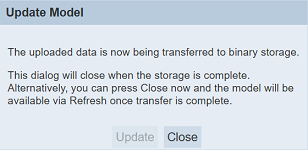
Once the update is completed, the following message will appear in the dialog box, informing that the data is now being transferred to binary storage. To continue with the update, leave the dialog box as it is until the dialog box closes by itself once the conversion is completed. It may take a few seconds. To abort the update, click on the “Close” button.
Download
To download the desired model, click on the  “Download” icon under the “Actions” column corresponding to the desired model.
The downloaded model will be a zip file with using the name of the model as its file name.
Delete
To delete a model, click on the  “Delete” icon under the “Actions” column of the corresponding model.
There is an option to undo the deletion. A notification with an “Undo” button appears right after clicking on the “Delete” icon.
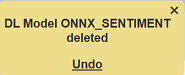
Upon clicking on the “Undo” button, the deleted model is restored and is added back to the list of models. Do note that the notification will disappear after five seconds.
More Actions
This feature allows user to perform actions on multiple models at the same time.
When the “More Actions” button located at the upper right corner of the page is clicked, a list of available actions are displayed.
If no model is selected prior clicking the button, there will be fewer actions available. To select a model, select the checkbox next to the name of the model.
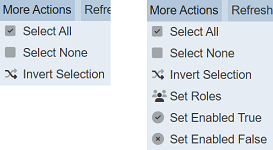
| Option | Description |
|---|---|
| Select All | Selects all models in the list. |
| Select None | Unselects all models. |
| Invert Selection | Inverts the current selection. That is, any models selected will be unselected and vice versa. |
| Set Roles | Selects the roles to be assigned to the models. |
| Set Enabled True | When selected, sets the selected models to enable. |
| Set Enabled False | When selected, sets the selected models to disable. |
Set Roles
To set the roles for the selected models, click on the “More Actions” button and select the “Set Roles” option. The “Set Roles” dialog box will appear.
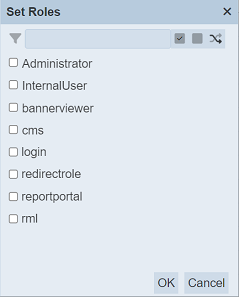
Select the roles to have access to the report by selecting the checkboxes. Alternatively, you can search for the desired role by keying in the keyword in the search function at the top of the dialog box. You can also choose to select all, select none or invert selection by clicking on their respective icons on the right of the search function.
Click on the “OK” button to save the changes or click on the “Cancel” button to abort the action.
Set Enabled True / False
To enable or disable the models, click on the “More Actions” button and select the “Set Enabled True” or “Set Enabled False” option respectively.
The selected models will be enabled or disabled as selected.
An enabled model is represented with a green tick under the “Enabled” column, while a disabled model is represented with a red cross.
Search
There is a cross-field search function for the list of models. It is located at the upper left corner of the page.

This provides an easy way to search through the list. It is case-insensitive and displays files that have the entered search value in any of the values of the fields below:
- Name
- Model Type
- File Size
- Size
- Owner
- Roles
- Last Modified
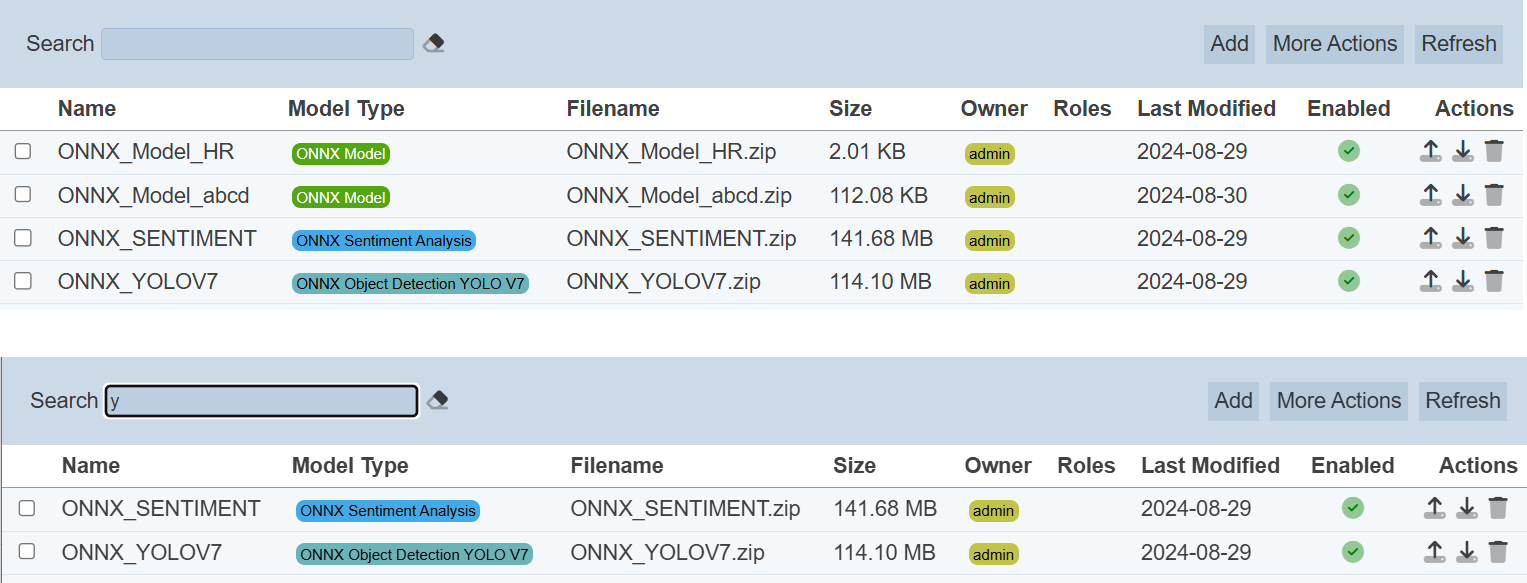
Alternatively, you can click on the any model or owner under the “Model” or “Owner” columns respectively to aid the search for the models in the page.
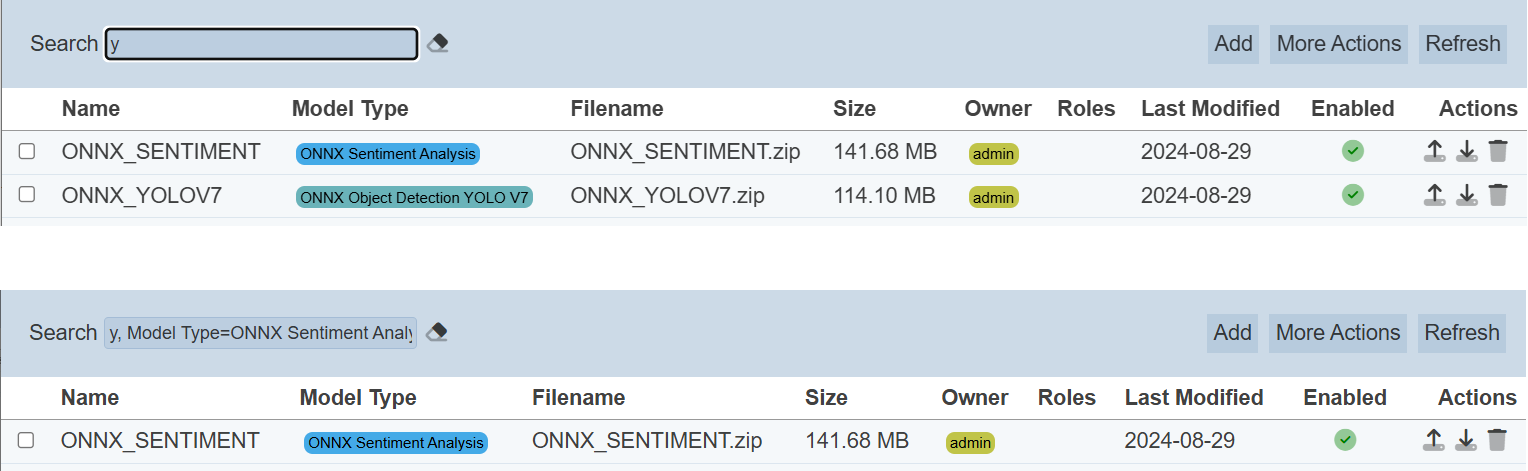
In the example above, model that is model “ONNX Sentiment Analysis” are shown.
These two search methods can be combined together, with each criteria separated by a comma.