
Workgroups
Description
The Workgroups module provides a way to group artifacts so that you can narrow the set of visible items to the project you are working on. It allows you to structure your system into independent or overlapping “containers” which defines a scope - limiting what you can see to the parts of the system you need.
Any artifact can belong to one or more workgroups. The behaviour of the artifacts in workgroup will be as such:
- Artifact with one workgroup can see everything in that workgroup
- Artifacts with no workgroup can see everything
- Artifacts with multiple workgroups can see everything in those workgroups
For example, if you are working on two projects, P1 and P2, you can associate some Dashboards, Forms and ETL Chainsets with project P1, others with project P2, and even some common ETL libraries with both.
Then when you are working on project P1, set the Workgroup to P1 in the Workgroup chooser of any supported module (eg. Dashboard, ETL etc.) and only the relevant artifacts will be shown across all the modules that have Workgroup integration.
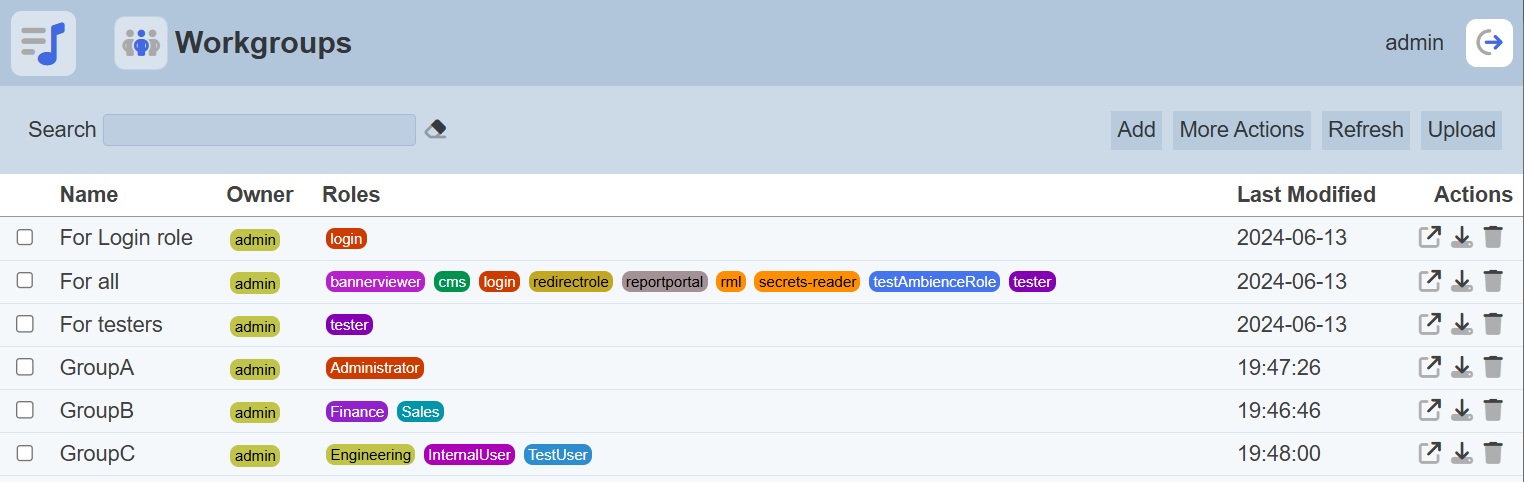
Workgroups have owners and roles. Users who can “see” a workgroup in the management page are either owners of the workgroup or are assigned roles in the workgroup.
For example, if User A creates a workgroup that has no roles, only User A can see that workgroup and no one else can. If that workgroup has any artifact (e.g. dashboard ABC), only User A can see dashboard ABC. If the workgroup has role “RoleA” selected, then any users who are assigned that role will be able to see dashboard ABC, although they are not the owner of dashboard ABC.
The types of artifacts that are associated with a workgroup are:
- Business Rules
- Dashboards
- Datasets
- ETL
- Forms
- Record Editor
- Workflows
Module Interfaces
| Interface | Description | Required Privilege |
|---|---|---|
| Workgroup | Allows adding, modifying and deleting workgroups. | mod-workgroups |
Add Workgroup
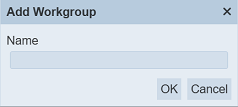
To add a workgroup, start by clicking on the “Add” button on the upper right corner of the page.

In the “Add workgroup” dialog box, select the desired roles from the list.
Input Field
| Field | Description | Mandatory | Input Type | Constraints | Default Value |
|---|---|---|---|---|---|
| Name | Unique name of the workgroup. | Y | String | Any text. The value must not exist in the current list of names. The value is case-sensitive. | Empty string |
Key in an unique name in the “Name” field and select the desired roles for the workgroup. Alternatively, you can search for the role by using the search function at the top of the section. There are options to select all, select none and invert selection by clicking on their respective icons next to the search function.
Click on the “OK” button to save the workgroup.
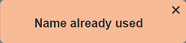
If the value for the “Name” field already exist or no name is provided, the relevant error message will appear.

Edit Workgroup
To modify an existing workgroup, click on the name of the workgroup under the “NAme” column.
The “Edit” dialog box will appear.
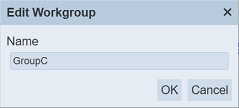
Edit the “Name” field as desired and click on the “OK” button to save the changes. Clicking on the “Cancel” button aborts the action.
Open Workgroup
This function allows you to view the artifacts that are associated with the workgroup.
Click on the  “Open” icon under the Actions column corresponding the desired workgroup.

The dialog box will appear with a count of the items associated with the respective artifacts.
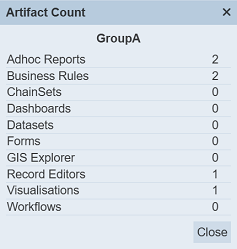
In the example above, workgroup GroupA is associated with one Business Rule, one Dashboard and four Forms.
Click on the “Close” button to close the dialog box.
Download Workgroup
The download function allows you to export the workgroup along with its artifacts to a zip file.
To download, click on the  “Download” icon corresponding the desired workgroup under the “Actions” column.
The downloaded zip file has a name format as such, <workgroup-name>.zip.
The downloaded file will contain two sets of items:
- Workgroup information in the format
<workgroup-name>.workgroup.json - All artifacts associated with the workgroup in JSON format
Upload Workgroup
The upload function allows you to upload a JSON file onto the management page.
The JSON file contains information on the workgroup and its associated artifacts. Uploading will add (or overwrite) the workgroup and also add (or overwrite) the artifacts stored within the workgroup file.
To upload, click on the “Upload” button at the upper right corner of the page.
The “Upload” dialog box will appear.
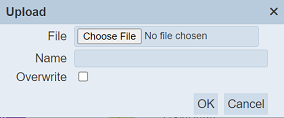
Browse to the location of the desired zip file and enter an unique name in the “Name” field. By default, the name of the zip file is used. Click on the “OK” button to upload the file.
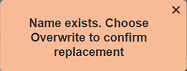
If the name already exist, an error message will appear.
To overwrite the existing file or to overwrite writing to the existing artifacts, ensure to select the “Overwrite” checkbox before clicking on the “OK” button to upload the file.
When the zip file is uploaded, it is checked to see if it matches the format of a workgroup. If it does, it takes the artifact lists and the supplierID (or which module it belongs to). It sends the list of its artifacts to the supplierID (or module) which handles the validation and uploading of them. If an artifact exists, if you are the owner and the overwrite is selected, the upload will resolve, otherwise it will not (i.e., it will fail)
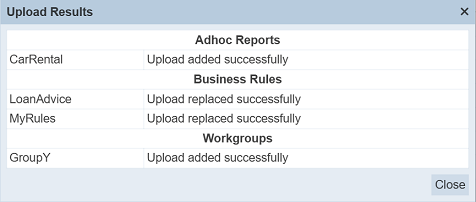
A dialog box will appear listing the results of the uploading.
If the upload fails to resolve the some of the artifacts, the dialog box will display the errors.
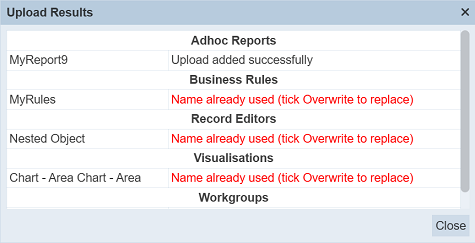
If the “Overwrite” field is selected prior uploading, any existing artifacts will be overwitten and new artifacts added.
Delete Workgroup
Deleting a workgroup removes it from the records.
To delete an existing workgroup, click on the  “Delete” icon under the “Actions” column corresponding the desired workgroup.
A confirmation dialog box will appear.
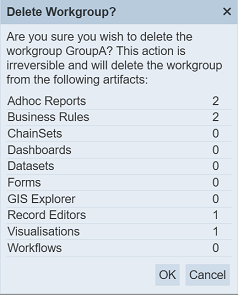
The dialog box will list the artifacts which the workgroup is related to. To confirm deletion, click on the “OK” button. To abort the action, click on the “Cancel” button.
Do note that this action is irreversible and the workgroup will be removed from the artifacts listed in the dialog box.
More Actions
This feature allows user to perform actions on multiple workgroups at the same time.
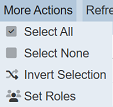
When the “More Actions” button located at the upper right corner of the page is clicked, a list of available actions are displayed.
If no workgroup is selected prior clicking the button, there will be fewer actions available. To select a workgroup, select the checkbox next to the name of the workgroup.
| Option | Description |
|---|---|
| Select All | Selects all workgroups in the list. |
| Select None | Unselects all workgroups. |
| Invert Selection | Inverts the current selection. That is, any workgroups selected will be unselected and vice versa. |
| Set Roles | Selects the roles to be assigned to the workgroups. |
Set Roles
To set the roles for the selected workgroups, click on the “More Actions” button and select the “Set Roles” option. The “Set Roles” dialog box will appear.
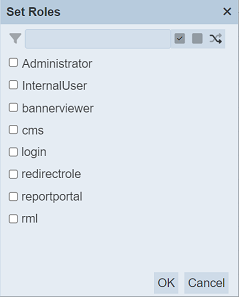
Select the roles to have access to the workgroups by selecting the checkboxes. Alternatively, you can search for the desired role by keying in the keyword in the search function at the top of the dialog box. You can also choose to select all, select none or invert selection by clicking on their respective icons on the right of the search function.
Click on the “OK” button to save the changes or click on the “Cancel” button to abort the action.
Refresh List
After performing actions on the browser window/tab, the list is reloaded to display the updated data. The manual “Refresh” button is available and is particularly useful if there are others making changes on the same page.
The “Refresh” button is available on the upper right corner of the page. Clicking on it reloads the list of workgroups.
Search
The search bar appears on the upper left corner of the page.

This provides an easy way to search through the workgroup list. It is case-insensitive and displays records that have the entered search value in any of the values of the fields below:
- Name
- Owner
- Roles
- Last Modified
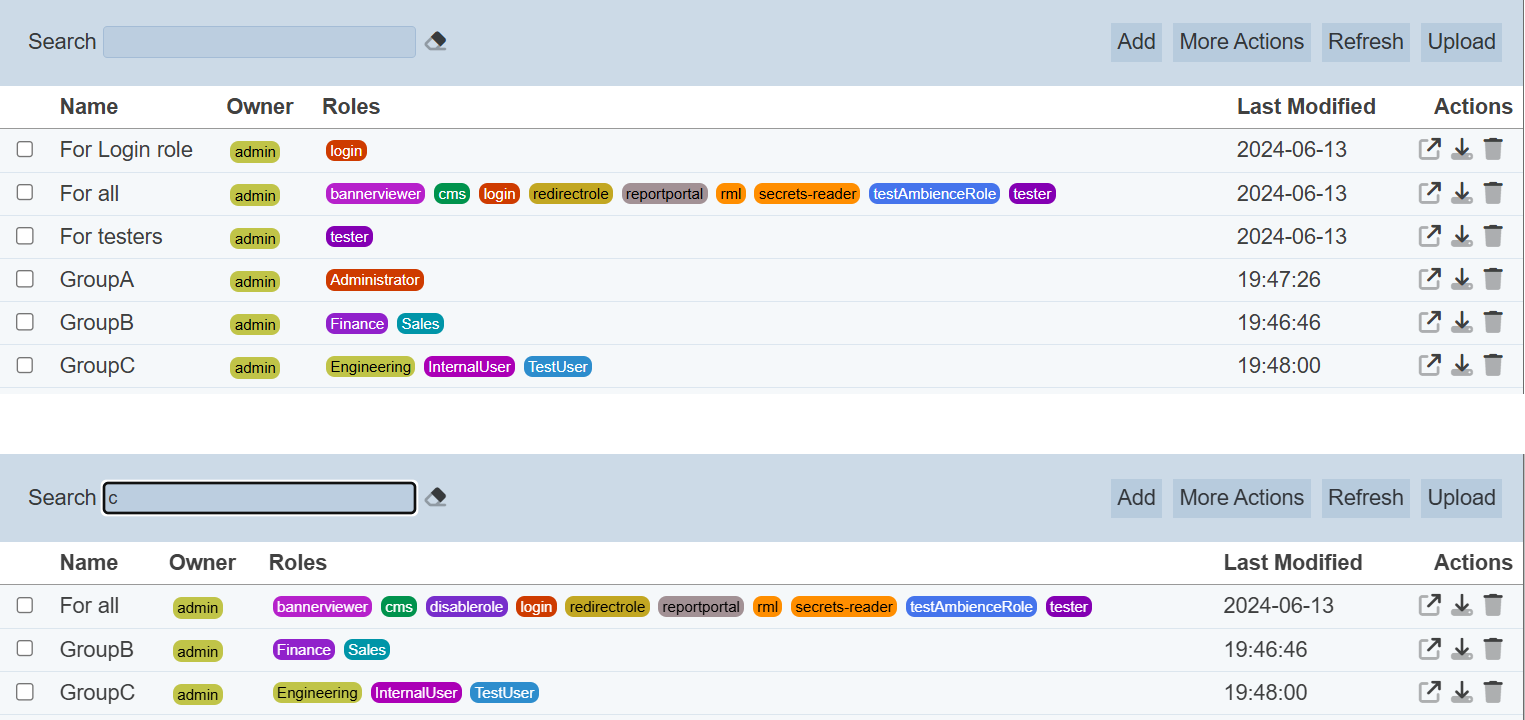
Alternatively, you can click on the any item under the “Owner” and/or “Roles” columns to aid the search for the workgroups in the page.

In the example above, workgroups that are assigned the role “tester” are shown.
These two search methods can be combined together, with each criteria separated by a comma.