In this case study, filtering, sorting and extracting data from the wizard and using ${view:ViewName.Selection} will be covered. The idea of this dashboard is to select a product_id from a Grid element and a Table element will display records with the selected product_id. The border title for the Table element will display the product_id selected.
-
Create a JDBC datasource and name it Sales using MondrianFoodMart.
Click on the
Query Builderbutton and use the table named sales_fact_1997. Select all the fields. Infer the schema and end the wizard. -
Create another JDBC datasource and name it Sales_param. Then,
follow the steps mentioned above except in the SQL Query, enter
WHERE sales_fact_1997.product_id=${id} after the line that says
FROM sales_fact_1997. Infer the schema. When prompted for the id, enter
1 and exit from the wizard by clicking on the
Finishbutton. -
Create a new Perspective and give it a unique name. Drag Sales.ds to the perspective. Select
Add Grid. When the wizard appears, click on theNextbutton twice. In theExpression Builder, enter 100 in theAmountfield. Then, click on theSet Valuebutton. This will extract the top 100 data from the datasource. Click onNexttwice. -
At this screen of the wizard, the user will need to select the field for the Grid element to
display. In the drop-down list, select
product_id. Finally, exit from the wizard by clicking on theFinishbutton. -
The Grid element will be displayed on the perspective with
Salesas the border title. -
Drag Sales_Param.ds into the perspective. Place it on the right of the Grid element. On release of the
mouse-click, select
Add Table. At the second page of the wizard, you will see the parameter defined in the datasource. UnderValue, change ${id} to ${view:Sales.selected:product_id}. This will pass in the value selected by the user from the Grid element to Sales_param.ds as a parameter. The Table element will display the respective results. -
At the next page of the wizard, add a Sort by clicking on the
Addicon. Selectproduct_idandAscendingfor the Name and Sort Order respectively. This will sort the data according to the product_id in ascending order. -
Click on the
Nextbutton twice. Over here, you will be able to do some filtering of data. UnderWhenof promotion_id, select Not Equals. As for theCondition, enter the value 0. This will filter away all the records where the promotion_id is zero. Finally, click onFinishto exit from the wizard. -
When an error appears saying that there is an error building the datasource table for repository
caused by a syntax error in the query expression, this is the correct behavior. This is because
when the perspective tries to load the data in all the elements, the Table element doesn't have
any data to load. There is no value being passed to the parameter, therefore causing the error.
To solve this problem, you can add
Initial Selectionto the Grid element. WithInitial Selection, the Table element will have a value to pass to the datasource when it loads. -
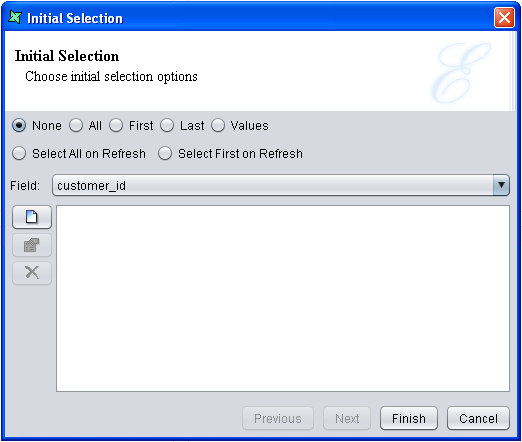
To add
Initial Selection, right-click on the Grid element and selectInitial Selection.... You will then see the Initial Selection Wizard like Figure 2.20, “Initial Selection Wizard”. SelectSelect First on Refresh. For theField, select customer_id. Click onFinish. With this setting, the first record of the Sales element will be selected (based on customer_id) each time the view is refreshed. -
In order for the border title of the Table element to display the product_id
selected in the Grid element, right-click anyway on the Table element. Select
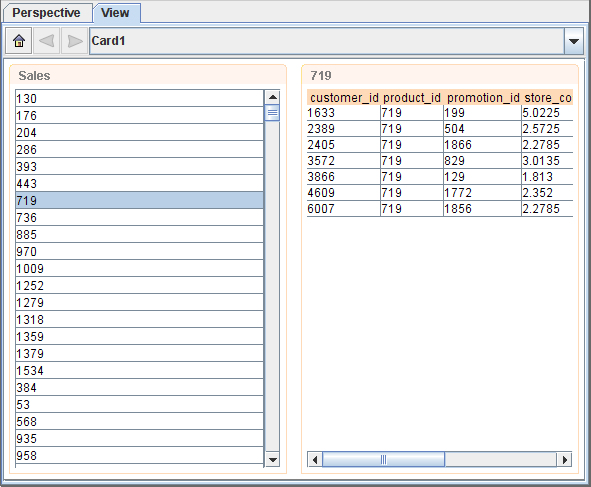
Presentation.... The default value for Border Title is ${ContentName}, which is the name of the element in the perspective. This name is editable at the properties of the element. To change it to reflect the selected product_id, enter ${view:Sales.selected:product_id} in the Border Title field. Click onFinishto exit from the wizard. - Try clicking on some of the values under Sales. The value selected will also be the border title of the Table element, which is similar to Figure 2.21, “Results of Case Study”