In this section we will review the different ways of adding a JDBC DataSource.
The JDBC/ODBC driver is only available on Microsoft Windows platforms and allows you to connect to Microsoft ODBC interfaces, such as Microsoft Access.
To add a Microsoft Access DataSource to the Elixir Repository we need to first register the ODBC source as described in the previous section. Select the Microsoft Access Driver(*.mdb) from the list of drivers. Enter the name
MondrianFoodMartin the Data Source Name text box. Locate your copy ofMondrianFoodMart.mdband set the path accordingly.Launch the Elixir Repertoire software.
Choose a file system or folder and Add a DataSource, choose JDBC and click Next.
Enter the name as
Salesin the text box. Choose DataSource and type JDBC.By default the JDBC/ODBC_Bridge(Sun JVM) is selected as the Driver Suggestion. Enter the URL
jdbc:odbc:MondrianFoodMartand the DataSource name asSales. Click Next.Click Query Builder. Select the Sales table from the list of tables and double click on it.
Select the Customer_id, Store_id and Store_sales fields from the table and click OK.
The query, including the selected columns, is displayed in the SQL window. Click Next.
Alternatively, instead of using the Query Builder to build the SQL query, you can enter the query
Select Customer_id, Store_id and Store_sales from sales
in the SQL tab window. Click Next.
In the Define DataSource schema screen, click Infer Schema. The schema is inferred from the data query. Click Finish. The
Sales.dsdata source is added to the repository. The records in the data source can be viewed by clicking on the Load Data menu in the Data Window.
Note
Refer to Appendix B, Samples for the sample files used in this chapter.
To make use of Stored procedure in the JDBC data source, a stored procedure must first be created in the database.
The following process creates a stored procedure using Oracle:
Create a new table
empwith columns Eno number, Dno number, Dname varchar2(12), and Esal number.We want to create a stored procedure on the table to fetch records with specific value of Eno or Dno or Esal.
A package is created using the code below:
CREATE OR REPLACE PACKAGE pack AS TYPE
empRowType IS REF CURSOR return emp%rowtype; FUNCTION
selemp(enumber in number, dnumber in number, esalary in
number) RETURN empRowType; End pack;
Compile the package.
The package body is created using the following code:
CREATE OR REPLACE PACKAGE BODY pack AS
FUNCTION selemp(enumber in number, dnumber in number,
esalary in number) RETURN empRowType IS myemp
empRowType; BEGIN OPEN myemp for select * from emp
where (Eno=enumber) or (Dno=dnumber) or (Esal=esalary);
return myemp; End; End pack;
Compile the package body.
Make sure the Oracle driver
classes12.jaris in the/Public/lib/folder. Click Refresh Job Engine Jars, to load the driver.Add a FileSystem
JDBC
						Stored1
using the procedure given in the previous chapter. Alternatively, the data source can be added to an existing FileSystem. Now select the folder, and choose Add -> DataSource from the popup menu. Select the JDBC DataSource type and click Next.Enter the data source name
JDBC_Call. Select Oracle(Thin_driver) as the driver suggestion. The driver and URL are assigned automatically. The URL can be altered according to the requirements. To make use of the stored procedure created in the Oracle server from the client system, specify the IP address of the system instead of localhost.The user name and password are entered. After entering all the details, the JDBC data source screen of the DataSource wizard appears as shown in Figure 3.14, “JNDI Values”.
Click Next. In the SQL window enter the syntax given below and select the Iscallable check box. The Callable procedure tab becomes active.
{?=call pack.selemp(?,?,?)}Where pack is the package name and selemp is the name of the function.
Select the Callable tab.
Specify the out type in the text box as follows:
oracle.jdbc.driver.OracleTypes.CURSOR
The out type is database dependent. In this case, a return cursor is specified as given above. Some databases do not need a return cursor, so the out type need not be specified for them. For more details on stored procedures with JDBC, refer to this article in JavaWorld. The link is:
http://www.javaworld.com/javaworld/jw-01-2000/jw-01-ssj-jdbc-p2.html
Click Add in the Callable tab and enter the Data type and values of the corresponding parameters. In this case three input parameters of integer Data type are needed.
Click Next and then click Infer Schema to view the schema for the data source. Click Finish. The data source is added to the repository.
Open the
JDBC_Call.dsdata source. Click the Load Data menu and verify that only the records with columns with the specified input values are fetched.
JNDI, the Java Naming and Directory Interface, allows applications to access various naming and directory services through a common interface. Like JDBC (Java Database Connectivity), JNDI is not a service, but a set of interfaces; it allows applications to access many different directory service providers using a standardized API.
JNDI uses the connection pooling technique to connect to JDBC datasources. Connection pooling is a technique that can be used to share database connections among requesting clients. When a connection has been created and is placed in a runtime object pool, an application can use that connection again. Each application does not have to perform the complete connection process every time it uses a connection.
When an application closes a connection, the connection is cached in the runtime object pool again. Connection pooling permits an application to use a connection from a pool of connections that do not have to be re-established for each use. By using pooled connections, applications can realize significant performance gains because they do not have to perform all the tasks that are involved in establishing a connection. This can be particularly significant for middle-tier applications that connect over a network, or for applications that repeatedly connect and disconnect.
The nodes in a JNDI namespace are known as contexts. The root node is known as the initial context. Initial contexts are created by initial context factories.
Elixir Data Designer provides enhanced support for JDBC DataSources deployed with JNDI.
The basic system requirements for using JNDI connections are:
The vendor package providing connectivity for JNDI (Factory context) and the supporting classes.
The connection process is as follows:
Use the filesystem or folder popup menu and select Add -> DataSource.
Choose the JDBC datasource and click Next.
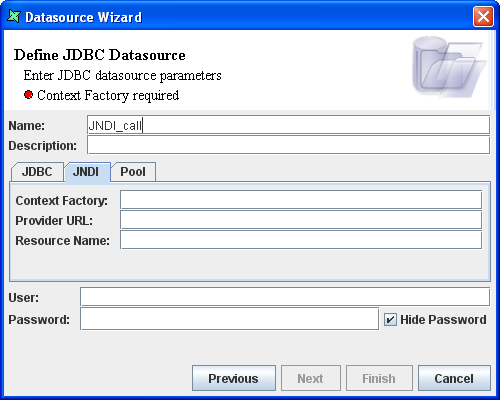
Select the JNDI tab.
Enter the context factory.
Enter the provider URL.
Enter the resource name. The resource points to the database.
Enter the user name and password if required.
The rest of the steps involved in connecting to the JDBC data source through JNDI using the Data Source wizard are similar to those followed in the above procedure using JDBC drivers.