Table of Contents
The Universe Designer allows you to create or import data sources into the universe, examine the rows in a table, set various table and column attributes, select the data to be transformed or displayed and create various transforms to transform the data to your desired results.
Double click a repository universe from the folder tree to open it in the Universe Designer.
The Universe Designer displays as shown in Figure 5.1, “Universe Designer”:

A Repository Universe allows you to select data from various table columns
across multiple data sources. If the system deduces the relationships between the various columns and tables, based on the primary and
foreign keys, it seamlessly joins and the data and outputs the results.
To add a new table column to the Universe:
- Click the
Add Tableicon ( ).
). - Select the data source for which you want to add a table. Repository universe supports a large number of data sources. In the example shown in Figure 5.2, “Selecting a Data Source - Repository Universe” we select a Tabular data source.:
- Enter a Name and a Description for the data source.
- Click the
Addicon ( ).
). - Enter a name for the column and select its data type as shown in Figure 5.3, “Adding a Column”:
- Click OK to save the column.
- Click the
Addicon again, and repeat the process to add as many columns as you need. - Click Next.
- You need to enter the values for the columns you have saved. Click the
Addicon (). - Enter the values for the columns you have saved, as shown in Figure 5.4, “Adding a Column Value”:
- Click OK to save the column.
- Click the
Addicon again and repeat the process to add as many values as you need. - Click Finish to add the data source to the Universe.


To import an existing data source into the Universe:
- Click the
Import data sourceicon ( ).
). - Select the data source to be imported, as shown in Figure 5.5, “Importing a Data Source”:
- Click OK.

The Settings tab displays the structure of the data source. You can add table and column attributes to each field
in the data source and add transforms to manipulate the data as desired before output.
Click the Schema tab to view the database schema of the data source. An example is shown in Figure 5.6, “Viewing a Schema”:
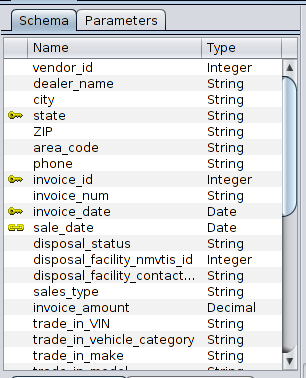
The Parameters tab displays the parameters of the data source
if any.
The Parameter processor retrieves parameters from one input and applies them to another flow. This allows flows to be developed and reused with different sets of parameters. Parameters can be maintained independent of the flows.
For more information on Parameters, see Parameter Processor
in the Data Designer Manual.
This section allows you to add table and column attributes. You can define Primary Key and Foreign Key relationships between the various columns.You can set table level security, set up a table to be cached in memory, and set dimension parameters.
This allows you to set the following attributes for the table as a whole.
Click the Add icon (![]() ).
).
The various table attributes are shown in Figure 5.7, “Setting Table Attributes”.

Change Dimension Capture: This is used to determine and track the data that has changed, so that suitable actions can be taken using the changed data.
Tables whose changes must be captured usually have a column that indicates the time of last change. Any row in any table that has a timestamp in that column that is more recent than the last time data was captured is considered to have changed.
Enter the name of the columns that contain the time of the last change.

This attribute is reserved for future use.
Slowly Changing Dimension: Dimension is a logical grouping of data such as customer or product information. With Slowly Changing Dimension (SCD), data changes slowly, rather than changing on a time-based, regular schedule.
For example, assume you have a dimension that tracks the sales from each salesman for each region.
If a Salesman moves to a different region at the end of a month, what happens to the sales data from the next month? Should all the data (including historical data) for the salesman be reflected in the new region? Slowly Changing Dimension takes care of these situations.
Type 1 - This option overwrites all old data with the new. Historical data is not preserved.
Type 2 - This option preserves historical data by creating multiple records for a given natural key in the dimensional tables with separate surrogate keys and different version numbers.
Enter the surrogate key for type 1, along with the start and end fields for which the SCD is valid.
This attribute is reserved for future use.
Static Cache: For increased performance, you can cache in memory, tables (data sources) that rarely change.
Marking a data source as
Static Cachecauses its entities to be cached in memory.Some examples of data sources that can be cached are a table of zip codes and the periodic table.
Table Security: Enter the names of the users who are allowed to view this table. User names can be separated by spaces, tabs or new lines.
By default (leaving this blank), all users are allowed to view this table.
You can also set
Columnlevel as well asRowlevel security by selecting theSecurityTransform. For detailed information on transform categories, refer to theElixir Transform User Manual.For JDBC and Stave Universes, you can set the
Columnlevel andRowlevel security, from within the Column Attributes tab. See the following Column Attributes section for more information.
This section allows you to set attributes for a single column in the table. You can enumerate values, set the format for display, set the column as a primary key or as a foreign key, and set the column values to be in a defined range.
The various column attributes are shown in Figure 5.8, “Setting Column Attributes”.

The following are the various column attributes:
Comments: Add any comments that you desire, for your own understanding. These comments are not displayed in the Ad Hoc report or dashboard when published.
Enumeration: By defining the attributes of individual fields, the system can validate the record values using the cleansing process. For example, you might specify that the field "Gender" is a nominal enumeration of "M" and "F". The cleansing process would then warn you of any records containing "m" or "Female".
Ordinal enumeration attributes allow you to specify the order in which to display data, while retaining the original order. For example, you might specify that the field "Fruit" is an ordinal enumeration of "Apple" and "Orange". Only "Apple" and "Orange" records can pass the validation in cleansing process.
Foreign Key: A foreign key is a field (or collection of fields) in one table that uniquely identifies a row of another table. Enter the name of the referenced table and the name of the referenced column.
In case of a compound foreign key where the foreign key is made up of two or more columns, the sequence number defines the order of the columns that make up the key.
Format: Enter the format of the data in this column.
Nullable: Specify whether the data can be Null values.
Primary Key: A Primary Key is necessary for all tables in the Repository Universe. Ensure that each table has a unique Primary Key column. This is important for Ad-Hoc Dashboard. For most cases, a table has only one Primary Key, therefore the sequence number is 0.
If you are working on a datasource without an obvious Primary Key - for example -
FruitSales.ds, add a Sequence Transform to create a new ID column, and add a Column Attribute to mark it as a Primary Key. SinceFruitSales.dsuses a composite Primary Key, an alternative approach is to add a Column Attribute to markCompanyasPrimaryKey:0, and add another Column Attribute to markFruitasPrimaryKey:1.Range: Specify the start value and end value for the data in the column.
RegExp: Define and test the regular expression syntax.
Either enter the regular expression, or select from the list. This helps ensure that the data is correctly entered, before processing.
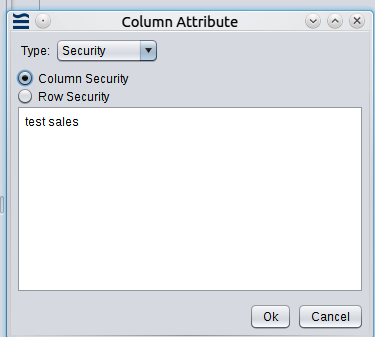
Security (Only applicable for JDBC and Stave Universes): Allows you to set the
Columnlevel andRowlevel security, for JDBC and Stave Universes.Enter the names of users and groups who are granted the right to view the column or row data. User names can be separated by spaces, tabs or new lines.
An example of setting
Columnsecurity is shown in Figure 5.9, “Setting Column Security”.Note the following points when setting up
ColumnorRowsecurity.- If you do not set up security, all users are allowed to view the column or row data.
- Make sure that the users or groups to whom you grant access, have at least the
SignIn,Adhoc Report ViewandAdhoc Dashboard Viewpermissions. - The users or groups also need access to the JDBC or Stave Universe.
The following is a demonstration of column security:
- Create either a JDBC Cars Universe or a Stave Cars Universe. Row and Column security do NOT work with Repository Universe yet.
- Add some new users and groups as follows:
- Users: test2, WY
- Groups: CA
- Make user
test2a member of the groupCA. - Ensure that users
admin,test,test2andWYhave the following privileges:SignInprivileges- Adhoc Report View and Adhoc Dashboard View privileges
- Access to the JDBC or Stave Universe
- Sign in to Ambience as user
admin. - Create an Adhoc Report in
/Publicwith a Table band that contains these columns: (all from Cars table)city,dealer_name,sales_typeandstate. - You will be able to view all columns as selected.
- Next, open up Designer, edit the Universe, and set the column security for the
sales_typecolumn totest2. - Save the Universe.
- Now from Ambience as
admin, refresh your report. You will not be able to view the values insales_typecolumn as they are hidden since you do not have the permission to view this column. - Log out of Ambience as
adminand log back in as usertest2. You should now be able to view all columns in the report (including thesales_type) column.
The above procedure demonstrates column security. You can only view the columns that are protected, if you are a user who has the access privilege set in the column security settings.The whole column is protected based on
username + groups.The following procedure demonstrates row security.
For this demo, we use the same Universe, report, users and groups and their privileges as in the column security demo.
- Remove the column security restriction set earlier in the column security demo.
- Open Designer, edit the Universe and set the row security for the
statecolumn to the word:test. - Save the Universe.
- Open Ambience and try logging in as the following users to view the report:
test-> can view all the rows in the table.WY-> can view only thestate=WYrows in the table.test2-> can view only thestate=CArows in the table (becausetest2is a member of theCAgroup.)admin-> cannot view any rows in the table (no state matches the wordadmin).
A user can belong to multiple groups - for example
test2could be made a member of theCAandAKgroups and see both sets of records.The above procedure demonstrates row security. Rows are removed based on
access rights + field value.
To set an attribute for a column:
- Click a column from the Schema.
- Click the Column Attributes tab.
- Click the Add Attribute icon (
 ).
). - Select the Attribute type.
- Enter the parameters as appropriate.
- Click OK to save the attribute.
The Rows tab displays either the original data of a table, or the output of column data if there are transforms created.
Click the Load Data icon (![]() ) to display the rows.
) to display the rows.
An example Rows tab is shown in Figure 5.10, “Rows Tab”.

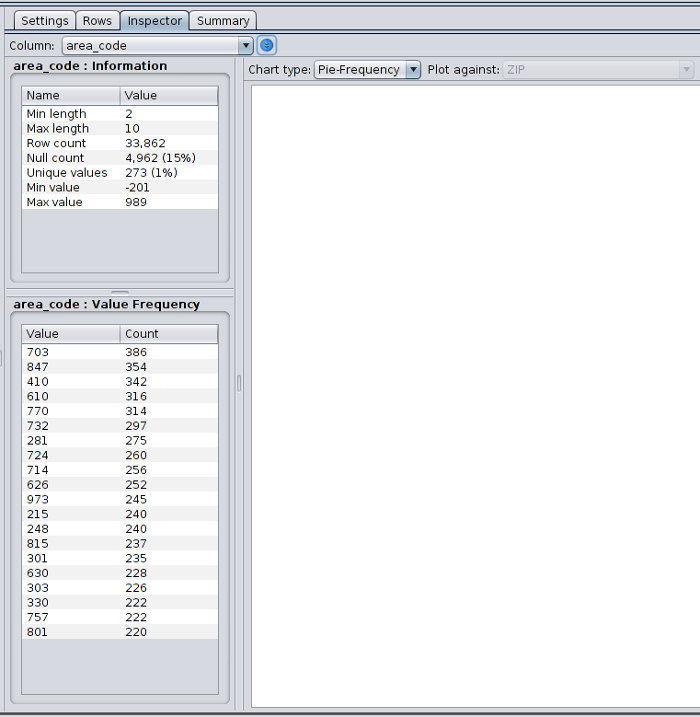
The Inspector tab enables you to review the contents of a column.
It displays column information, value frequency based on the data type, as well as the chart type and plot.
Select the column to inspect and click the Load Data icon (![]() ).
).
An example Inspector tab is shown in Figure 5.11, “Inspector Tab”.
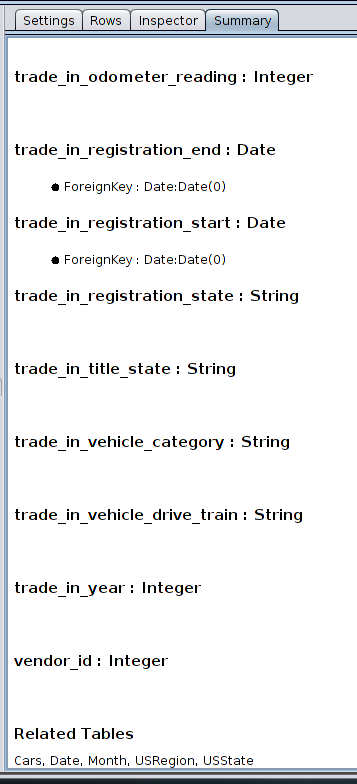
The Summary tab displays the column names, data types and Primary and Foreign Key information.
An example Summary tab is shown in Figure 5.12, “Summary Tab”.
To export the Universe for use by Ad-Hoc Dashboard and Ad-Hoc Report:
- Click the Admin Tools (
 ) icon.
 - Select the Universe as shown in Figure 5.13, “Exporting the Universe”.
- Optionally, click the Edit
 ) icon and enter
your desired Universe name. The Universe is mapped with this name and can now be referred to in
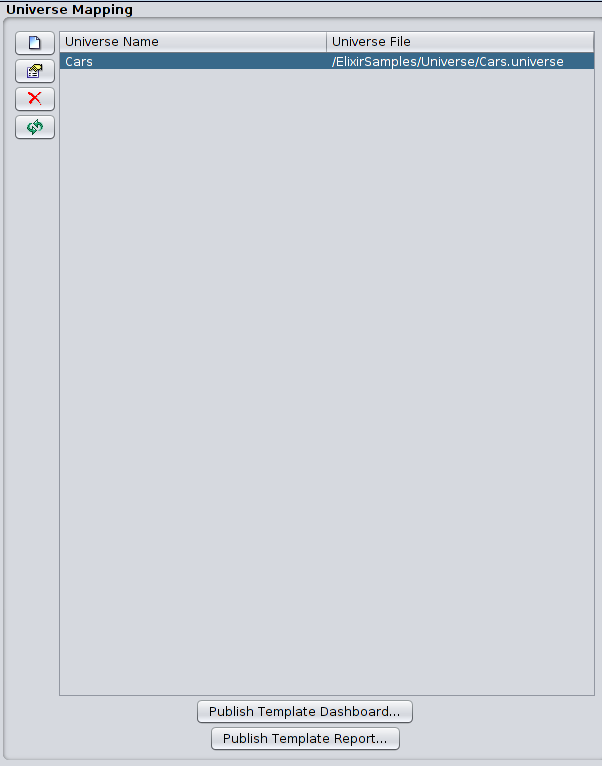
the Ad-Hoc Dashboard and Ad-Hoc Report applications. An example of mapping is shown in Figure 5.14, “Mapping the Universe”
) icon and enter
your desired Universe name. The Universe is mapped with this name and can now be referred to in
the Ad-Hoc Dashboard and Ad-Hoc Report applications. An example of mapping is shown in Figure 5.14, “Mapping the Universe” - Click either Publish Template Dashboard or Publish Template Report, to save the Universe in a format suitable for use by Ad-Hoc Dashboard and Ad-Hoc Report respectively.

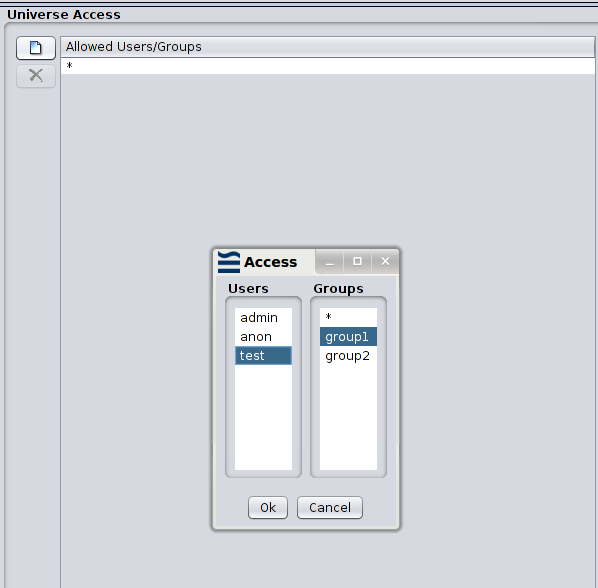
By default, everyone can access the Universe provided it is saved in a publicly accessible folder, i.e. not in any User folder.
Optionally, to set restrict the users and groups who can access the Universe:
- Click the Universe Access (
 ) icon.
 - Select the Users and Groups who are allowed to access the Universe, as shown in Figure 5.15, “Setting the Universe Access Permissions”.
- Click OK to save the access settings.