
The Sort processor is used to sort data source records using specified criteria in the ascending or descending order. It includes a Group On option to group the records depending on their values or specified ranges. Unlimited levels of sorting and grouping can be done on a data set. The Group Range used for delimiting groups can be specified for a field of type number, date or string.
Elixir Data Designer provides an Expression Builder to assist in the extraction of ranges of records. Using this, the top n or bottom m records present in the data source can be retained. These values need not be constants, they can be variables and also include percentages.
The Sort processor is selected from the menu bar of the Designer window and then placed in the designer window workspace.
Properties
The editable properties are shown in Figure 4.11, “Sort Wizard”.
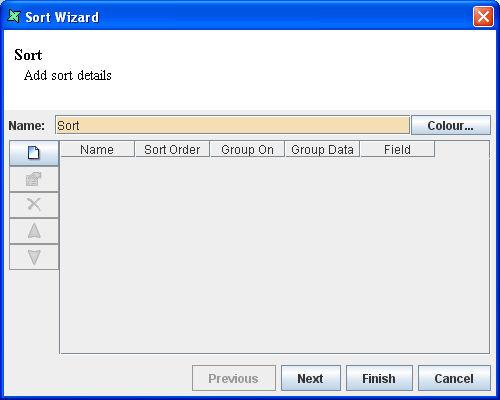
There are four columns in the sort table: Name, Sort Order, Group On and Group Data Field. The columns will be sorted based on the values assigned to these columns.
On clicking the Add button, a Sort dialog pops up as shown in Figure 4.12, “Add Sort Item”. The following options are available in the Sort dialog box:
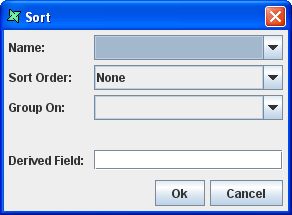
In the "Name" Combo box the field name of the data source based on which the sorting has to be done is selected.
The Sorting order as none, ascending or descending has to selected from the "Sort Order" combo box. There are two new sort orders, simple ascending and descending sort. These uses a more simplistic algorithm is to compare unicode character values literally. The benefit of this is that it doesn't ignore spaces.
The options available in the Group On combo box is based on the data type of the selected field. The Group On options are discussed below.
Finally, on clicking the OK button the Sort options specified in the Sort Wizard are added in the corresponding columns.
On clicking the Next button, the "Extract screen appears as shown in Figure 4.13, “Extract Options”. The main part of this screen is the Expression Builder.
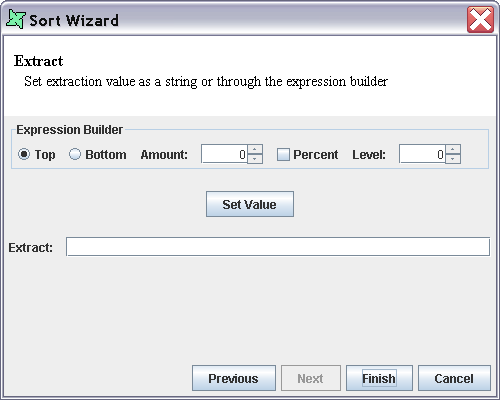
The Top option is selected if the top n number of records has to be retained.
The Bottom option is selected to retain the bottom n number of records.
In the Amount field, the value of 'n' has to be specified. Where 'n' is the number of records to be sorted.
If the Percent check box is selected then the Amount value represents a percentage of the total number of records flowing through.
The level field indicates the level at which the extraction algorithm applies. A value of 0 indicates that it applies over all records. A value of 1 indicates the top n records of each group level 1 will be retained. The value can vary between 0 and the number of grouping levels identified on the previous page
Having edited all the values, clicking the Set Value button will produce a command string in the Extract Text box. This string can be edited manually, for example to include dynamic parameters.
The Group On combo box lists the various options available for each field based on its data type.
Numerical Data
If a number type is selected for grouping then the options that are listed in the "Group On" combo box are Each Value, Range, Count and All.
String Data
If the String data type field is selected for grouping then the options that are listed in the "Group On" Combo box are Each Value, Substring, Range, Count and All.
Date Data
If the Date data type field is selected for grouping then the options that are listed in the "Group On" combo box are All, Count, Each Value, Year, Quarter, Month, Week of Year, Week of Month, Day of Year, Day of Month, Day of Week, Range.
Each Value - When this option is selected then consecutive records (after sorting) with the same selected field value are grouped together.
All - When this option is selected then all the records are grouped together irrespective of the selected field value
Count - When this option is selected then the records are grouped with a fixed number of records in each group. For example, 20 records with Count=3 would yield 7 groups. The first six groups would contain three records each (18 in total) and the last group would only contain two.
Range - When this option is selected the range text field appears. There are two types of syntax for specifying the range.
The first type of syntax is [condition]:label, for example "<x:A". Where x is the threshold value based on which grouping is done and A is the label name that is assigned for the group. A number of ranges can be specified. For example:
<5:A|<10:B|<15:C
A, B and C are the label names assigned for those groups. Alternate conditions can be described by using operators, '>' and '='. Ranges are always tested left-to-right and the first one that matches is chosen. You can leave a condition off the last range expression to form the default value:
=A:First|<E:Pass|:Fail
This example will return 'First' for input 'A', 'Pass' for inputs like 'B','C','D' and 'Fail' for all other inputs.
The other type of syntax is step(value,value,value), for example "step(x,y,z)". Where x stands for the start value, y stands for the increment, and z stands for the stop value. A number of ranges can be specified. For example:
step(2,3,10)
This example is equivalent to ranges of:
<2, 2-5, 5-8, 8-10, >=10
If we translate this example into the first type of syntax, it is equivalent to:
<2:<2|<5:2<5|<8:5<8|<10:8<10|>=10:>=10
Substring - When this option is selected from the list then the [Start,End] text box appears. In this text box the starting and ending character of the string is specified. For instance, if the syntax specified in the text box is [0,3] then the grouping will be based on 3 characters starting from the first character of the string (indexes are zero-based).
There is also an option to add a derived field that holds the substring values, so that subsequent processors can use them without having to derive them again. To use this feature, just enter a unique name for Derived Field. If you inspect the output schema of the Sort, you will see the additional field is listed.
Year - When this option is selected and a value is entered in the Group Interval text box the records are grouped according to the Years of the specified field and the group interval. Suppose the years in the date field are starting from 2000-2020 and the "Year" option is selected from the Group On combo box and the value 2 is entered as group interval, then the records containing years 2000-2001, 2002-2003, 2004-2005, etc are grouped together.
Month - When this option is selected and a value is specified in the Group Interval text box the records are grouped based on the Month of the specified field and the group interval. For instance, if the Month is selected as the Group On option and the Group Interval is entered as 3 the months are sorted as January-March, April-June, etc irrespective of the years. If suppose, the Month grouping has to be done for a particular group interval of years, then the years must be grouped followed by the grouping of months.
Quarter - When this option is selected and a value is entered in the Group Interval text box the records are grouped based on the quarter function of the specified field. For instance, if the Quarter is selected as the Group On option then the records are categorized into four quarters. The first quarter is represented as Q01: January-March. The second quarter is represented as Q11: April-June. The third quarter is represented as Q21:July-September and the fourth quarter is represented as Q31: October-December. If suppose, the quarter grouping has to be done for a particular interval of years then the years must be grouped followed by the quarter grouping.
Week of Year - When this option is selected and a value is entered in the Group Interval text box for a particular field then the records are grouped based on the number of weeks in a year and the group interval. Since, there are a total of about 52 weeks in a year the grouping is done accordingly. For instance, if the Week of Year is selected as the Group On option and the value of group interval is entered as 3 then the grouping output is 0-2, 3-5, etc. Where 0-2 corresponds to the first two weeks of the years as 0 corresponds to a null value and 3-5 includes the next three weeks of the year, so on. If suppose, the Week of the Year grouping has to be done for a particular interval of year then the years must be grouped first followed by the week of the year grouping. Sunday is always considered as the first day of a week while using Week of Month option.
Week of Month - When this option is selected and a value is entered in the Group Interval text box for a particular field then the records are grouped based on the Week of the month and the group interval. For instance, if the Week of Month is selected as the Group On option and the value of group interval is entered as 2 then the grouping output is 0-1, 2-3, 4-5, etc. Where 0-1 fetches only the first week of the month since 0 corresponds to a null value and 2-3 groups the second and third week of the month. If suppose, the Week of the month grouping has to be done for a particular interval of year and month then the years must be grouped first followed by months. Finally, the week of the month grouping is done. Sunday is always considered as the first day of the week while using Week of Month option.
Day of Year - When this option is selected and a value is entered in the Group Interval text box for a particular field then the record are grouped based on the days of the year and the group interval. Since there are 365 days in a year the grouping is done accordingly. For instance, if the Days of Year is option is selected and the group interval is specified as 4 then the grouping output is 0-3, 4-7, etc. Where 0-3 fetches the records corresponding to the first 3 days of the year as 0 corresponds to null value and 4-7 the fourth to seventh day of the year. If suppose the day of the year grouping has to be done for a particular interval of year then the years must be grouped first followed by the days of the year grouping.
Day of Month - When this option is selected and a value is entered in the Group Interval text box for a particular field then the records are grouped based on the days of the month and the group interval. For instance, if the Day of Month option is selected and the group interval is specified as 1 then the grouping output is 1,2...30 or 31 depending on the total number of days in the month. If suppose, day of the month grouping has to be done for a particular interval of the months of a year then the years are grouped first by the month grouping. Finally the Day of Month grouping is done.
Day of Week - When this option is selected and a value is entered in the Group Interval text box for a particular field then the records are grouped based on the days of the week and the group interval. For instance, if the Day of Week option is selected and the group interval is entered as 2 then grouping output is Monday-Tuesday, Wednesday-Thursday, Friday- Saturday and finally Sunday. That is the records corresponding to the fields having Monday and Tuesday as the days of the week are grouped together and so on. If suppose the day of the week grouping has to be done for a particular interval of year and months then the years are grouped first followed by the month grouping. Finally, the Day of Week grouping is done.
The Hour, Minute and Second options are listed in the combo box only if the date field selected for grouping contains time or if the time field is selected for grouping.
Hour - When this option is selected and a value is entered in the Group Interval text box for a particular field then the records are grouped based on the hours. For instance, if the Hour Group On option is selected and the group interval is specified as 3 then the output is 0-2, 3-5, etc. Where 0-2 returns the records corresponding to the first 3 hours of the day starting from the 12th hour and 3-5 groups the next three hours of the day.
Minute - When this option is selected and a value is entered in the Group Interval text box for a particular field then the records are grouped based on the minutes. As there are 60 minutes in an hour the grouping is done accordingly. For instance, if the Minute Group On option is selected and the group interval is specified as 4 then the output is 0-3, 4-7, etc. Where 0-3 returns the records corresponding to first 4 minutes of the hour starting from the 0th minute and 4-7 returns the records having fourth to seventh minute of the hour.
Second - When this option is selected and a value is entered in the Group Interval text box for a particular field then the records are grouped based on the seconds. As there are 60 seconds in a minute the grouping is done accordingly. For instance, if the Second Group On option is selected and the group interval is specified as 0-3, 4-7, etc. Where 0-3 returns the records corresponding to the first 4 seconds of the minute starting from the 0th second and 4-7 returns the records having fourth to seventh second of the hour.
Add the JDBC data source for Sales using the procedure given in the previous chapter.
Add a Composite DataSource named
Sort.Now select the Sales data source, drag and drop it on the Composite diagram.
Place a Sort processor on the diagram.
Connect the Sales data source to the Sort processor and the output of the Sort to the Result. The diagram should appear as shown in Figure 4.14, “Sample Sort Flow”.

Sorting records by applying Sort Order Options
Ascending
Open the Sort processor properties.
In the first screen of the Sort Wizard click the Add button. The Sort dialog box appears.
Select
store_salesfrom the list of field names available in the Combo box.Select the Sort Order as Ascending from the Combo box. Click the OK button. The sort column is added to the Sort Wizard.
Click Finish button and view the Result to see all the records are sorted in ascending order by store_sales.
Extracting records using Expression Builder
a) Top n records
Open the Sort properties and remove any previous sort options (from the previous examples).
In the first screen of the Sort Wizard click the Add button. The Sort dialog box appears.
Select the store_id from the list of field names available in the Combo box.
Select Descending Sort Order and click the OK button. The sort column is added to the Sort Wizard. On clicking the Next button, the extract screen appears.
In the extract screen, select the top option and enter 6 in the Amount field.
Click the Set Value button. The values entered in the fields of the expression builder will get displayed in the text box.
Click the Finish button and view the records produced - the records are sorted in descending order by store_id and the top six retained.
b) Percentage of bottom n records
Follow the same procedure as a) above, except in the extract screen, select the bottom option and enter 25 in the Amount field. Select the Percent check box.
Click the Set Value button. The values entered in the fields of the expression builder will get displayed in the text box.
With this modification, the records are still sorted in descending order, but now the bottom 25% of the records are retained. That is out of 24 records only 6 records are displayed.
Sorting records by applying Group On Options
a) Group On - Each Value
Using the same sort diagram as the previous section, open the Sort properties and remove any previous sort and extract options.
In the first screen of the Sort Wizard click the Add button. The Sort dialog box appears.
Select the customer_id from the list of field names available in the Combo box.
Select Descending Sort Order.
Select the Each Value option from the Group On Combo box. The dialog box appears as shown in Figure 4.15, “Sort Dialog”. On clicking the Ok button, the sort column gets added to the Sort Wizard.
Click the Finish button in the Sort Wizard and view the Result.

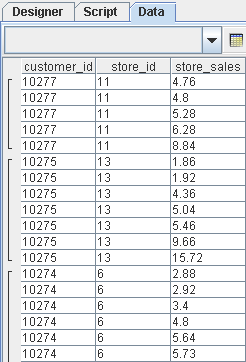
The output is shown in Figure 4.16, “Group on - Each Result”. Records with the same consecutive values of customer_id are grouped together in descending order.
b) Group On - All
Modify the previous example by selecting the All option from the Group On Combo box.
The output is shown in Figure 4.17, “Group on - All Result”. It is seen that all the records irrespective of the value of customer_id are grouped together in descending order. This form of grouping is useful when you want to perform subsequent group operations using other tools in the Elixir toolchain - for example, a group-based chart can show results collected from all records.

c) Group On - Range
Numeric data
Modify the previous example by selecting the Range option from the Group On Combo box. Enter the value given below in the Range text box.
<=10274:a|<=10275:b|<=10277:c
The output is shown in Figure 4.18, “Group on - Range Result”. The records are grouped into a, b and c based on the values of the customer_id in ascending order. Where 'a' group includes all records less than or equal to 10274, 'b' group includes all the records less than or equal to 10275 and the 'c' group includes all the records less than or equal to 10277.

String data
Instead of the Sales data source specified in the sort procedure given above, drag and drop the Stores data source and connect it to the Sort processor. As usual, the Sort processor output is connected to Result.
Open the Sort properties and in the first screen click the Add button. The Sort dialog box appears.
Select the Country from the list of field names available in the Combo box.
Select the Sort Order as "Ascending" from the Combo box.
Select the Range as the Group on option. Enter the value given below in the Range text box.
=USA:a|=Mexico:b|=Canada:c
The output is shown in Figure 4.19, “Group on - Range by Country Result”. It is seen that the records are grouped into a, b and c based on the values of the Country in ascending order. Where 'a' group includes all the records having Country name as USA, 'b' group includes records with Country name Mexico and 'c' group records with Country name Canada.

d) Group On- Substring
Using the same Composite configuration as the previous illustration, open the Sort properties.
Select the City from the list of field names available in the combo box.
Select the sort order as "Descending" from the Combo box.
Select the Substring as the Group On option. Enter the value as 0,2 in the text box. Click the Ok button and Finish and then view the result.
The records are grouped based on the first 2 characters of the City field and sorted in descending order. So the Cities with names starting with "Ya" are grouped followed by names starting with "Wa" and so on.
e) Group On - Year
Instead of the Sales data source specified in the sort procedure given above, drag and drop the Employee data source and connect it to the Sort processor. Then open the Sort Properties
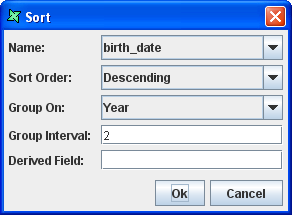
In the first screen of the Sort Wizard click the Add button. The Sort dialog box appears.
Select birth_date from the list of field names available in the combo box.
Select the sort order as "Descending" from the combo box.
Select the Year option from the combo box. Enter the value 2 in the Group Interval text box. The Sort dialog box appears as shown in the Figure 4.20, “Completed Sort Dialog”. Click the OK button. The sort column gets added to the Sort Wizard.
Click the Finish button in the Sort Wizard and view the result.
The records are grouped based on the years and sorted in descending order. So records having birth_date as 1978-1979 are grouped together followed by 1976-1977 and so on.