The XML DataSource Wizard properties are shown in Figure 7.2, “Define XML DataSource”.
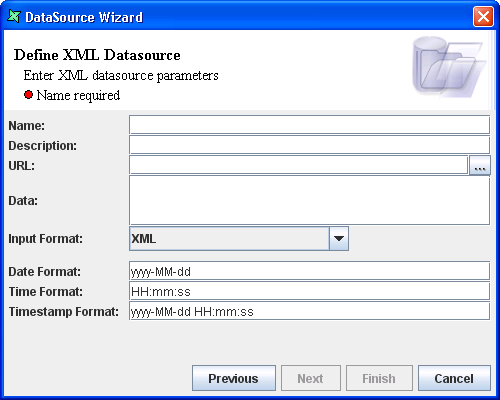
The unique name of the data source is entered in the Name text box and any extra description that is used to describe the data source can be entered in the Description text box.
The format of date, time and timestamp strings in the XML can be specified. By default the date, time and timestamp formats follow ISO standards. If the date and time fields in the XML file follow a different format, then that format has to be defined in the appropriate text boxes.
XML data can be supplied in one of two ways. You can either enter the URL of an XML file, or enter the XML directly into the wizard. The URL approach should be preferred when the XML contents is large. If you specify both URL and XML, the XML value will take precedence.
Note
Both the URL and XML entries allow for ${substitution}
to be used. For XML, this allows the XML contents
to be passed in through dynamic parameters - for example from a report.
To do this, set the XML text to an entity such as ${XML} and then supply
the XML parameter at render time.
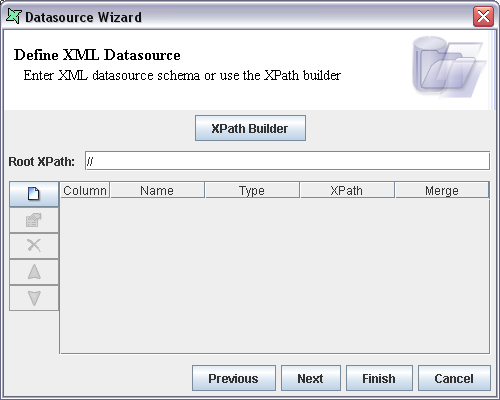
There are two ways by which the columns in the XML file can be added.
There is a main "Root XPath", which allows you to specify the node in the tree from which you would want to start your traversal. The XPath is used to specify the XPath of the node, with respect to the "Root XPath".
Method 1
In this method, the columns in the XML source can be added by clicking XPath Builder shown in Figure 7.3, “Choosing the XPath Builder”.
There are two panel windows in the XPath Builder. The tree structure view of the XML file will be displayed in the left panel. The value of the fields selected in the XML file will be displayed in the text field below the panel.
The Root XPath is specified in the text box provided at the top of the right panel. Select the field to be displayed and then drag and drop them in the Field and XPath cells of the columns. Alternatively, enter the name of the Field and XPath in the corresponding cells. Select the Merge type from the combo box. The field values are displayed in the column.
Click Ok to add the selected fields to the Wizard.
Method 2
This method can be used if the XPath of the columns are already known. In this method, the Root XPath is entered in the text box. There are five buttons - Add Column, Edit Column, Move Up, Move Down and Remove Column.
Click Add Column to display the Add Column dialog. The name of the column is entered in the text box. The data type of the column is selected from the Data Type combo box.
The XPath is entered in the text box. Select the Merge type from the combo box and click OK to add the column to the Wizard.
To alter the values in the column, click Edit Column.
Click Move Up and Move Down to reorder the selected columns, if the sequence in which they are displayed needs to be changed.
To delete the column, click Remove Column.