Table of Contents
This chapter describes how to set up an Ambience Cluster.
Ambience is fully HA compliant. All jobs can run on any node of the cluster and all data are replicated across the cluster.
In case of a node failure, jobs on the failed node are automatically run on other nodes.
When the failed node recovers, it automatically joins the cluster again.
Note: I use Debian 7 for all my servers. Adapt the commands to whichever OS you are using.
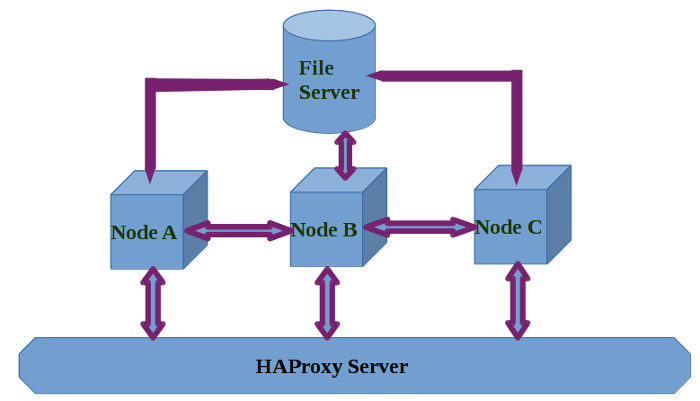
Let us say we have three nodes A,B,C with the following IP addresses:
- A – 199.168.117.23
- B – 199.168.117.24
- C – 199.168.117.30
All three nodes should be running the recommended version of Java (currently Java 8) on them. This is mandatory to run Ambience 4.2.
There is also a file server (199.168.117.59) that contains the Dacapo data folder shared between these three nodes.
Finally, a HAProxy server (199.168.117.60) load balances the web serving of these three nodes.
The block diagram of the architecture is shown in Figure 6.1, “High Availability Architecture”
- Login to the three nodes and create a new user called
ambience:adduser ambience -
Logout and login to the three nodes as user
ambienceand unzip the Ambience software. For e.g.unzip elx-ambience-4.2.0.zip Navigate to the
etc/folder within the Ambience structure and editapplication.conf.On each server, change client=”localhost” to the IP address of the server. For e.g. client=199.168.117.23
On each server, change:
      seed-nodes = [
      "akka.tcp://elx-ambience@"${host}":"${seed-port}
    ]
to:
    seed-nodes = [
"akka.tcp://elx-ambience@199.168.117.23:"${seed-port},
"akka.tcp://elx-ambience@199.168.117.24:"${seed-port},
"akka.tcp://elx-ambience@199.168.117.30:"${seed-port}
   ]
Now you have a cluster of three nodes. Each node can connect to the others. In case a node or two goes down, the other will still run. When the failed nodes come back online, they will automatically join the cluster.
Note: You can change the order of the seed-nodes. However, the seed-nodes configuration should be identical on all the servers.
- Save the configuration.
Note: You can use any storage method such as NFS, S3, Samba etc for this. I use sshfs.
Create data mount points on the three nodes.
Login to each node as user
ambienceand create a folder calleddacapoin/home/ambience.cd /home/ambience mkdir dacapo
-
Login to the file server and install
sshfsasroot.apt-get install sshfs
-
Create a new user called
ambience. Never operate asroot. Run:adduser ambience
to add a new user called
ambience. -
Make sure that the
fusekernel module is loaded:lsmod | grep fuse
The command should return output similar to the following :
lsmod | grep fuse
fuse 62012 1
If the
fusemodule is not loaded, load it:modprobe fuse
-
Add user
ambienceto thefusegroup:adduser ambience fuse
-
Change to user
ambience.su ambience
-
Navigate to the
ambiencehome directory:cd /home/ambience
-
Make a folder called
dacapoon the fileserver under the/home/ambiencefolder.mkdir dacapo
-
Change back to the
rootuser:exit
-
Create a public/private keypair to use to mount the filesystem on the nodes:
ssh-keygen
Do not enter a pass phrase otherwise mounting will not work without human interaction. Simply hit ENTER when prompted for a pass phrase.
-
Copy the generated keygen to all the three nodes.
ssh-copy-id -i $HOME/.ssh/id_rsa.pub ambience@199.168.117.23
ssh-copy-id -i $HOME/.ssh/id_rsa.pub ambience@199.168.117.24
ssh-copy-id -i $HOME/.ssh/id_rsa.pub ambience@199.168.117.30
-
Mount this dacapo folder as
/home/ambience/dacapoon each of the three nodes.sshfs -o idmap=user \ ambience@199.168.117.23:/home/ambience/dacapo \ /home/ambience/dacapo -o nonempty sshfs -o idmap=user \ ambience@199.168.117.24:/home/ambience/dacapo \ /home/ambience/dacapo -o nonempty sshfs -o idmap=user \ ambience@199.168.117.30:/home/ambience/dacapo \ /home/ambience/dacapo -o nonempty
-
To automatically mount at boot, add these commands to
/etc/rc.local. -
Login to each of the nodes as user
ambience, create the data folder in the Ambience folder if it does not exist and link the mounted dacapo folder as the Ambience dacapo folder.cd /home/ambience/ElixirAmbience mkdir data cd data ln -s /home/ambience/dacapo dacapo
Ambience initialization needs to be done only once at startup by the first node listed in the seed node configuration.
We recommend that you delete the init directory inside the Ambience folder structure from all the other seed nodes, to prevent problems with initialization when two nodes start up simultaneously.
- Always start the first node mentioned in the seed-node configuration. This is important as it initializes the cluster correctly.
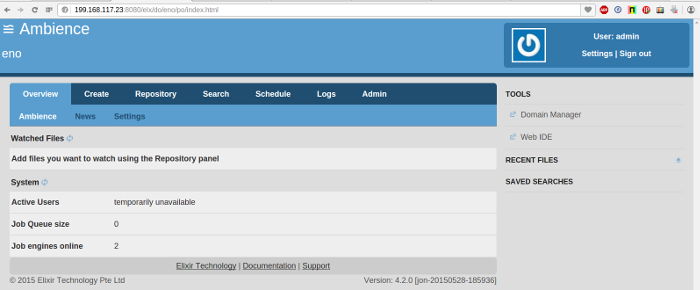
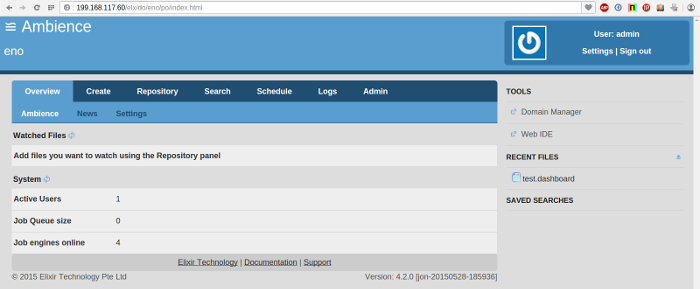
- Login to Ambience using the node IP and port 8080 (default). The default domain is eno, user name is admin and password is sa.
- Note the number of Job Engines. It should be 2 (By default 2 Job Engines are started for each Ambience instance).
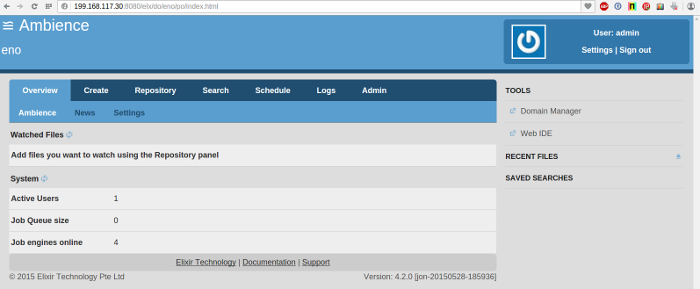
- Next, start up Ambience on any of the other two servers.
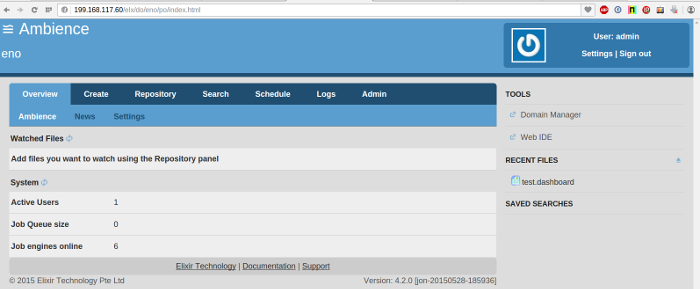
- Wait a minute and view the number of Job Engines in any of the running Ambience instances. The Job Engines count should now be 4.
- Now start the remaining Ambience instance.
- Wait a minute and view the number of Job Engines in any of the running Ambience instances. It should now be 6.
- Stop any Ambience instance (for example: 199.168.117.24) to simulate a failure. The Job Engine count should drop to 4.
- Start the stopped Ambience instance (199.168.117.24 in our example) to simulate recovery. The Job Engine count should increase to 6 again.


The above examples serve to show you how simple it is to configure Ambience nodes as a cluster, for redundancy.
This section provides the steps to configure and install an SSL certificate for Elixir Ambience (here after referred to as Ambience). You can then access Ambience over the secure HTTPS protocol.
This section assumes that Ambience is installed and running.
You can use either the JDK Keytool or OpenSSL to create the SSL certificate.
The following command generates a key pair and certificate directly into a keystore:
keytool -keystore keystore -alias jetty -genkey -keyalg RSA
The jetty directory inside the Ambience tree contains the keystore, as shown in the following example:
ambience@test:~/ElixirAmbience/jetty$ ls
contexts  etc  keystore  lib  license-eplv10-aslv20.html
 notice.html  README.txt  start.d
   start.ini  start.jar  VERSION.txt

ambience@test:~/ElixirAmbience/jetty$ pwd
/home/ambience/ElixirAmbience/jetty
The keys and certificates generated with the JDK keytool and OpenSSL are sufficient to run an SSL connector. However the browser will not trust the certificate you have generated, and it will prompt the user to this effect.
To obtain a certificate that most common browsers will trust, you need to request a well-known certificate authority (CA) to sign your certificate. Such trusted CAs include: AddTrust, Entrust, GeoTrust, RSA Data Security, Thawte, VISA, ValiCert, and Verisign among others.
Each CA has its own instructions but all involve a step that generates a certificate signing request (CSR).
Note: You need to install OpenSSL. This is not bundled with Ambience.
On Windows, you can get it from http://openssl.org/.
On other platforms, you can install it using your package manager.
- Generate a private key using the following commands.
openssl genrsa -des3 -passout pass:1 -out jetty.pass.key 2048

openssl rsa -passin pass:1 -in jetty.pass.key -out jetty.key

rm jetty.pass.key
-
Create Certificate Signing Request (CSR) file using this key. Enter relevant information when asked.
openssl req -new -key jetty.key -out jetty.csr
Note: If you want a certificate to be signed by a trusted CA, send the jetty.csr file to the CA. Else, you can sign it yourself as shown in step 3.
-
Sign it yourself.
openssl x509 -req -days 365 -in jetty.csr \ -signkey jetty.key -out jetty.crt -
Add this CSR to the trust chain and package it in PKCS12 format. Pick a keystore password and enter it each time a password is asked. Run these commands one by one.
keytool -keystore keystore -import -alias jetty \ -file jetty.crt -trustcacerts openssl pkcs12 -inkey jetty.key -in jetty.crt -export \ -out jetty.pkcs12 keytool -importkeystore -srckeystore jetty.pkcs12 \ -srcstoretype PKCS12 \ -destkeystore keystore -
Move the
keystorefile to thejettydirectory inside the Ambience tree.
-
Obfuscate the passwords you used when creating the SSL certificate. Navigate to the jetty directory (here after referred to as JETTYHOME) and run the command as shown in the following example:
ambience@test:~/ElixirAmbience/jetty$ java -cp \
    lib/jetty-util-9.0.6.v20130930.jar \
        org.eclipse.jetty.util.security.Password testpassword
The output should be similar to:
testpassword
OBF:1vv31vn61xtv1zlo1y0s1v1p1v2p1y0y1zlu1xtn1vnw1vu7
MD5:e16b2ab8d12314bf4efbd6203906ea6c
Substitute your password for testpassword.
Note the line beginning with OBF. This is the obfuscated password that you need to use in the configuration.
-
Edit
JETTYHOME/etc/jetty-ssl.xmland change the following, as shown in the example:Replace YOUR_KEYSTORE_PASSWORD parts. We do not define the KeyManagerPassword because our key has no password.
<Configure id="sslContextFactory" class="org.eclipse.jetty.util.ssl.SslContextFactory"> <Set name="KeyStorePath"><Property name="jetty.home" default="." />/<Property name="jetty.keystore" default="/keystore"/></Set> <Set name="KeyStorePassword"> <Property name="jetty.keystore.password" default="OBF:1mf31j8x1lts1ltu1lq41lq61j651mbj"/></Set> <Set name="TrustStorePath"><Property name="jetty.home" default="." /> <Property name="jetty.truststore" default="/keystore"/></Set> <Set name="TrustStorePassword"> <Property name="jetty.truststore.password" default="OBF:1mf31j8x1lts1ltu1lq41lq61j651mbj"/></Set> <Set name="EndpointIdentificationAlgorithm"></Set> -
Edit
JETTYHOME/start.inito include the jetty-ssl.xml file.#Enable https listener etc/jetty-ssl.xml etc/jetty-https.xml #End of https listener
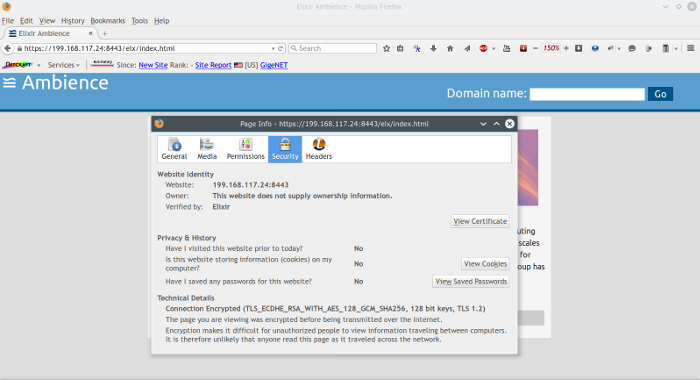
Restart Ambience. Open your browser and access Ambience over port 8443 (HTTPS access).
Accept the certificate warning (if using a self signed certificate).
You now have a secure connection to Ambience.
To redirect http access to https, edit JETTYHOME/etc/webdefault.xml.
Replace the security-constraint section with:
<security-constraint>
<web-resource-collection>
<web-resource-name>Everything in the webapp</web-resource-name>
<url-pattern>/*</url-pattern>
</web-resource-collection>
<user-data-constraint>
<transport-guarantee>CONFIDENTIAL</transport-guarantee>
</user-data-constraint>
</security-constraint>
Restart Ambience. Now accessing Ambience over http (port 8080), will automatically redirect you to https access over port 8443.
You can use a load balancer such as HAProxy to load balance the Ambience nodes.
HAProxy (High Availability Proxy) is an open source load balancer which can load balance any TCP service. It is particularly suited for HTTP load balancing as it supports session persistence and layer 7 processing.
root:
echo deb http://httpredir.debian.org/debian \
      wheezy-backports main | \
      tee /etc/apt/sources.list.d/backports.list

apt-get update

apt-get install haproxy -t wheezy-backports
-
Edit
/etc/default/haproxyand set:ENABLED=1
-
To start HAProxy on boot, run:
update-rc.d haproxy defaults
-
Move the default configuration file and create a new one.
mv /etc/haproxy/haproxy.cfg{,.original} -
Create a new file:
/etc/haproxy/haproxy.cfgwith the following contents:global log 127.0.0.1 local0 notice maxconn 2000 une.ssl.default-dh-param 2048 tune.ssl.default-dh-param 2048 user haproxy group haproxy defaults log global mode http option httplog option dontlognull retries 3 option redispatch timeout connect 5000 timeout client 10000 timeout server 10000 listen haproxy 199.168.117.60:80 mode http balance leastconn option http-server-close timeout http-keep-alive 3000 option forwardfor cookie SRVNAME insert server node1 199.168.117.23:8080 cookie N1 check server node2 199.168.117.24:8080 cookie N2 check server node3 199.168.117.30:8080 cookie N3 check
-
Start HAProxy:
service haproxy start
Now start Ambience on your nodes and access it with your HAProxy IP on port 80.
An example with my HAProxy loadbalancer (199.168.117.60) is shown below.
Use the powerful, easy to use cluster for your needs.
Before you begin, install openssl as it is NOT bundled with Ambience.
On Windows, you can get it from http://openssl.org/.
On other platforms, you can install it using your package manager.
To access HAProxy over a secure HTTPS channel, perform the following steps:
-
Login as
rooton the HAProxy system. -
Navigate to the
/etc/ssldirectory on the HAProxy system:cd /etc/ssl
-
Create your Private key:
openssl genrsa -out domain.tld.key 1024
-
Create your Certificate Signing Request (CSR):
openssl req -new -key domain.tld.key -out domain.tld.csr
Note: You can either self sign your certificate or send the CSR to a Certificate Authority such as Verisign or Geo Trust for signing.
In this document, we self sign our certificate.
-
Self-Sign your certificate:
openssl x509 -req -days 365 -in domain.tld.csr \ -signkey domain.tld.key -out domain.tld.crt -
Create a PEM File:
cat domain.tld.key domain.tld.crt > domain.tld.pem
-
Change your HAProxy config to:
global log 127.0.0.1 local0 notice maxconn 2000 tune.ssl.default-dh-param 2048 user haproxy group haproxy defaults log global mode http option httplog option dontlognull retries 3 option redispatch timeout connect 5000 timeout client 10000 timeout server 10000 frontend LB #Access HAProxy on port 80 #Substitute your HAProxy IP below. bind 199.168.117.60:80 reqadd X-Forwarded-Proto:\ http default_backend LB frontend LBS #Access HAProxy on port 443 #Substitute your HAProxy IP below. bind 199.168.117.60:443 ssl crt /etc/ssl/domain.tld.pem reqadd X-Forwarded-Proto:\ https default_backend LB backend LB 199.168.117.60:80 #This is the backend configuration where nodes are defined. #Redirect HAProxy HTTP Access to HTTPS redirect scheme https if !{ ssl_fc } mode http balance leastconn option http-server-close timeout http-keep-alive 3000 option forwardfor cookie SRVNAME insert server node1 199.168.117.23:8080 cookie N1 check server node2 199.168.117.24:8080 cookie N2 check server node3 199.168.117.30:8080 cookie N3 check -
Restart HAProxy:
service haproxy restart
Now access your HAProxy IP and you will be redirected to HTTPS access.
To access HTTPS backend nodes (if you have configured them as shown in the section called “Accessing Ambience Over HTTPS” using HAProxy, modify the server node lines as shown in the following example:
server node1 199.168.117.23:8080 cookie N1 check ssl verify none
The entire HAProxy configuration now becomes:
global
   log 127.0.0.1 local0 notice
   maxconn 2000 une.ssl.default-dh-param 2048
tune.ssl.default-dh-param 2048
   user haproxy
   group haproxy

defaults
  log global
  mode http
  option httplog
  option dontlognull
  retries 3
  option redispatch
  timeout connect 5000
  timeout client 10000
  timeout server 10000

listen haproxy 199.168.117.60:80
  mode http
  balance leastconn
  option http-server-close
  timeout http-keep-alive 3000
  option forwardfor
  cookie SRVNAME insert
  server node1 199.168.117.23:8080 cookie N1 check ssl verify none
  server node2 199.168.117.24:8080 cookie N2 check ssl verify none
  server node3 199.168.117.30:8080 cookie N3 check ssl verify none
The ssl verify none option tells HAProxy to skip trying to verify the SSL certificates from the backend nodes and to accept them as they are. This works best for self signed certificates.
Access your HAProxy over SSL and HAProxy will now fetch Ambience over SSL too. Your connection is now end to end encrypted.