Table of Contents
WebIDE allows you to create custom front ends for Elixir Ambience web interface from within the Ambience environment.
This option is available only if you are an administrator or a member of the WebIDE group.
Click the WebIDE link from the Ambience web interface, as shown in Figure 4.1, “WebIDE Link”.

The WebIDE looks as shown in Figure 4.2, “WebIDE”:

To change the Ambience landing page:
- Right-click the
webdirectory and select Add File. - Name it
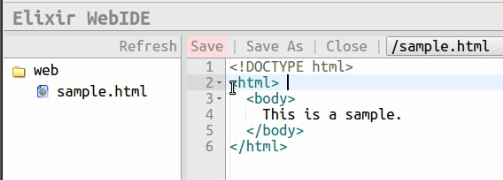
sample.htmlfor example. Click OK. - Type in your code. An example is shown in Figure 4.3, “Landing Page Code Sample”. The editor highlights code, and also syntax errors if any.
- Click Save to save the changes. Notice that the Save button turns pink when there are unsaved changes, as shown in Figure 4.4, “WebIDE Unsaved Changes”
- To preview your sample, right click the file and select Preview as shown in Figure 4.5, “WebIDE Preview Option”
- The preview is displayed as shown in Figure 4.6, “WebIDE Preview Result”
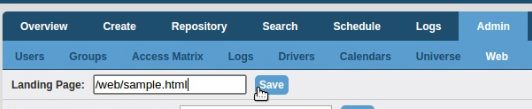
- Change the landing page link to the one we created with WebIDE. Click Admin > Web and change the landing page as shown in Figure 4.7, “WebIDE Change Landing Page”
- Logout and then login back to Ambience. Your landing page will be the one that you created with WebIDE.


You can use other files such as JavaScript and CoffeeScript files as your source. CoffeeScript files are automatically converted to Javascript output using Ant.
The following sample demonstrates using a CofeeScript file:
- Create a new folder for your script - say
sample. - Right click the sample folder and select
Upload File. - Click Choose File and select the
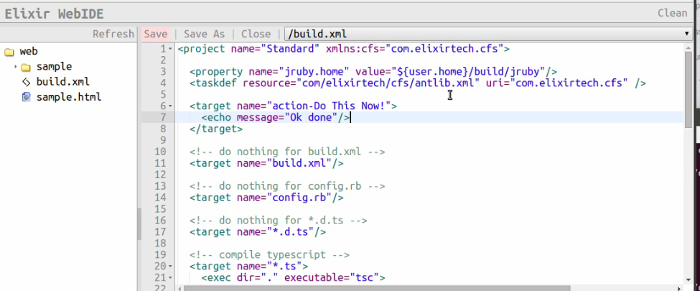
build.xmlfile inside the/misc/webide/folder. Click OK. - The build file is displayed as shown in Figure 4.8, “build.xml Source”
- Add a new file called
my.coffee - Enter the coffee script code as shown in Figure 4.9, “CoffeeScript Source”.
- Notice that when you save the CoffeeScript code, Ant automatically compiles it into JavaScript. You can see the compilation messages in the log window at the bottom.


When you rename a file or a folder (asset) from WebIDE, the original output is not automatically overwritten, but still exists in the deployment folder.
Click Clean to clean the deployment folder and re-build all the assets.
To create a custom action in WebIDE:
- Create a
build.xmlfile in the top level WebIDE folder, as shown in Figure 4.10, “Top Level build.xml Source”. - Modify
build.xmlto include a custom target. Note that the target name should begin withaction-. This is shown in Figure 4.11, “Top Level Action”. - Save the code and refresh WebIDE. You will now see the custom action as a button, as shown in Figure 4.12, “Custom Action Button”. In our example, it is "Do This Now!".


Once you are done building your custom front end, you can lock WebIDE to prevent any further changes.
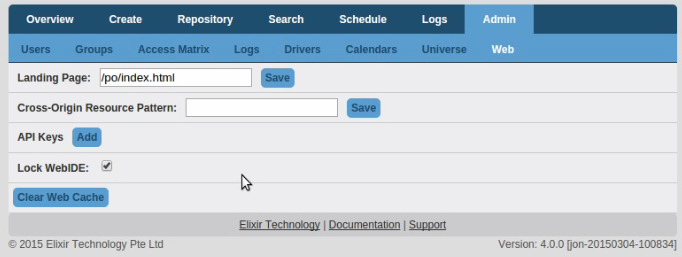
Click Admin > Web. Select the Lock WebIDE option as shown in Figure 4.13, “Locking WebIDE”.
The webIDE is locked by default, if you are using Ambience 3.x data. If you are starting from Ambience 4.0 afresh, you can choose to lock and unlock it, as required.