
ETL Daemon
Description
An ETL Daemon identifies an ETL chainset that is intended to run continuously while the Ambience server is alive. This means that it does not need to be scheduled, that it will automatically restart upon failure and that it will switch from machine to machine in a cluster if the machine it is running on fails.
For example, an ETL daemon can be used to continuously reads messages from a broker (MQTT, Kafka etc.) or scan a directory for changes.
The ETL Daemon module allows you to create and manage ETL daemons.
A set of ETL steps for controlling ETL daemons are available under the “ETL Daemon” category in the ETL module. These steps provide the ability to start-stop ETL daemons which enables them to be run for scheduled periods of time rather than continuously. This allows the ETL daemons to be scheduled to run at high load and stop in quieter periods.
To run ETL daemons, the Daemon User must be set in the ETL Daemon option in the System Settings module.
All actions and who performed them, and other important information are sent to the Audit Log.
This module is available in both Ambience and Repertoire software suite.
Module Interfaces
| Interface | Description | Required Privilege |
|---|---|---|
| ETL Daemon | Allowed to view ETL Daemon | mod-etl-daemon |
| ETL Daemon | Allowed to call ETL Daemon API | mod-etl-daemon-api |
| ETL Daemon | Allowed to edit ETL Daemon | mod-etl-daemon-edit |
| ETL Daemon | Able to receive from ETL Daemon | mod-etl-daemon-notifications |
UI and Status
UI
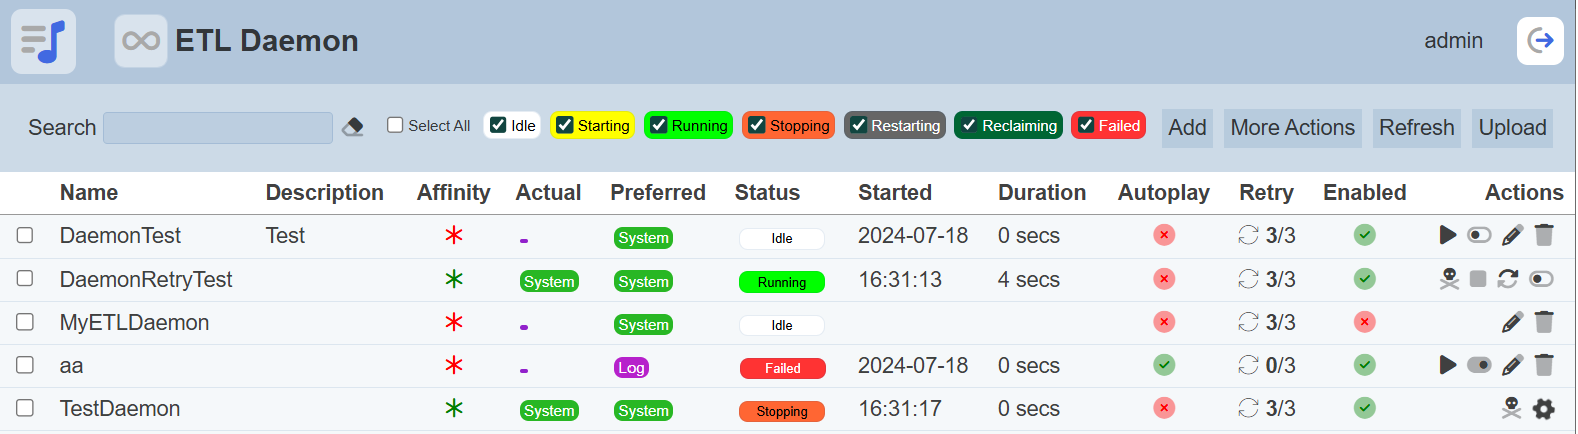
There are several columns in the ETL daemon management page.
| Column | Description |
|---|---|
| Name | Name of ETL daemon. |
| Description | Brief description of ETL daemon. |
| Affinity | It is green when the values of “Actual” and “Preferred” are equal, otherwise it is red. |
| Actual | Actual Ambience instance that is running the ETL daemon. |
| Preferred | Preferred Ambience instance to run the ETL daemon, set in System Settings module. |
| Status | Current status of ETL daemon. |
| Started | When the ETL daemon was started. |
| Duration | Indicates how long the ETL daemon has been running. |
| Autoplay | Indicates a green tick if autoplay is turned on, otherwise a red cross if autoplay is turned off. |
| Retry | Current retry logic state Spinning icon indicates current retrying. “2/3” indicates 2 of 3 retries remaining. |
| Enabled | Shows a green tick if enabled, otherwise a red cross if the ETL daemon is disabled. |
| Actions | List of actions to be performed on the ETL daemon. |
Retry
The retry iteration includes a retry strategy with a count of 3. If a daemon fails, it will automatically started again up to three times.
Depending on the retries remaining, the delay before the daemon is automatically started will differ as follows:
- 3 retries remaining = 10 sec delay
- 2 retries remaining = 30 sec delay
- 1 retry remaining = 60 sec delay
Each time a daemon fails, a warning notification will be sent if there ar retries remaining. If there are no retries remaining, then an error notification will be sent. Notification are sent to whoever has the mod-etl-daemon-notifications privilege.
Status
The status of the ETL daemons are as follows:

| Status | Description |
|---|---|
| Idle | ETL daemon not running. |
| Starting | ETL daemon was started by the run action but has not yet been picked up by an Ambience instance. |
| Running | ETL daemon is running |
| Stopping | ETL daemon was stopped by the stop action but has yet been stopped. Stop is not always immediate as the ETL chain will await for a safe place to stop in a managed way. |
| Restarting | ETL daemon was restarted by the restart action and is still in the process of restarting. |
| Reclaiming | ETL daemon was running in a non-preferred Ambience instance and the preferred instance was started causing the ETL daemon to be reclaimed automatically. |
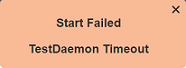
| Failed | ETL chain that the ETL daemon was running has failed and all retries wre exhausted. |
The checkboxes beside the “Select All” field and status allow users to filter the ETL daemon that are listed in the page.
Add
To add a ETL daemon, start by clicking on the “Add” button on the upper right corner of the page.

The “Add Daemon” dialog box will appear.
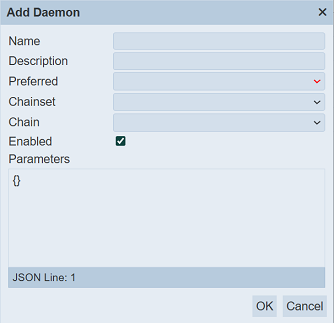
| Field | Description | Mandatory | Input Type | Constraints | Default Value |
|---|---|---|---|---|---|
| Name | Unique name assigned to the ETL daemon. | Y | Text field | Any text (case-sensitive) | Empty string |
| Description | Brief description for the ETL daemon. | N | Text field | Any text | Empty string |
| Preferred | Select the preferred Ambience instance to run the ETL daemon. | Y | Drop-down list | Select from list | Not selected |
| Chainset | Select the ETL chainset to be used. | N | Drop-down list | Select from list | Not selected |
| Chain | Select the ETL chain to be used. | N | Drop-down list | Select from list | Not selected |
| Enabled | If selected, enables the ETL daemon. | Y | Checkbox | True (selected) or false (unselected) | Selected |
| Parameters | JSON parameters to pass to the ETL daemon. | Y | Text field | Any text | Empty string |
Key in an unique name for the new ETL daemon in the “Name” field. It is case-sensitive. Provide a brief description on the ETL daemon in the “Description” field. Select the desired system ID from the drop-down list in the “Preferred” field.
Select the desired ETL chainset and chain for the ETL daemon in the “Chainset” and “Chain” fields respectively. In the “Parameters” field, key in the desired parameters in JSON format for the ETL daemon.
The “Enabled” field is selected by default. Do note that only enabled ETL daemons can be run.
For the ETL chain to appear in the drop-down list, the ETL chain must contain the ETL Daemon Signature step and include an ETL step that performs a continuous task that has been designed to work with the ETL daemon. Currently, these steps are :
- Daemon MQTT Reader
- Daemon Timer
Click on the “Save” button at the top right corner of the panel to create the new ETL daemon. Clicking on the “Cancel” button aborts the action.
If the “Preferred” field is left empty, an error message will appear.

If the name already exist or the name is missing, the relevant error message will appear.


Upon successful saving the ETL daemon, a message will appear.

More Actions
This function allows you to perform the same action on multiple daemons.
To perform an action on multiple daemons, select one or more checkboxes next to desired daemons. Click on the “More Actions” button at the upper right corner of the page.
Select the desired action to perform from the list. The available options that appear in the list depends on the status of the ETL daemon. If the selected daemons are running, the below options will be available.
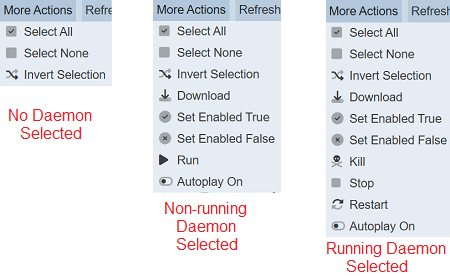
If no daemon is selected, only the first three options will appear, which allows you to either select all, select none or invert selection.
| Option | Description |
|---|---|
| Select All | Selects all ETL daemons in the list. |
| Select None | Unselects all ETL daemons. |
| Invert Selection | Inverts the current selection. That is, any ETL daemons selected will be unselected and vice versa. |
| Download | Downloads multiple ETL daemons as a zip file. If only one ETL daemon is selected, the selected ETL daemon will be downloaded as a JSON file. |
| Set Enabled True | When selected, sets the selected ETL daemons to enable. |
| Set Enabled False | When selected, sets the selected ETL daemons to disable. |
| Kill | Kills the selected ETL daemons. |
| Stop | Stops the selected ETL daemons. |
| Restart | Restarts the selected ETL daemons. |
| Autoplay On/Off | Toggles autoplay to on/off for the selected ETL daemons. |
Download
To download the selected ETL daemons, click on the “More Actions” button and select the “Download” option.
If only one daemon is selected, the downloaded daemon has a filename of <filename>.etl-damon.json.
If more than one daemon are selected prior, the “Download” dialog box will appear.
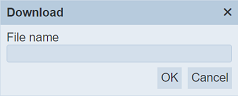
Key in the desired name for the zip file and click on the “OK” button. The selected ETL daemons will be downloaded as a zip file with the filename provided earlier. The individual ETL daemon in the zip file will have the filename format as mentioned above.
Set Enabled True / False
To enable or disable the ETL daemons, click on the “More Actions” button and select the “Set Enabled True” or “Set Enabled False” option respectively.
The selected ETL daemons will be enabled or disabled as selected.
An enabled ETL daemon is represented with a green tick under the “Enabled” column, while a disabled daemon is represented with a red cross.
Run
To run a ETL daemon, click on the  “Run” icon under the “Actions” column corresponding the desired daemon.

If any error occurs, an error message will appear and the daemon will stop running.
Once the ETL daemons runs, the status of the daemon will change from “Idle” to “Starting”. The  “Busy” icon will appear in the “Actions” column. Once the Ambience instance picks up the ETL daemon, the status will change to “Running”. Do note that the “Busy” icon may not be noticeable, as the duration may be too short.

The available icons will change according to the status of the ETL daemon.
Kill
Killing a running ETL daemon will stop the ETL daemon anywhere in the ETL chain (unsafe). This is potentially unsafe as the chain may be at any step. For example, in the middle of a complex action that should be allowed to complete. Instead you should use “Stop” as described below. Autoplay that is set prior will be set to false automatically.
To kill a running ETL daemon, click on the  “Kill” icon under the “Actions” column corresponding the desired daemon that is running.
A “Kill Daemon” dialog box will appear.
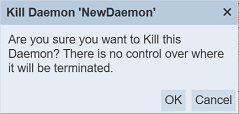
Click on the “OK” button to kill the ETL daemon. To abort, click on the “Cancel” button.
Stop
Stopping a running ETL daemon will stop the ETL daemon at a managed place in the ETL chain (safe). This ensures that the chain is not in the middle of a complex action that needs to complete. Autoplay that is set prior will be set to false automatically.
To stop a running ETL daemon, click on the  “Stop” icon under the “Actions” column corresponding the desired daemon that is running.
The “Busy” icon will appear with its status changed to “Stopping”. Until the ETL daemon stops running, its status will change to “Idle”. Do note that the icon may not be noticeable, as the time to stop can be short, depending on which step in the chain is currently executing.
Restart
Restarting a running ETL daemon stops (safe) and then starts the ETL daemon.
To restart a running ETL daemon, click on the  “Restart” icon under the “Actions” column corresponding the desired daemon.
Autoplay On/Off
When autoplay is set to true, the ETL daemon will run automatically when the Ambience instance starts. The autoplay is set to off by default.
To set autoplay to on (true), click on the  “Toggle On” icon under the “Actions” column corresponding the desired daemon. A green tick will appear under the “Autoplay” column.
To set autoplay to off (false), click on the  “Toggle Off” icon under the “Actions” column corresponding the desired daemon. A red cross will appear under the “Autoplay” column.
Edit
To modify an existing ETL daemon, click on the  “Edit” icon under the “Actions” column corresponding the desired daemon.
The “Edit Daemon” dialog box will appear.
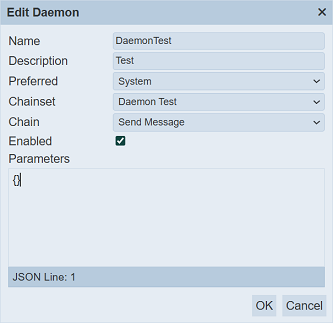
Edit as desired and click on the “Save” button to save the changes. Once the daemon is saved, a message will appear.
You can enable or disable an ETL daemon. Disabled ETL daemons cannot be triggered or run.
Do note that if the ETL daemon is running, the icon will not appear.
Delete
Deleting a ETL daemon removes it from the list.
To delete an existing daemon, click on the  “Delete” icon under the “Actions” column corresponding the desired daemon.
If the daemon is running, the icon will not appear.
There is an option to undo the deletion. A notification with an “Undo” button appears right after clicking on the “Delete” icon.

Upon clicking on the “Undo” button, the deleted daemon is restored and is added back to the list. Do note that the notification will disappear after a few seconds.
Upload
To upload a ETL daemon, start by clicking on the “Upload” button on the upper right corner of the page.
The “Upload” dialog box appears on the page.
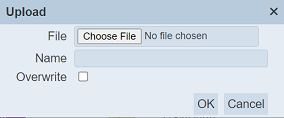
To upload a single file, browse to the location of the file (<filename>.etl-daemon.json) to be uploaded and set the “Name” field. By default, the “Name” field uses the name of the upload file. You can change it to an appropriate name if desired. If the file to be uploaded is to replace an existing daemon, select the “Overwrite” field. Do note that the “Name” field must be unique, or an error message will appear.
To upload a zip file (multiple files), browse to the location of the zip file. The name of the reports will be extracted from the zip file.
| Field | Description | Mandatory | Input Type | Constraints | Default Value |
|---|---|---|---|---|---|
| File | Browse to select file to be uploaded. | Y | “Choose File” button | Any text | Empty |
| Name | Unique name assigned to the file to be uploaded. When a file is specified in the above field, this field will automatically takes in the file name of the specified file. |
Y | Text field | Any text | Empty string |
| Overwrite | If selected, overwrites existing daemon. | N | Checkbox | Select or not selected | Not selected |
Click on the “OK” button to upload the selected file. Click on the “Cancel” button to abort the action.
For uploading a single file, a message will appear after the file has been successfully uploaded.

If the name of the daemon to be uploaded already exist, an error message will appear.

To overwrite the existing daemon, select the “Overwrite” field in the dialog box, then click on the “OK” button.
For uploading a zip file, the “Upload Results” dialog box will display the results of the uploading.
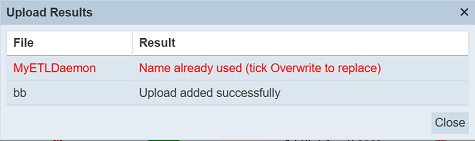
Those results in black are uploaded successfully while those in red indicates upload failures with their relevant messages. Click on the “Close” button to close the dialog box.
You can arrange/sort the list of daemons in ascending or descending order by clicking on the name of the desired field. By default, the list is sorted by the “Name” field in ascending order.
Refresh
After performing actions on the browser/tab, the list is reloaded to display the ETL daemons. The manual “Refresh” button is available and is particularly useful if there are others making changes on the same page.
The “Refresh” button is found on the upper right corner of the page. Clicking on it reloads the list.
Search
The search bar appears on the upper left corner of the page.

This provides an easy way to search through the list. It is case-insensitive and displays records that have the entered search value in any of the values of the fields below:
- Name
- Description
- Actual
- Preferred
- Status
- Started
- Retry
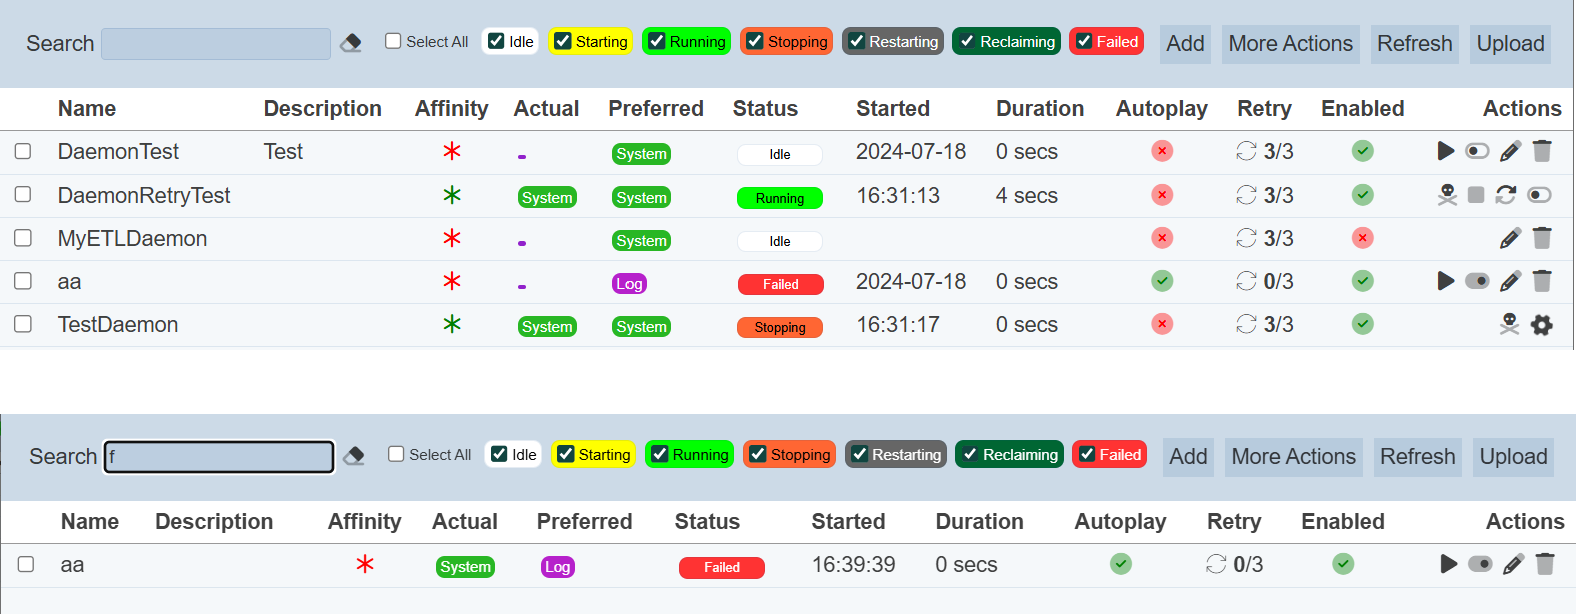
Alternatively, you can click on the any items under the “Actual”, “Preferred” or “Status” columns respectively to aid the search for the daemons in the page.

In the example above, ETL daemons that are assigned the role “tester” are shown.
These two search methods can be combined together, with each criteria separated by a comma.