Queue Monitor
Description
The Queue Monitor module has a tabbed interface providing a Job Queue tab and an Engines tab.
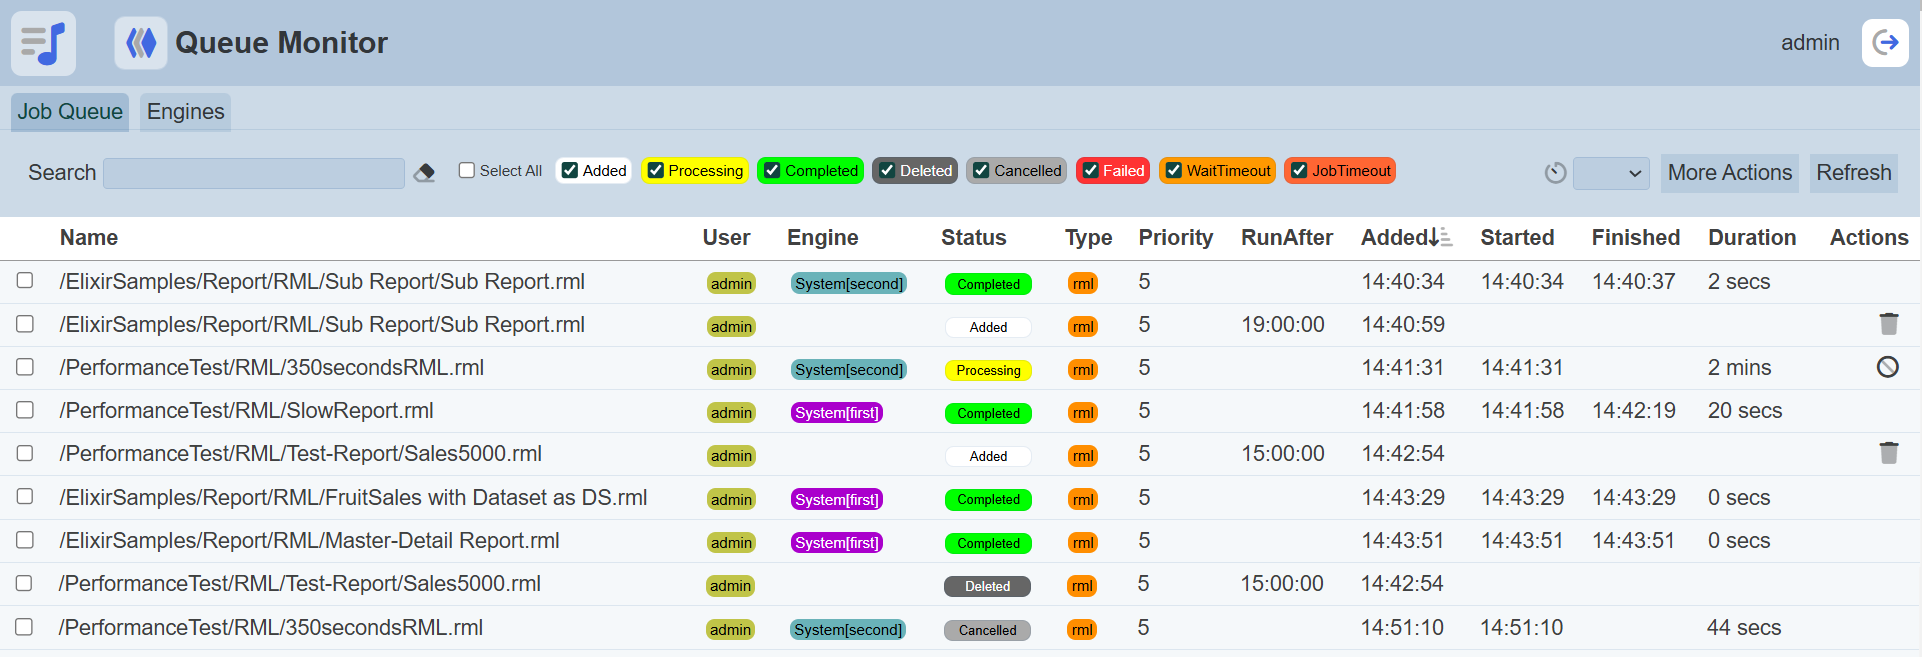
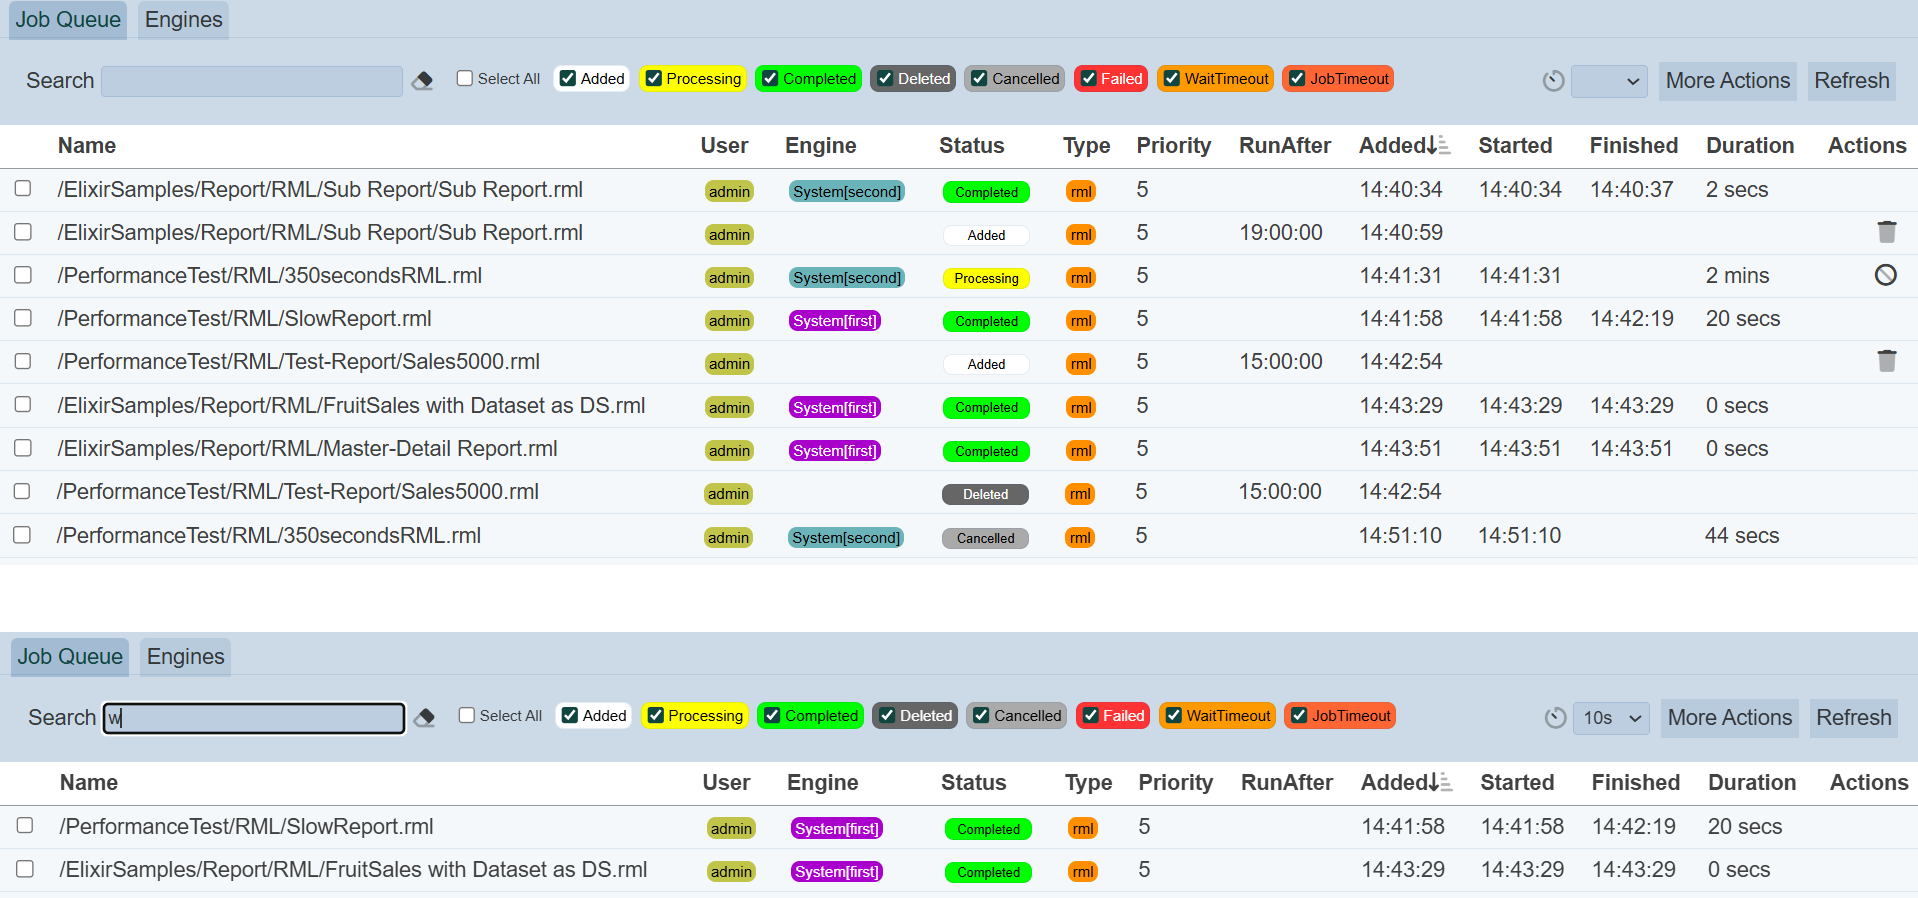
The Job Queue tab shows the list of jobs generated and their current status, timing information, as well as which engine is handling the job, etc.
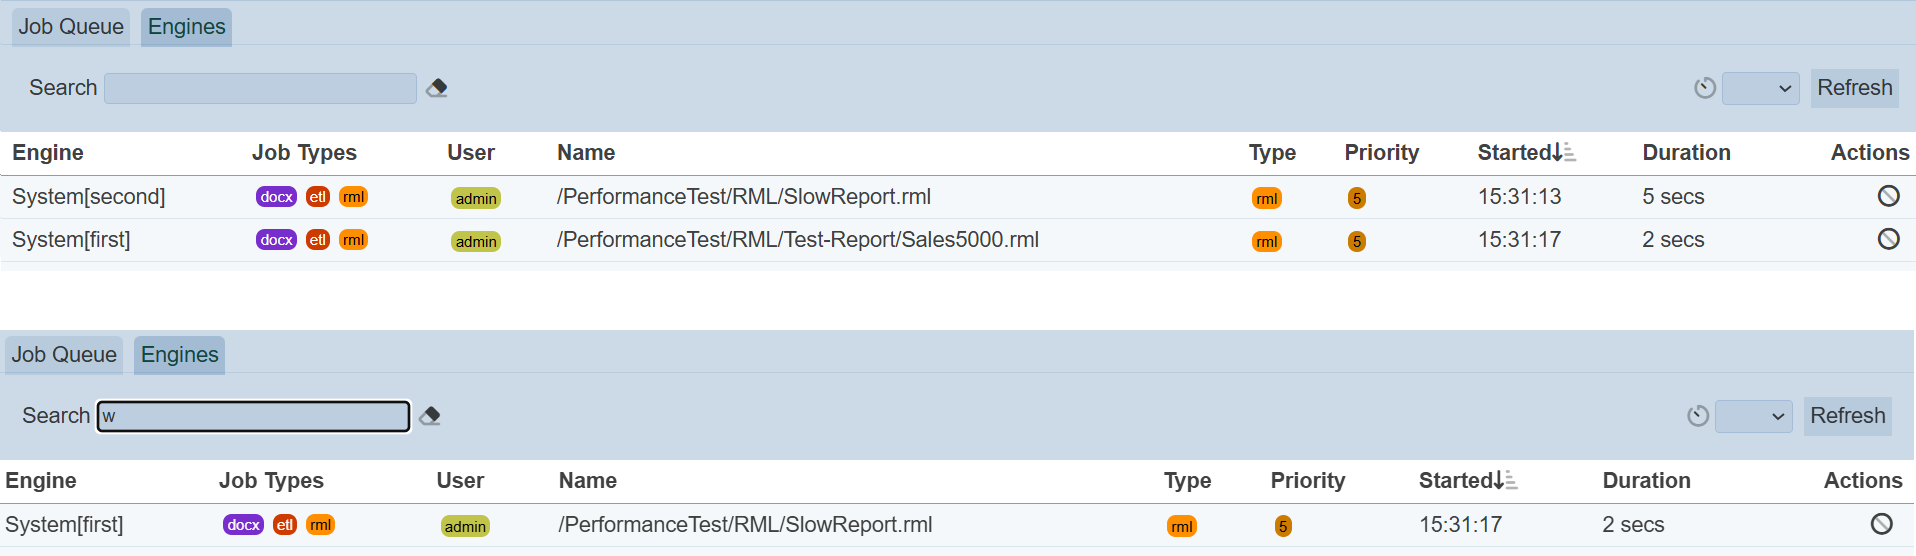
The Engines tab shows the available engines for each Ambience instance being used, the job types they can handle, as well as their current processing jobs, start time, duration, etc.
This module is available in both Ambience and Repertoire software suite.
Module Interfaces
| Interface | Description | Required Privilege |
|---|---|---|
| Queue Monitor | Allows Queue Monitor module access | mod-queue-monitor |
| Queue Monitor | Allows viewing of Job Queue | mod-queue-monitor-job |
| Queue Monitor | Allows editing of Job Queue | mod-queue-monitor-job-edit |
Job Queue
The Job Queue tab shows the list of jobs generated and their current status, timing information, as well as which engine is handling the job, etc. This information can be useful to help users understand how and when Ambience will process their requests on the job queue.
If no job is queued, the Job Queue tab will be empty. A job will be displayed in the list for 24 hours, after that the job will be removed.
See Report Job Queue for more information on job queue.
Job Status
The top bar in the tab consists of three parts:
- Search function
- Status select function
- Refresh function
The table below the top bar displays the job queue.
The status select function allows you to filter and search for jobs under the status. By default, the “Added” and “Processing” statuses are selected when the Queue Monitor module is launched. If none of the status are selected in the top bar, all status will be displayed.
Below are the list of status available for the Job Queue.
| Status | Description |
|---|---|
| Added | A job has been added to the Queue and is waiting for a Job Engine to pick it up and to start processing it. A job in the Added status can move to the following statuses: - Processing - WaitTimeout - Deleted - Failed |
| Processing | A job is being processed by a job engine. A job in the Processing status can move to the following statuses: - Completed - JobTimeout - Cancelled - Failed |
| Completed | A job engine has completed processing the job successfully. A job in the Completed status cannot move to another status. |
| WaitTimeout | A job was added to the Queue and was not picked up by a job engine by the defined wait timeout duration. The default wait timeout is defined in the application.conf file ( ambience.queue.manager.wait-timeout = 10 minutes). It can be overridden by the job (e.g. with a parameter elx-wait-timeout = 60). To prevent wait timeouts, increase these values or evaluate the architecture to ensure enough job engines are available to handle the desired load. |
| JobTimeout | A job was being processed but was taking too long to complete. Internally, a default value of one minute is used but it can be overridden by the job via a parameter elx-end-timeout. To prevent job timeouts, increase the elx-end-timeout value or evaluate the architecture to ensure enough job engines are available to handle the desired load. |
| Failed | A job failed. Hover over the status and the tooltip will give the details of why the job failed. |
| Cancelled | A job was being processed and was cancelled by the Cancel action. |
| Deleted | A job was added to the Queue and was deleted by the Delete action. |
Actions Available
There are several actions that will appear under the “Actions” column:
 “Delete” - Will appear if the job is in the “Added” status
 “Stop” - Will appear if the job is in the “Processing” status
If a job is neither in the “Processing” nor “Added” status, no icon will appear in the “Actions” column.
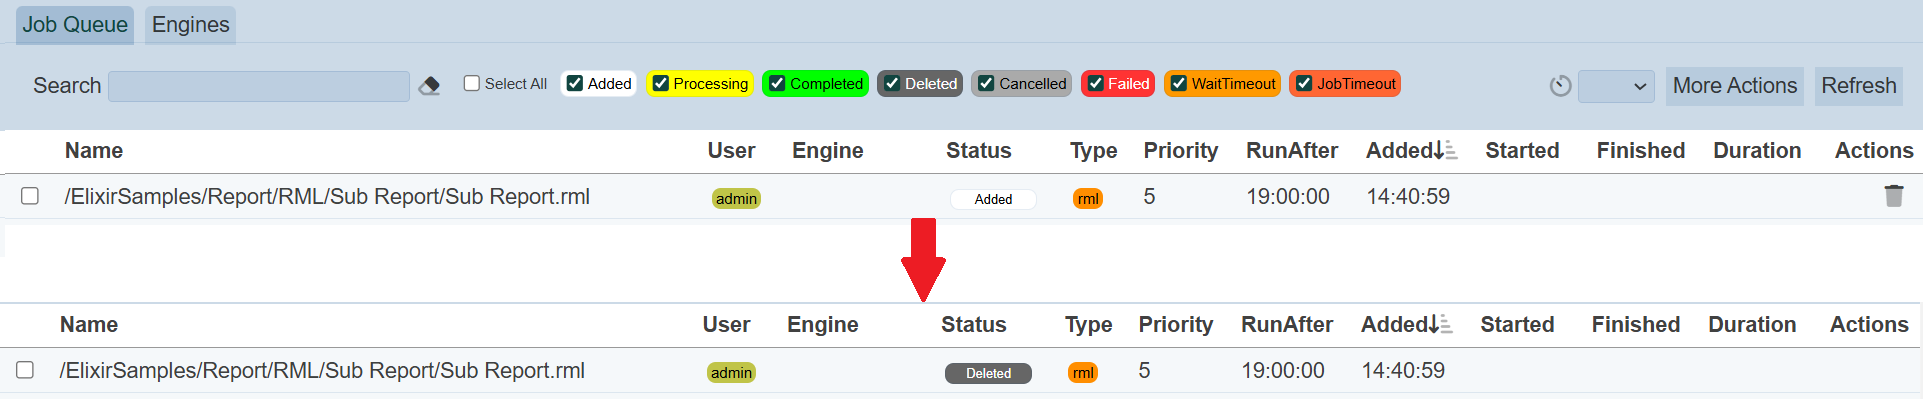
Delete
The icon will appear under the “Actions” column corresponding job if it is in the “Added” status. It allows you to remove the job from the job queue. A “Delete Job” dialog box will appear, prompting user to confirm the delete action.
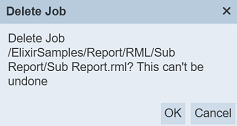
To confirm the action, click on the “OK” button. The status of the job will change from “Added” to “Deleted”.
Stop
If the status of the job is the “Processing” status, the icon will appear in the “Actions” column of the corresponding job. A “Cancel Running Job” dialog box will appear, prompting the user to confirm the action.
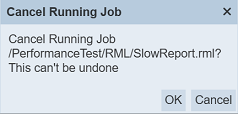
To confirm the action, click on the “OK” button. The status of the job will change from “Processing” to “Cancelled”.

More Actions
This feature allows user to perform actions on multiple queues at the same time.
When the “More Actions” button located at the upper right corner of the page is clicked, a list of available actions are displayed.

If no Kanban board is selected prior clicking the button, there will be fewer actions available. To select a Kanban board, select the checkbox next to the name of the Kanban board.
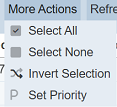
| Option | Description |
|---|---|
| Select All | Selects all Kanban boards in the list. |
| Select None | Unselects all Kanban boards. |
| Invert Selection | Inverts the current selection. That is, any Kanban boards selected will be unselected and vice versa. |
| Set Roles | Selects the roles to be assigned to the Kanban boards. |
Engines
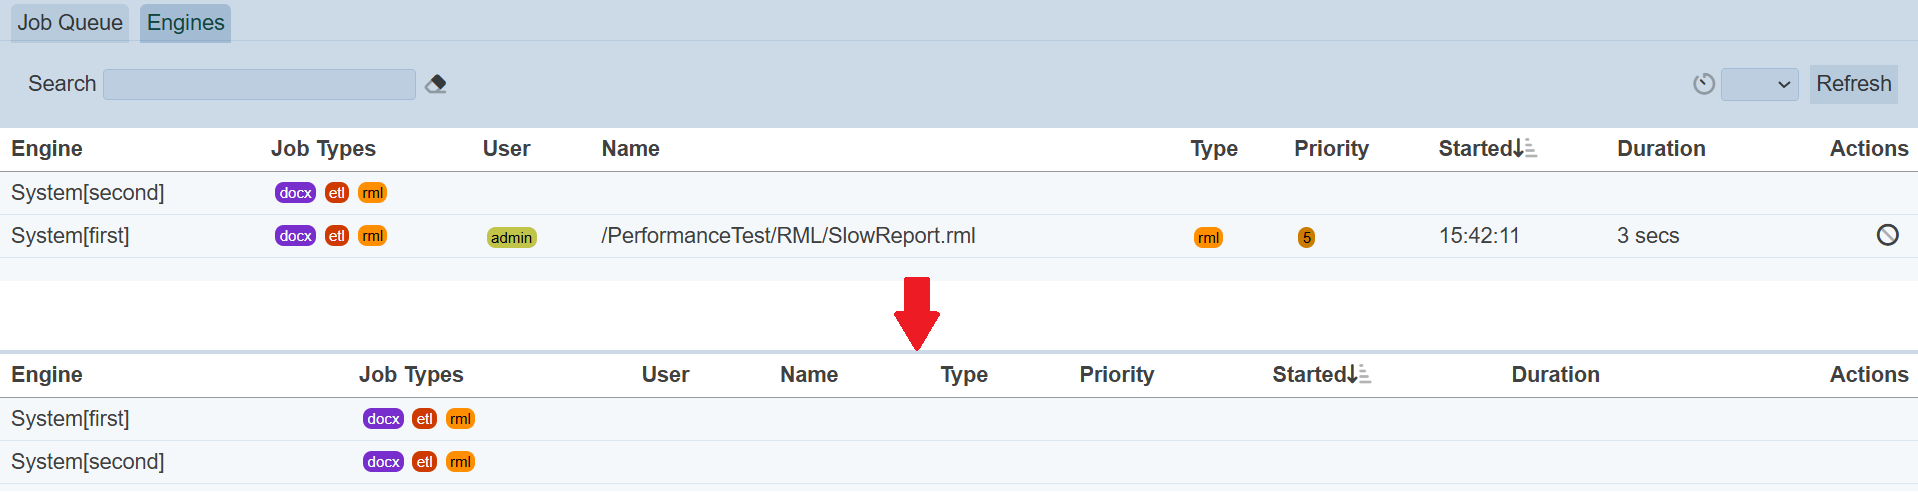
The Engines tab shows the available engines for each Ambience instance being used, the job types they can handle, as well as their current processing jobs, start time, duration, etc.

The list shows the jobs that are currently being processed. If no job is not in the “Processing” status, the information in all columns except the “Engine” and “JobTypes” columns is blank, showing the engines available and the job type it could run.
While the job is being processed, the “Stop” icon under the “Actions” column will appear. This allows you to stop the job if it takes too long for that engine and it is holding up the queue. Click on the icon and the “Cancel Running Engine” dialog box will appear.
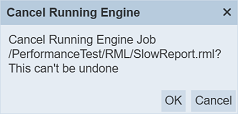
To confirm cancellation of the job, click on the “OK” button and the job will be stopped and removed from the list. To abort the action, click on the “Cancel” button. The job will be removed from the Engines tab. In the Job Queue tab, you can see that the status of the job will be changed to “Cancelled”.
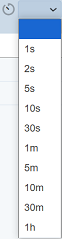
Auto Refresh
As the queue comes and goes, it may be good to set an auto-refresh to update the list of items. To do so, click on the “Auto Refresh” and select the desired timing from the drop-down list.
Refresh List
After performing reassign actions on the browser window/tab, the list is reloaded to display the updated jobs. The manual “Refresh” button is available and is particularly useful if there are others making changes on the same page.
The “Refresh” button is available on the upper right corner of the page. Clicking on it reloads the list of jobs.
Search
There is a cross-field search function for the list of jobs in the page. It is located at the upper left corner of the page.

This provides an easy way to search through the list of jobs. It is case-insensitive and displays the items that have the entered search value in any of the values of the fields.
For Job Queue tab, the fields below can be used to the search:
- Name
- User
- Engine
- Status
- Type
- Priority
- Added
- Started
- Finished
For Engines tab, the fields below can be used to the search:
- Engine
- JobTypes
- User
- Name
- Type
- Priority
- Started
- Duration