Render Wizard
The Render Wizard assist you to render a report with various output format to select from.
The available output format ranges from CSV, PDF, DocX, PS, to XML, etc.
There are two ways to render a report:
- From repository
- From workspace
Repository
From the repository, select the desired RML file and right-click on it. Select “Render…” action from the list of available actions.
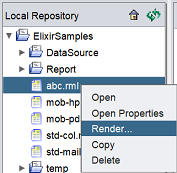
The Render Wizard will appear.
Workspace
From the workspace method, it is assumed that the RML file is opened in the workspace.
In the workspace, select the “Render…” button at the action bar.

The Render Wizard will appear.
Wizard Pages
In the Render Wizard that appear, the first page allows you to select the type of output format of the report.
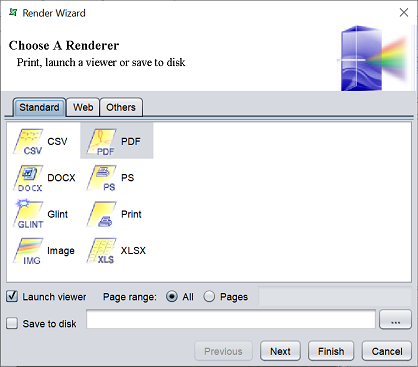
The output format are divided into three tabs, namely “Standard”, “Web” and “Others”. Each tab consists of different groups of output format.
| Fields | Description |
|---|---|
| Standard | |
| Standard formats | Available options: CSV, PDF (default), DocX, PS, Glint, Print, Image, XLSX |
| Web | |
| Web formats | Available options: HTML, HTML-Zip, SVG-Zip |
| Others | |
| Other format | Available option: XML |
| Launch viewer | If selected, launch the viewer before rendering the report output. By default, it is selected. Does not apply to Print format. |
| Page range | Defines the pages of the report to render. Available options: - All (default) - Pages If “Pages” is selected, key in the page range in the enabled textbox. |
| Save to disk | If selected, saves to report to disk defined in the textbox. By default, it is not selected. Does not apply to Print format. |
Select a desired output format from the three tabs. If a preview is desired, leave the “Launch viewer” field selected. Select the pages to render in the “Page range” field.
To save the report to disk, select the “Save to disk” field and key in the path for the report to be saved in.
Click on the “Next” button to continue. The next page will display the parameters to define for the selected output format.
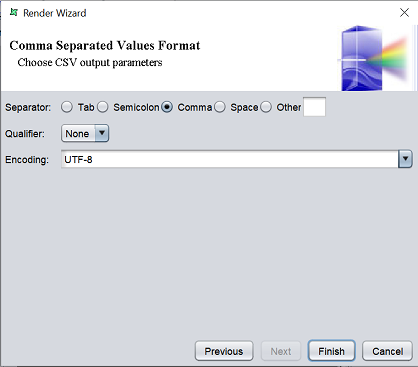
CSV Format
For Comma-Separated Values (CSV) format, the following page will appear that allows you to define the CSV output parameters.
| Fields | Description |
|---|---|
| Separator | Defines the character that separates one character from another. Available options: - Tab - Semicolon - Comma (default) - Space - Other |
| Qualifier | Defines the the start and stop of a text (e.g., a string). Available options: - None (default) - “ - ’| | Encoding | Defines the encoding method. Available options from drop-down list. Default value is ”UTF-8". |
Select the desired parameters in the three fields and click on the “Finish” button to continue. To go back to the previous pages, click in the “Previous” button.
If the “Launch viewer” is selected, the Excel application will launch and display the report.

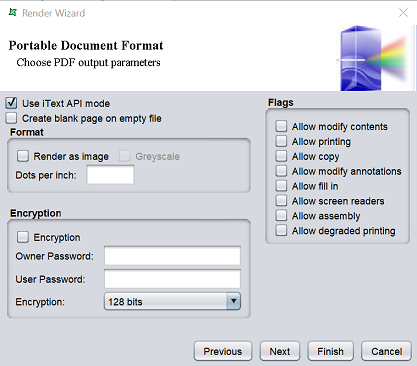
PDF Format
For Portable Document Format (PDF), the two pages will appear sequentially. One page allows you to define the PDF parameters and the other page allows you to choose the CJK font mapping file.
In the parameters page, it has the following fields.
| Fields | Description | Type |
|---|---|---|
| Use iText API mode | If selected, uses iText API mode. By default, this field is selected. |
Checkbox |
| Create blank page on empty file | If selected, creates a blank page on empty file (such as 0 bytes size). By default, it is not selected, which means 0 byte file size will fail to render an output. |
Checkbox |
| Format | ||
| Render as image | If selected, renders the PDF as page-sized image. This results in bigger file size but required no embedded fonts. |
Checkbox |
| Greyscale | If selected, image is rendered as greyscale. If “Render as image” field is not selected, this field is disabled. |
Checkbox |
| Dot per inch | Defines the number of print dots in an inch. | Textbox |
| Encryption | ||
| Encryption | If selected, enables encryption on the PDF file. By default, it is not selected (i.e., no encryption). |
Checkbox |
| Owner Password | If filled, owner must use password to open PDF. | Textbox |
| User Password | If filled, user must use password to open PDF. | Textbox |
| Encryption | Selects the encryption method. Available options: - 128 bits (default) - 40 bits If the “Encryption” field is not selected, any selection in this field is not applied. |
Drop-down list |
| Flags | ||
| Allow modify contents | If selected, allows content to be modified. By default, it is not selected. |
Checkbox |
| Allow printing | If selected, allows the PDF printed. By default, it is not selected. |
Checkbox |
| Allow copy | If selected, allows content to be copied. By default, it is not selected. |
Checkbox |
| Allow modify annotations | If selected, allows annotations to be modified. By default, it is not selected. |
Checkbox |
| Allow fill in | If selected, allows PDF fill in. By default, it is not selected. |
Checkbox |
| Allow screen readers | If selected, allows PDF to be read in readers. By default, it is not selected. |
Checkbox |
| Allow assembly | If selected, allows PDF to be assembled. By default, it is not selected. |
Checkbox |
| Allow degraded printing | If selected, allows PDF to be printed in degraded mode. By default, it is not selected. |
Checkbox |
Select the desired parameters and click on the “Next” button to continue to the CJK font maapping page.
In the CJK font maaping page, key in the path to the mapping file or click on the “…” button to browse to the mapping file.
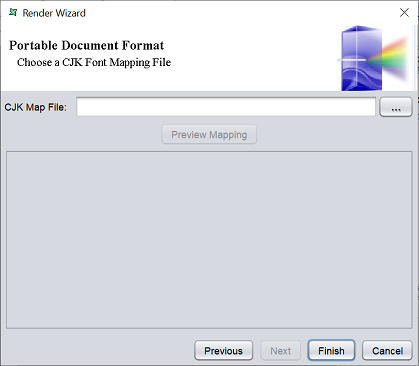
You can ignore this page if you do not need a mapping file.
Click on the “Finish” button to render the report. To go back to the previous pages, click in the “Previous” button.
If the “Launch viewer” is selected, the PDF file will open and display the report.
DocX/PS/Glint Format
For DocX, Postscript (PS) and Glint format, there are currently no output parameters. Below is an example for the DocX format.
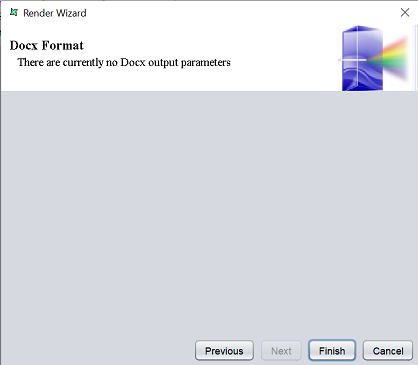
Click on the “Finish” button to render the report. To go back to the previous pages, click in the “Previous” button.
If the “Launch viewer” is selected, the DocX and Glint file will open and display the report. Below is an example for the DocX format.
For PS format, the “Launch viewer” will not display the output.
Print Format
When the print format is selected, the “Launch viewer” and “Save to disk” fields are disabled. In the next page, it has the following parameters.
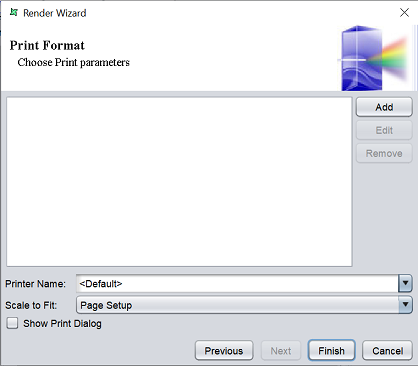
| Fields | Description |
|---|---|
| Print Attributes | List the print attributes. By default, it is empty. To add an attribute, click on the “Add” button on the right. |
| Printer Name | Selects a printer name from the dorp-down list. |
| Scale to Fit | Defines how the data is to be fit to a page. All reports have one or more pagesetup configurations which define the default page size for each section of the report. In certain special circumstances, it may be required to produce an output on a different sized paper. For example, to print a scaled copy of an A3 report on an A4 page for inclusion in an A4 binder. To achieve this, change the default value of this field to the desired paper size. |
| Show Print Dialog | If selected, displays the print dialog box when report is rendered. By default, it is not selected. |
Select the desired parameters and click on the “Finish” button to render the report. To go back to the previous pages, click in the “Previous” button.
Image Format
For image format, the following page will appear that allows you to define the image output parameters.
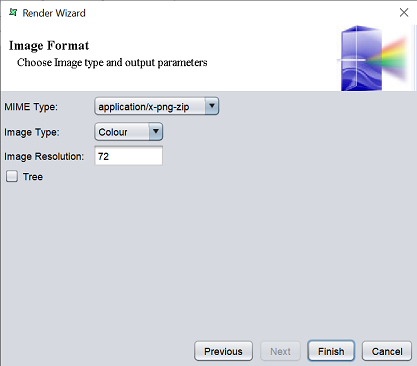
| Fields | Description |
|---|---|
| MIME Type | Selects the MIME type from the drop-down list. Available options: - application/x-bmp-zip - application/x-jpeg-zip - application/x-png-zip (default) - application/x-tiff-zip - application/x-wbmp-zip |
| Image Type | Selects the image type. Available options: - Colour (default) - Greyscale |
| Image Resolution | Defines the resolution of the image file. Default value is 72. |
| Tree | If selected, allows you to breaks the document up into multiple hyperlinked pages in a tree structure. By default, it is not selected. |
Select the desired parameters and click on the “Finish” button to render the report. To go back to the previous pages, click in the “Previous” button.
If the “Launch viewer” is selected, the image file will open and display the report.
XLSX Format
For XLSX format, the following page will appear that allows you to define the output parameters.
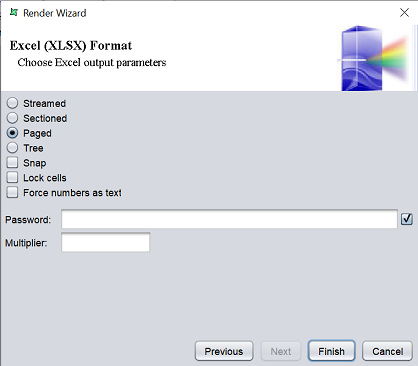
| Fields | Description |
|---|---|
| Streamed | If selected, data will be displayed on one continues worksheet in the Excel file. |
| Sectioned | If selected, each selected section is rendered on a separate worksheet in the Excel file. |
| Paged | If selected, data will be split into multiple pages (based on page setup) and displayed across multiple worksheets. When this field is not selected, no page headers or footers will be rendered. This is the default. |
| Tree | If selected, report is rendered into a tree structure, based on TOC field defined in group header properties. There should be two nested groups with the same criteria. The outer group is blank with TOC enabled, while the inner group contains the information. The outer group will be used to split so that there will be one set of data on each worksheet. The inner group will then show the header, records and footer on each worksheet. |
| Snap | If not selected, the cells are positioned exactly the same as in the report template (at least one pixel gap between two report elements). If selected, all coordinates are adjusted to fit on a 4x4 pixel grid. |
| Lock cells | If selected, locks the cell width in the Excel file. |
| Force numbers as text | If selected, allows full format of numbers to be displayed (including decimals). If not selected, numbers rendered in the output will be displayed in a whole figure format. |
| Password | Defines the password to open the Excel file. The checkbox on the right of the field hides the password when selected. To view the password, unselect the checkbox at the right of the field. |
| Multiplier | Defines the setting of cell width scale of output. Allows lengthy words to be displayed fully, larger multiplier value is advised. |
Select the desired parameters and click on the “Finish” button to render the report. To go back to the previous pages, click in the “Previous” button.
If the “Launch viewer” is selected, the image file will open and display the report.

HTML Format
For HTML format, the following page will appear that allows you to show or hide the header parameter.
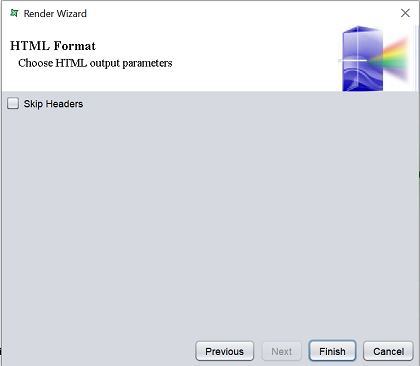
The “Skip Headers” field by default is not selected, which shows the headers in the HTML output file. To hide the headers, select the “Skip Headers” field. It will removes all HTML headers so that rendered content can be more easily inserted into an existing portal or framework.
Select the parameter as required and click on the “Finish” button to render the report. To go back to the previous pages, click in the “Previous” button.
If the “Launch viewer” is selected, the HTML file will open and display the report.
HTML-Zip Format
For HTML-Zip format, the following page will appear that allows you to define the output parameters.

| Fields | Description |
|---|---|
| Streamed | If selected, data will be displayed on one continues HTML file. |
| Sectioned | If selected, report is rendered as multiple HTML files, with each page showing a section. |
| Paged | If selected, report is rendered into multiple HTML files, with each page showing a page header and footer. This is the default. |
| Tree | If selected, report is rendered into a tree structure, based on TOC field defined in group header properties. The first level will show the root, along with the names of the groups (defined by TOC). Clicking on a group will drill down to the next layer in the tree. |
| SVG Pass-Through | If selected, will not convert SVG graphics to images, but embed SVG into HTML. THis results in smaller, higher-quality output if the browser supports SVG. |
| Skip Headers | If selected, removes all HTML headers so that rendered content can be more easily inserted into an existing portal or framework. |
| Highlight Background Normal Background |
Defines the colours to be used to create hover effects as the mouse moves over a clickable group, to highlight that an action can be performed. These fields are enabled only when “Tree” field is selected. |
There are two ways to define the colour for the “Highlight Background” and “Normal Background” fields:
- Key in a colour value in the textbox
- Select a colour using the colour picker
To key in a colour value, any colour value that is understand by HTML can be used.
To use a colour picker, click in the “…” button on the right of the field. A colour picker dialog box will appear.
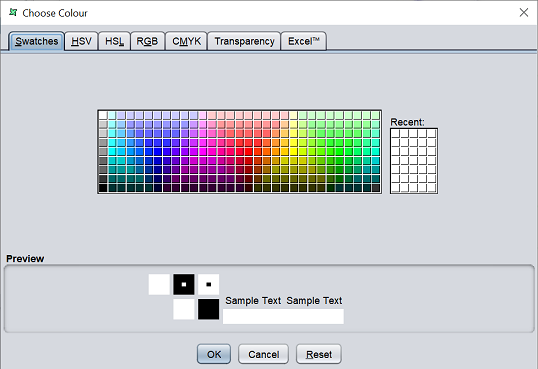
Select the desired colour from the various tabs and “Preview” panel at the bottom of the dialog box will display the colour selected.
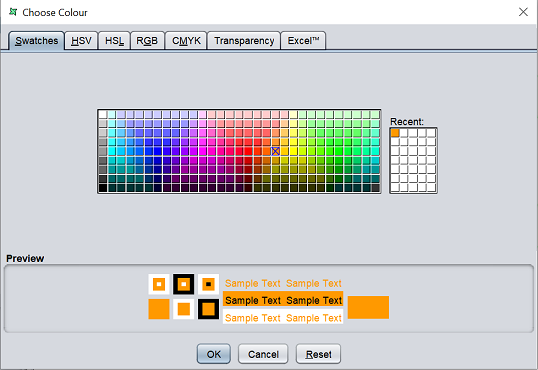
The transparency of the selected colour can be defined in the “Transparency” tab. The default value is 100%.
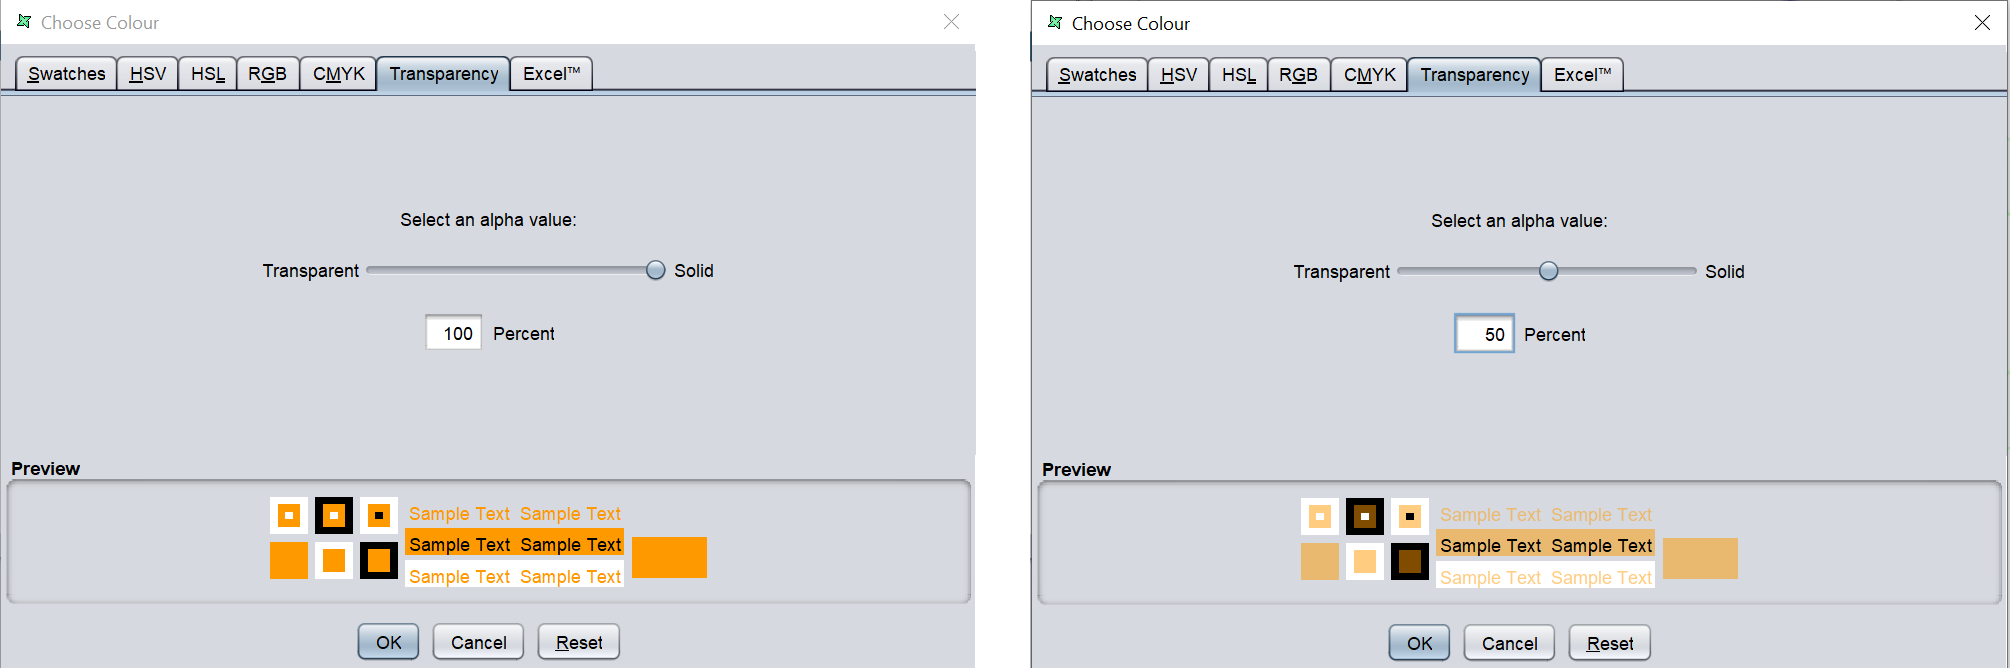
To remove the colour selected, click on the “Reset” button. After all settings are done, click on the “OK” button to confirm the colour.
If the “Launch viewer” is selected, the file explorer will open to display the zip file containing all supporting images and files.
SVG-Zip Format
For Scalable Vector Graphics (SVG)-Zip format, there are currently no output parameters.
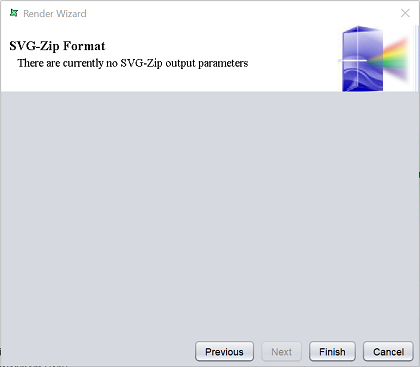
Simply click on the “Finish” button to render the report.
If the “Launch viewer” is selected, the file explorer will open to display the zip file containing all supporting images and files.
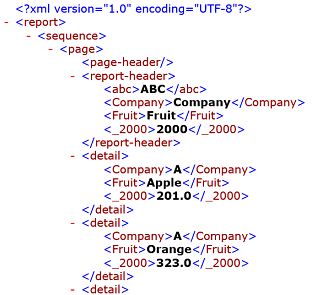
XML Format
For Extensible Markup Language (XML) format, the following page will appear that allows you to define the output parameters.
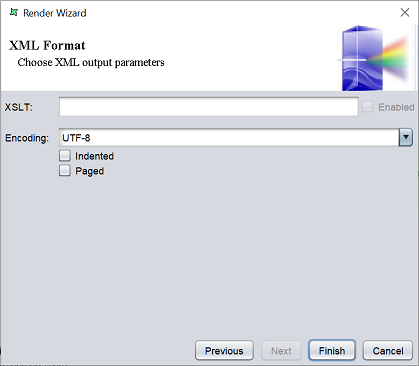
| Fields | Description |
|---|---|
| XSLT | Defines the XSL file to be used. |
| Enabled | When selected, enables the XSL file and disables the “Encoding” field. By default this field is disabled. It is enabled only when a XSL file is defined in the “XSLT” field. |
| Encoding | Defines the encoding method from the drop-down list. |
| Indented | If selected, the output is indented. By default, it is not selected. |
| Paged | If selected, the output is paged, else the output is streamed. By default, it is not selected. |
Define the parameters as required and click on the “Finish” button to render the report.
If the “Launch viewer” is selected, the file explorer will open to display the zip file containing all supporting images and files.