Editing Rules
Editing rules defines the policies and configurations that control how metadata can be changed and under what conditions. These rules ensure that metadata is updated in a controlled, secure and consistent manner, supporting data governance and integrity.

Add Editing Rule
To add an editing rule, click on the “Add” button at the upper right corner of the page.

The “Add Editing Rule” dialog box will appear.
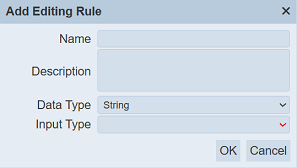
| Field | Description | Mandatory | Constraint | Default |
|---|---|---|---|---|
| Name | Unique name assigned to the editing rule. | Y | Any text (case-sensitive) | Empty |
| Description | Brief description of the rule. | N | Any text | Empty |
| Data Type | Selects the data type. | Y | Selects from drop-down list | “String” |
| Input Type (Varies) | Selects the input format or range of the data type. Available options depends on data type selected. |
Y | Vary | Vary |
Key in a unique name for the new editing rule in the “Name” field. Provide a brief description in the “Description” field.
In the “Data Type” field, select the desired option from the drop-down list. Depending on the option selected, the next field “Input Type” may change.
Below are some examples.

Select the desired options in these fields from their respective drop-down list or key in the desired value.
Click on the “OK” button to save the rule. To abort, click on the “Cancel” button.
If the name is not provided or the name already exist, the relevant error message will appear.


The rule once added successfully, it will appear in the Editing page.
Edit Editing
To edit a editing rule, click on the name of the desired rule under the “Name” column.
The “Edit Editing Rule” dialog box will appear.
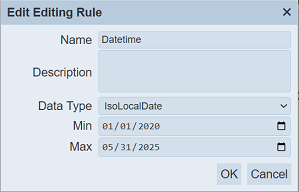
Edit as desired and click on the “OK” button to save the changes.
If you are not the owner of the rule, you can only view the details of the rule.
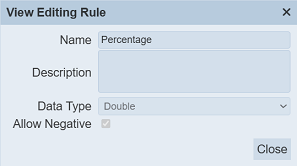
To close the dialog box, click on the “Close” button.
Delete Editing Rule
To delete a editing rule, click on the  “Edit” icon under the “Actions” column corresponding the desired rule.
![]()
There is an option to undo the deletion. A notification with an “Undo” button appears right after clicking on the “Delete” icon.

Do note that if you are not the owner of the rule, the  icon will not appear.
Upload
To upload one or more editing rules, click on the “Upload” button at the upper right corner of the page.

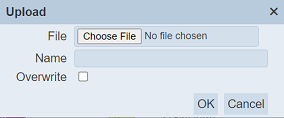
The “Upload” dialog box will appear.
Single File
Browse to the location of the rule JSON (.json) file to be uploaded and key in an unique name in the “Name” field. If no file is selected or the name already exist, the relevant error message will appear.


If the rule to be uploaded is to replace an existing rule, select the “Overwrite” field. Click on the “OK” button to upload the rule. Click on the “Cancel” button to aborts the action.
Upon successful uploading, a message will appear.

Zip File
Browse to the location of the zip file to be uploaded. The name of the rules will be extracted from the zip file. Click on the “OK” button to upload the rules. The “Upload Results” dialog box will display the results of the uploading.

Those results in black are uploaded successfully while those in red indicates upload failures with their relevant messages. Click on the “Close” button to close the dialog box.
More Actions
This feature allows user to perform actions on multiple rules at the same time.
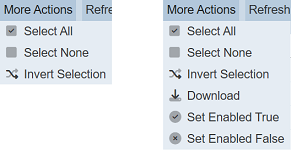
When the “More Actions” button located at the upper right corner of the page is clicked, a list of available actions are displayed.

If no rule is selected prior clicking the button, there will be fewer actions available. To select a rule, select the checkbox next to the name of the rule.
| Option | Description |
|---|---|
| Select All | Selects all rules in the list. |
| Select None | Unselects all rules. |
| Invert Selection | Inverts the current selection. That is, any rules selected will be unselected and vice versa. |
| Download | Downloads multiple rules as a zip file. If only one rule is selected, the selected rule will be downloaded as a JSON file. |
| Set Enabled True | When selected, sets the selected rules to enable. |
| Set Enabled False | When selected, sets the selected rules to disable. |
Download
To download the selected rules, click on the “More Actions” button and select the “Download” option.
If only one rule is selected, the downloaded rule has a filename of <filename>.editing-rule.json.
If more than one rule are selected prior, the “Download” dialog box will appear.

Key in the desired name for the zip file and click on the “OK” button. The selected rules will be downloaded as a zip file with the filename provided earlier. The individual rule in the zip file will have the filename format as mentioned above.
Set Enabled True / False
To enable or disable the rules, click on the “More Actions” button and select the “Set Enabled True” or “Set Enabled False” option respectively.
The selected rules will be enabled or disabled as selected.
An enabled rule is represented with a green tick under the “Enabled” column, while a disabled rule is represented with a red cross.
Refresh
After performing actions on the browser/tab, the list is reloaded to display the editing rules. The manual “Refresh” button is available and is particularly useful if there are others making changes on the same page.
The “Refresh” button is found on the upper right corner of the page. Clicking on it reloads the list.

Search
The search bar appears on the upper left corner of the page.

This provides an easy way to search through the list. It is case-insensitive and displays records that have the entered search value in any of the values of the fields below:
- Name
- Description
- Data Type
- Owner
- Last Modified
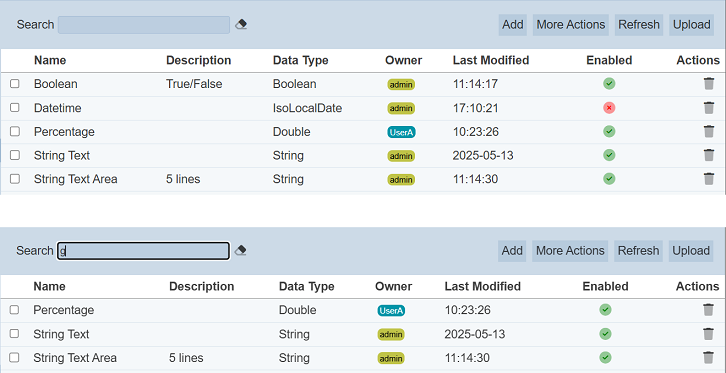
Alternatively, you can click on the any owner under the “Owner” column to aid the search for the rules in the page.
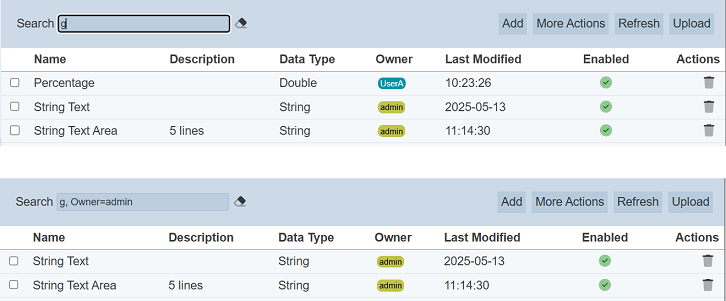
In the example above, rule that contains the letter “g” and owner “admin” is shown.
These two search methods can be combined together, with each criteria separated by a comma.
