Checklist Example
Below is an example of a simple checklist that request for some financial information. The checklist basically acquires two different types of information:
- Personal information (such as, name, age range, gender)
- Property ownership information
Create Checklist
In the Checklist management page, create a new checklist.
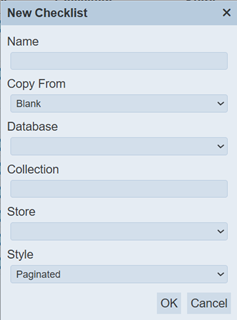
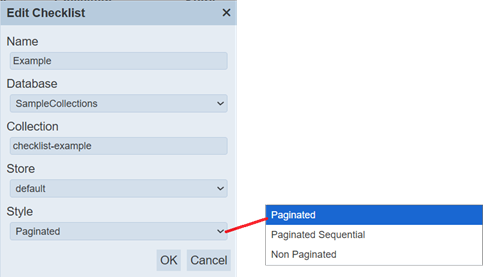
Provide a unique and meaningful name for the checklist and select the appropriate database collection and store. Select the option Pagination for the “Style” field. We can change this option later.
Click on the “OK” button to save the new checklist.
Design Checklist
Personal Information
In the Designer page, the Wizard dialog box will appear.
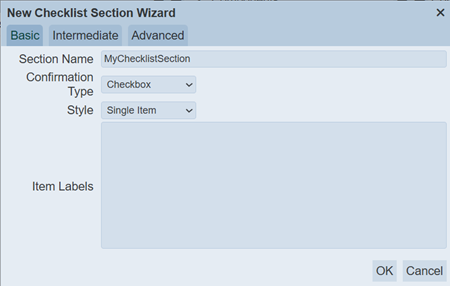
We can use this dialog box to create the personal information checklist section. In the dialog box, select “Advanced” tab and set up as in the screenshot below for the name information.
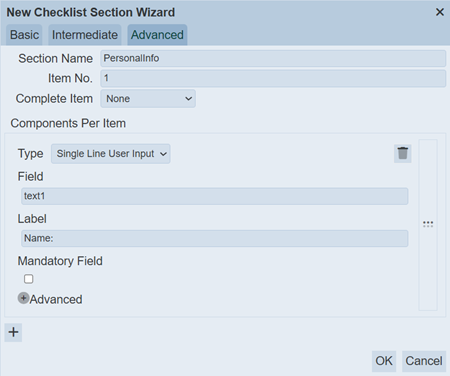
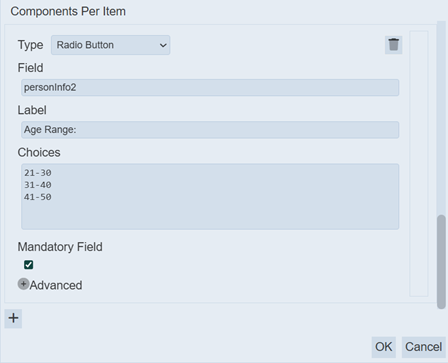
Click on the “+” icon at the bottom left of the dialog box to add a new component. Set up as in the screenshot below for the age range information.
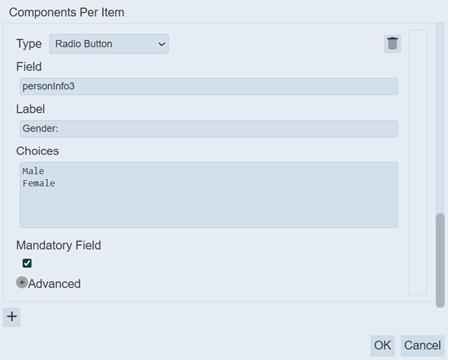
Add another component as per screenshot below for gender information.
Click on the “OK” button to save the settings.
The Designer page will display the checklist, items and components set earlier.
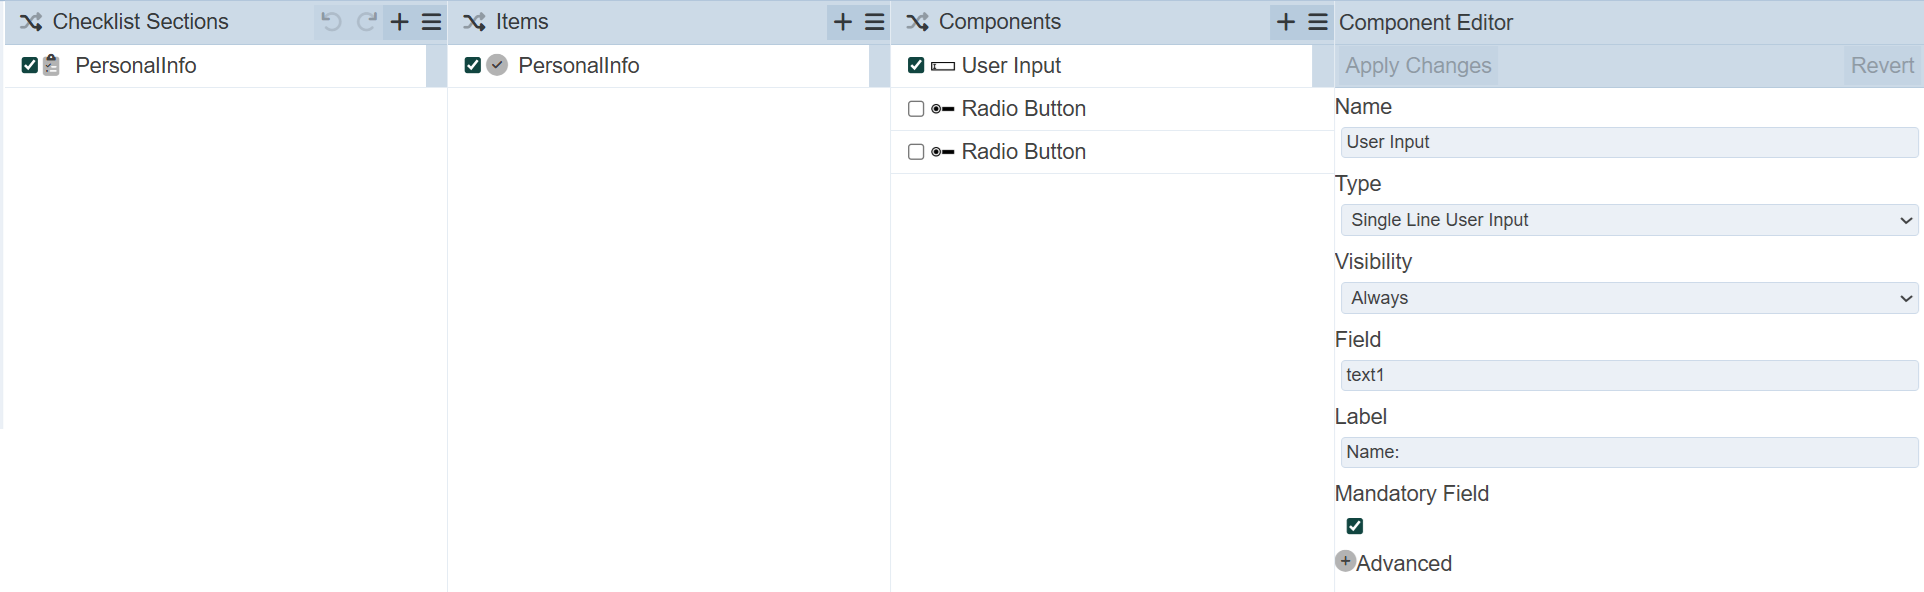
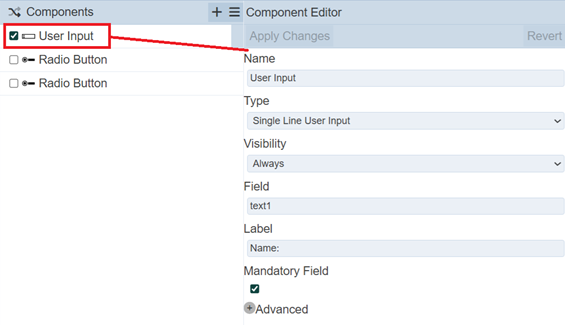
Fine tune the components in the Components Editor panel.
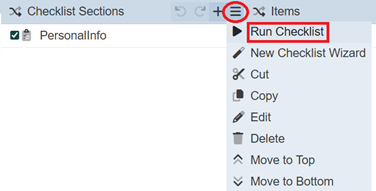
You can run the checklist to check your input. To do so, click on the “More Actions” icon at the top of the Checklist panel and select the “Run Checklist” option.
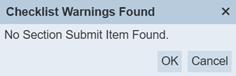
Click on the “OK” button if any dialog box that may appear. In this case, a dialog box will appear as we have not include “Submit” in this checklist.
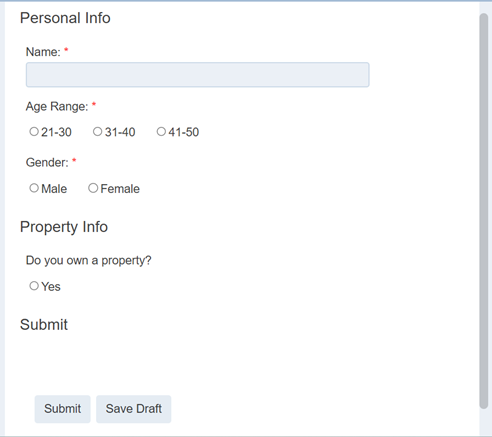
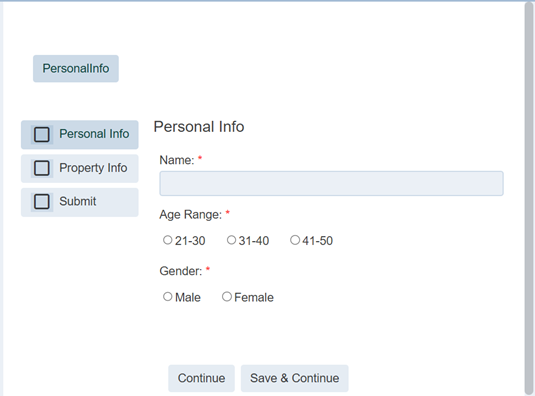
The checklist will appear in another browser tab.
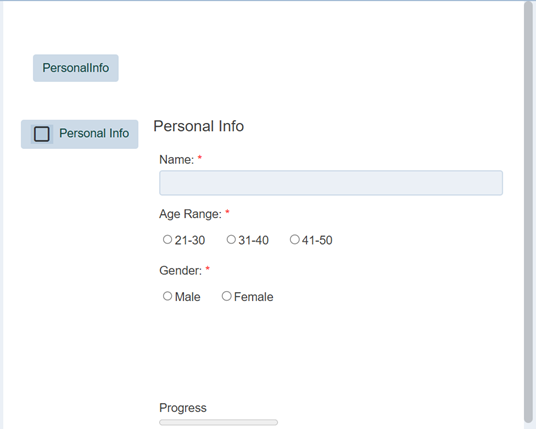
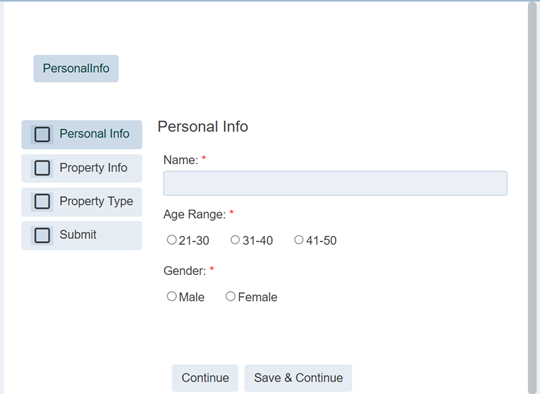
This checklist is for the personal information only.
Property Information
In this example, the Property Information acquires three information:
- Own a property or not
- Type of property
- Mortgage status
Two checklists are required for the above. One checklist acquire if the person owns a property. Other checklist for the property type and mortgage status. The latter checklist will appear only if the person owns a property.
First Property Checklist
To add a checklist, we can either use the Wizard or the Add Checklist option under the “More Actions” icon in the Checklist panel.
In this case, lets use the Add Checklist option. To do so, in the Checklist panel, click on the “More Actions” icon and select the Add Checklist option.
The “Add Checklist Section” dialog box will appear.
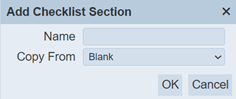
Key in the appropriate name for the checklist and select “Check” in the “Type” field. Click on the “OK” button to save the checklist.
Using this method, only an empty checklist is created, with no items or components.
To add an item to the checklist, click on the “+” icon in the Items panel. The “Add Item” dialog box will appear.
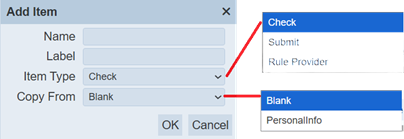
Provide an unique name for the item and select the option “Check” in the “Item Type” field. Select the “Blank” option in the “Copy From” field. Click on the “OK” button to save the item.
To add a component click on the “+” icon under the Components panel. The “Add Component” dialog box will appear.
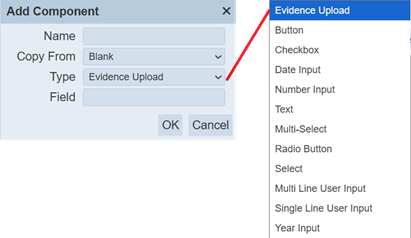
Provide a meaningful name for the component in the “Name” field. Select “RadioButton” in the “Type” field. Click on the “OK” button to save the component.
In the Components Editor panel, setup as in the screenshot.
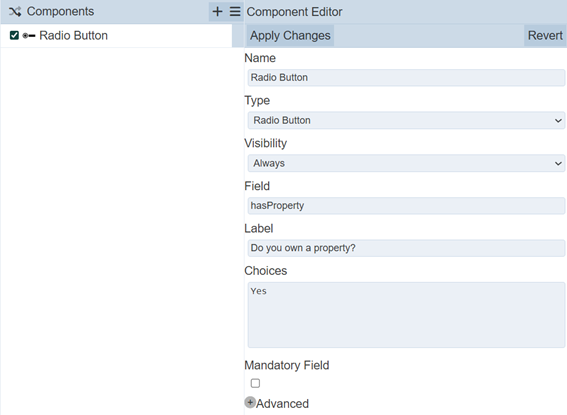
Click on the “Apply Changes” button at the top of the Component Editor panel.
Second Property Checklist
Add another checklist for the second property checklist. Add an item to the checklist and two components to the item.
Set up the components in the Component Editor panel as in the screenshots.
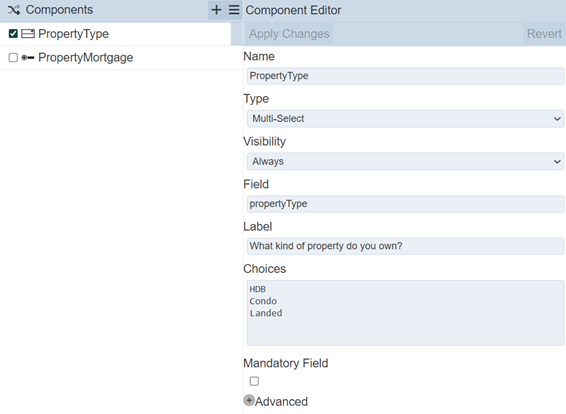
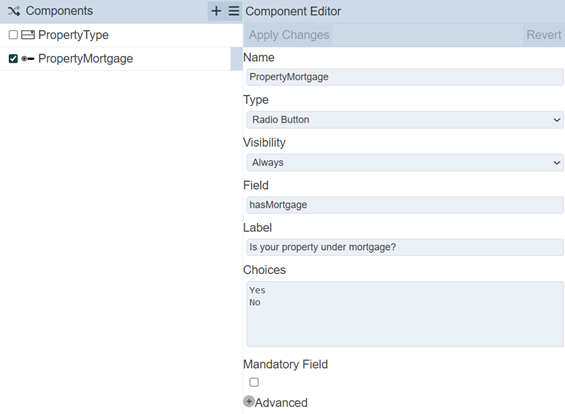
Do click on the “Apply Changes” button to save the edits.
Submit
The last checklist section is the “Submit” section. This is required to allows the information entered and selected to be added to the database.
Add a new checklist section and name it as “Submit”. Add an item to the section and select “Submit” as option for “Item Type” field. Clock on the “OK” button to save the item.
No component is required.
Section Rules
The Section Rules allows user to show/hide checklist sections according to the conditions setup.
In this example, the second property checklist should remain hidden during initial launch of the checklist and when the person does not own a property.
To see the effect of the section rules, run the checklist prior setting up the section rules.
All checklist sections appear in the checklist.
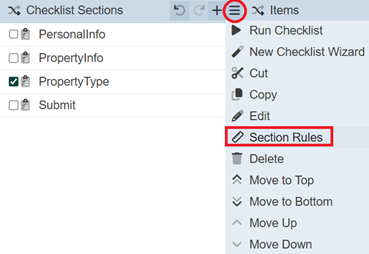
To setup the Section Rule, select the second property checklist section and click on the “More Actions” icon under the Checklist Section panel. Select the “Section Rules” option in the drop-down list.
The “Section Rules” dialog box will appear.
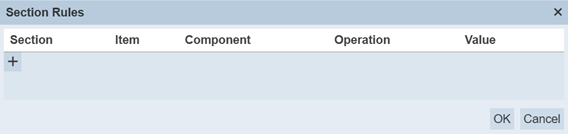
To add a new rule. click on the “+” icon in the dialog box. A new line will appear.
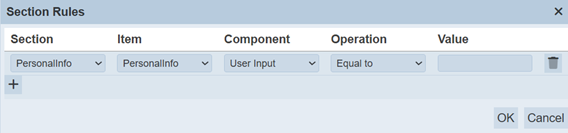
Select the first property checklist and key in the desired value in the “Value” field. In this case, “Yes” is entered.
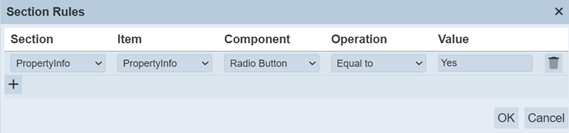
Click on the “OK” button to save the new rule.
Try running the checklist to see the effect of this rule.
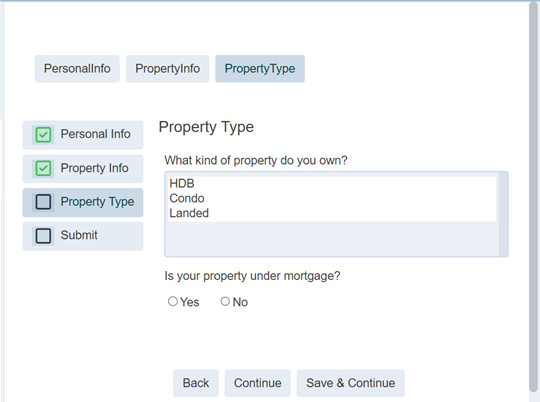
The Property Type section is hidden.
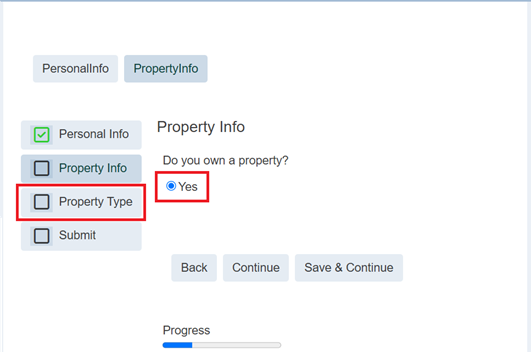
When the “Yes” radio button is selected and the “Save & Continue” button is clicked, only then the Property Type section will appear.
The checklist is now completed with section rules.
Run Checklist
There are two ways to run a checklist. One first method is by using the “Run Checklist” option in the More Actions“ icon in the Designer page as you have ran in ths example. The second method is by using the ”Run“ icon under the ”Actions" column in the Management page.
In the management page, click on the “Run” icon under the “Actions” column corresponding the checklist.

The checklist will appear in another tab.
This checklist is currently using the “Pagination” option as selected prior. This can be changed in the management page.
In the management page, click on the “Edit” icon under the “Actions” column corresponding the checklist. The “Edit Checklist” dialog box will appear.
In the “Type” field, change the option to Non Paginated.
Click on the “Run” icon under the “Actions” column corresponding the checklist to see the effect of the change.