Groups
The Groups tab allows users to manage the groups created.
A group represents a collection of pages which will eventually by published to a CMS web site from a snapshot. It also states which page is the home page.

Only owner of the group can access them.
Module Interface
| Interface | Description | Required Privilege |
|---|---|---|
| CMS | Allows access to CMS management page. | mod-cms-management |
| CMS Designer | Allows access to CMS Designer page. | mod-cms-designer |
| CMS Designer | Allow to edit CMS Groups, Page, Template and Resources. | mod-cms-designer-edit |
Add Group
This function allows you to add a new group.
To do so, click on the “Add” button at the upper right corner of the page.

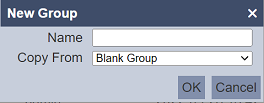
The “New Group” dialog box will appear.

| Field | Description | Input Type | Default Value |
|---|---|---|---|
| Name | Unique name of template. | Text field | Empty |
| Copy From | Indicates what template the new group would be based on. Selecting “Blank Group” results in using a blank canvass as a starting point. Selecting an existing group would result in having the selected group as the starting point. |
Drop-down list | “Blank Group” |
Key in a unique name for the new group in the “Name” field.
Select either copy from a blank group or an existing group. Note that in copying another group, any change made to the group in the “Copy From” would not be applied to the new group after its creation. Copying does not link any of the groups.
Click on the “OK” button to create the new template.
If the name already exist, an error message will appear.

Upload Group
This function allows you to upload a group file (JSON) onto the Groups tab.
Click on the “Upload” button at the upper right corner of the page.

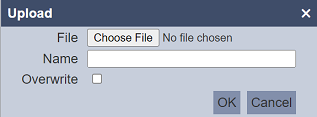
The “Upload” panel will appear.

Browse to the location of the desired group file. The filename of the selected file will appear in the “Name” field. If the name is not desired, change to an appropriate name.
Click on the “OK” button to upload the file. To abort, click on the “Cancel” button. Upon successfully uploading, a message will appear.

If the wrong file is selected or it is not a JSON file, an error message will appear.

If the name already exist, an error message will appear.

To overwrite the existing file, select the “Overwrite” field in the dialog box, then click on the “OK” button to upload the file.
Import Group
This function allows you to import a file with contents of a group. The file must be a zip file.
To imprt a file, click on the “Import” button at the upper right corner of the page.

A “Import” dialog box will appear.

Browse to the location of the zip file and click on the “OK” button to import the file.
If the selected is not a zip file or if the content is incorrect, an error message will appear.

Upon successful importing the zip file, a message will appear.

If the name of the group already exist, the imported group will have the name with a suffix (X) where X is a number. For example, a group with the name myGroup already exist. A group with the same name myGroup is imported. the newly imported group will have the name myGroup(1). The next group with the same name being imported will have the name myGroup(2).
Edit Group
This function allows you to edit the properties and roles of the group.
Click on the  “Edit” icon under the “Actions” column corresponding the desired group.
![]()
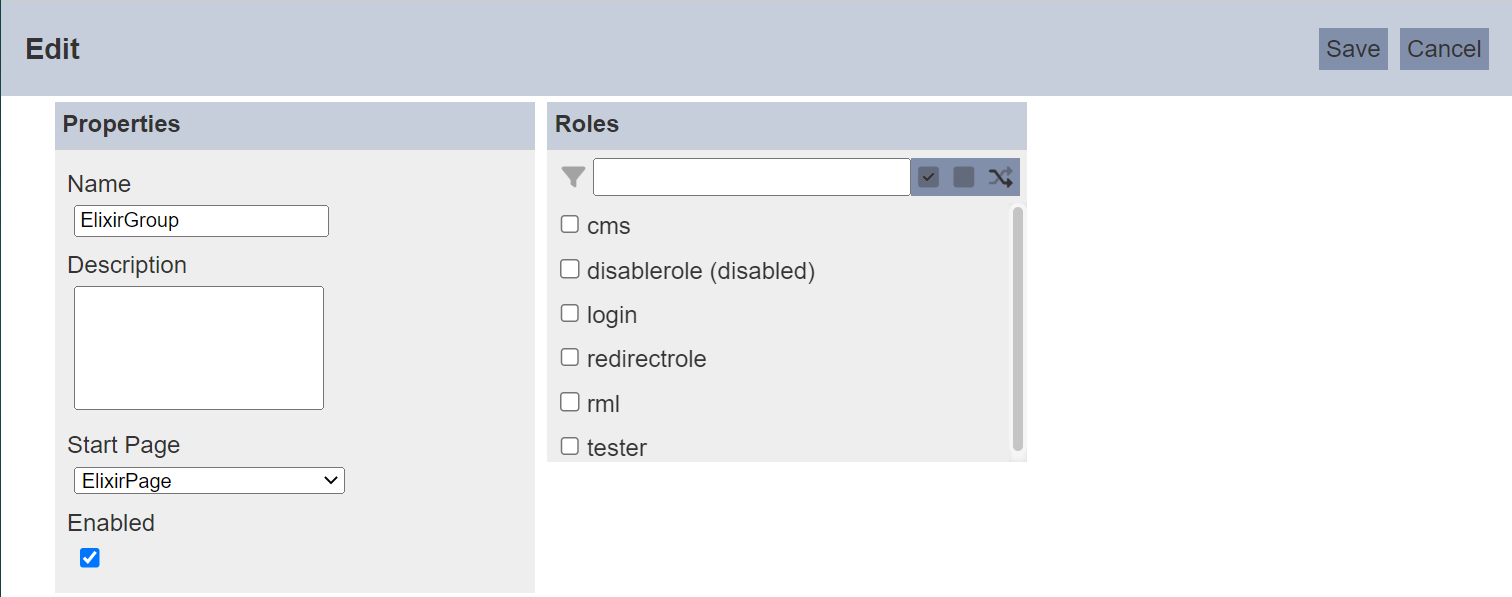
The “Edit” panel will appear.

| Field | Description | Input Type | Default Value |
|---|---|---|---|
| Properties | |||
| Name | Unique name of the group. | Text field | As per defined |
| Description | Brief description of the group. | Text field | Empty |
| Start Page | Selects the starting page of the group. | Drop-down list | Not selected |
| Enabled | If selected, this group will be enabled. | Checkbox | Selected |
| Roles | |||
| Roles | List of roles that are granted access to the group. | Checkboxes | Not selected |
In the “Properties” section, you can edit the properties of the group. Make sure the name of the group is unique. You can also enable or disable the group.
In the “Roles” panel, you can select or deselect the roles that are allowed to access the group. Alternatively, you can search for the role by using the search function at the top of the section. There are options to select all, select none and invert selection by clicking on their respective icons next to the search function.
Preview Group
This function allows you to preview the group content. To do so, click on the ![]() “Preview” icon under the “Actions” column corresponding the desired group.
“Preview” icon under the “Actions” column corresponding the desired group.
![]()
The group content will be displayed in another windows tab.
Download Group
This function allows you to download the selected group.
To do so, click on the  “Download” icon under the “Actions” column corresponding the desired group.
![]()
The downloaded file will have the following file format:
<filename>.cms-group.json
Export Group
This function allows you to export the group.
To do so, click on the ![]() “Export” icon under the “Actions” column corresponding the desired group. The exported file is a zip file (e.g.,
“Export” icon under the “Actions” column corresponding the desired group. The exported file is a zip file (e.g., export-<Name of Group>.zip). It contains the metadata of the group, including details of the page in JSON format.
Delete Group
This function allows you to delete a group.
To delete a group, click on the  “Delete” icon under the “Actions” column corresponding the desired group.
![]()
There is an option to undo the deletion. A notification with an “Undo” button appears right after clicking on the “Delete” icon.

Upon clicking on the “Undo” button, the deleted group is restored and is added back to the list of groups.
Refresh
After performing actions on the browser/tab, the list is reloaded to display the list of groups. The manual “Refresh” button is available and is particularly useful if you have opened multiple pages and are making changes.
The “Refresh” button is found on the upper right corner of the page. Clicking on it reloads the list of groups.

Search
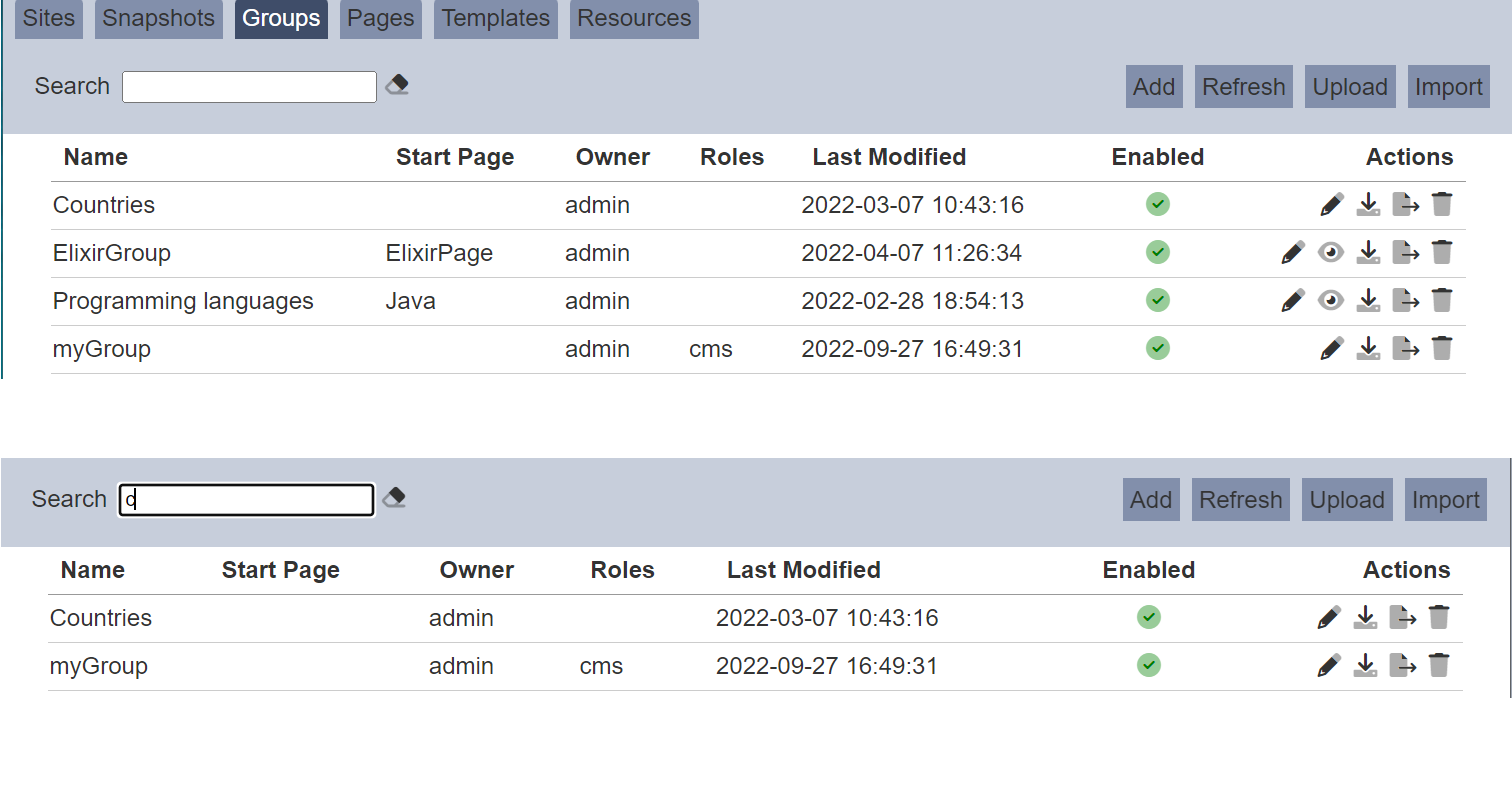
There is a cross-field search function for the list of groups. It is located at the upper left corner of the page.

This provides an easy way to search through the list of groups. It is case-insensitive and display groups that have the entered search value in any of the values of the fields below:
- Name
- Start Page
- Owner
- Roles
- Last Modified

