
Form with Sidebar
In this example, a form is created with a sidebar using script.
It consists of several parts and involves the Forms, Workflow and ETL modules.
- Create form
- Create ETL
- Create workflow
Create Form
In the Forms module, create a new form with three pages in the following hierarchy:
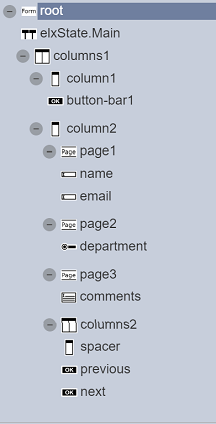
The form should look like this.
Add Script
In the “After Build Script” property of the Root component, enter the following scriptto add a bit os styling to the sidebar.
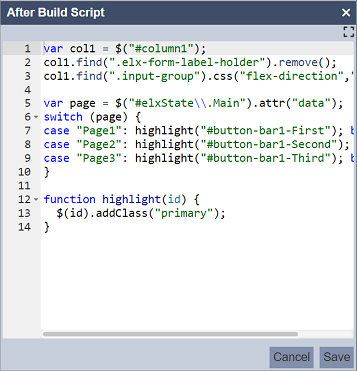
var col1 = $("#column1");
col1.find(".elx-form-label-holder").remove();
col1.find(".input-group").css("flex-direction","column");

var page = $("#elxState\\.Main").attr("data");
switch(page){
    case "Page1": highlight("#button-bar1-First"); break;
    case "Page2": highlight("#button-bar1-Second"); break;
    case "Page3": highlight("#button-bar1-Third"); break;
}

function highlight(id) {
    $(id).addClass("primary");
}
The first part is to configure the sidebar so all the buttons are the correct width. the second part is to add the “primary” class to the urrent selected page, so we jnow where we are. More elaborate styling can be added if desired.
Setup Rule
In the “Rules” tab, create three rules, namely “Page1”, “Page2” and “Page3”.
Page1
Setup the “Page1” rule as per the screenshot below.
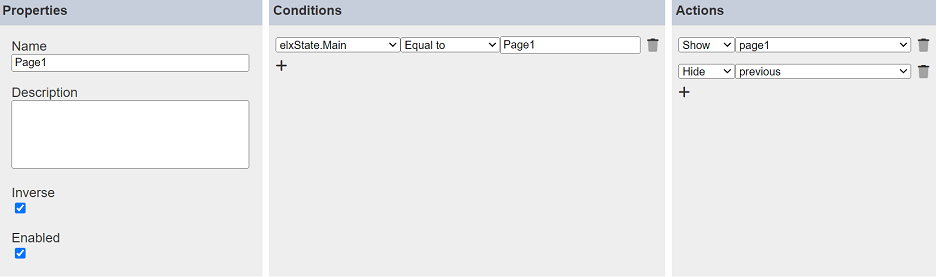
Note that the “Inverse” field is selected. Setup the “Actions” panel to show only Page 1 and hides the “Previous” button when the workflow state is “Page1”.
Page2
Setup the “Page2” rule as per the screenshot below.

Note that the “Inverse” field is selected. Setup the “Actions” panel to show only Page 2 when the workflow state is “Page 2”.
Page3
Setup the “Page3” rule as per the screenshot below.
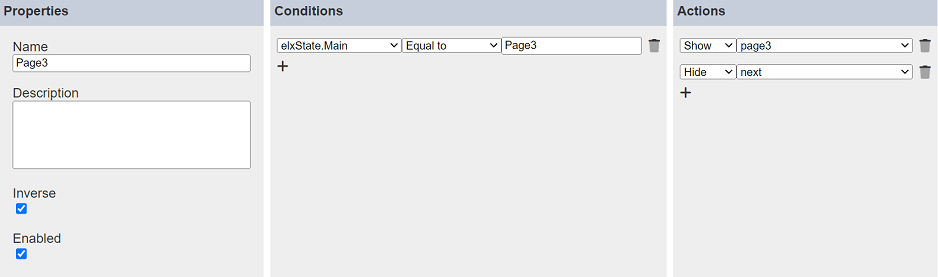
Note that the “Inverse” field is selected. The setup in the “Actions” panel shows Page 3 and hides the “Next” button when the workflow state is “Page3”.
Create ETL
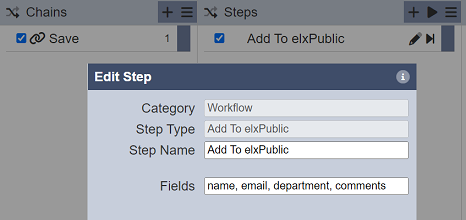
In the ETL module, create an ETL chainset as per the screenshot below.
Create Workflow
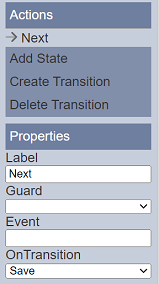
In the Workflow module, create a workflow as per the screenshot below that uses the ETL chainset create above.

For all “Next” and “Previous” transitions, set the “OnTransition” to “Save”.
Run Form
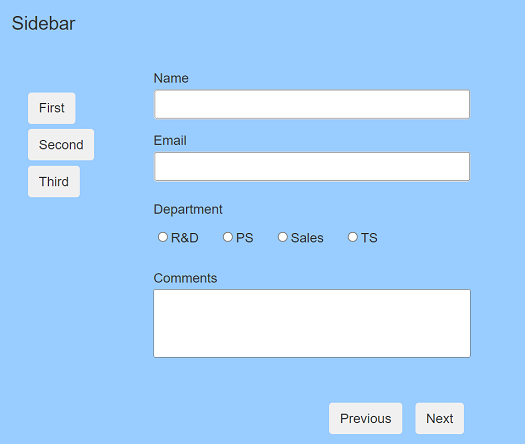
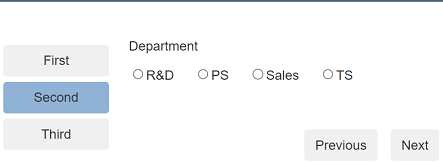
Run the form with the workflow created above. The form will display the sidebar on the left, highlighting the “First” button and “Page1” on the right.
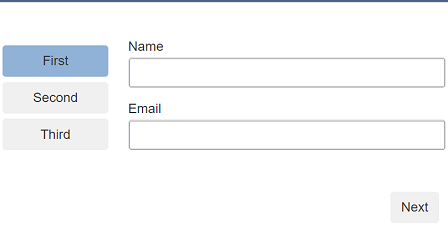
To go to the “Page 2”, either click on the “Second” button on the sidebar or click on the “Next” button at the bottom right of “Page 1” in the form.
To go back to “Page 1” of the form, either click on the “First” button on the sidebar or click on the “Previous” button in the page. “Page 3” of the form can be accessed using the same method.
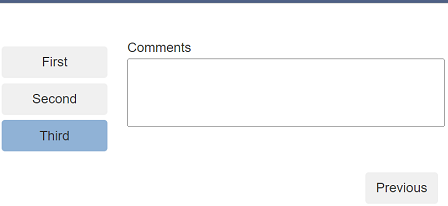
You may have noticed that the “Previous” button is hidden in Page 1 and the “Next” button is hidden in Page 3. These are according to the rules created in the form.