
Barcode
The  Barcode element allows you to add a barcode onto the report.
A barcode is a series of vertical black and white strips that are read by a barcode scanner. The vertical black and white lines can contain product information, such as price, weight and size. Once it has been scanned, the barcode is translated and often printed out onto a receipt.
There are different types of barcode known as barcode symbologies. Some symbologies are generic, others are designed for the unique needs of a specific industry.
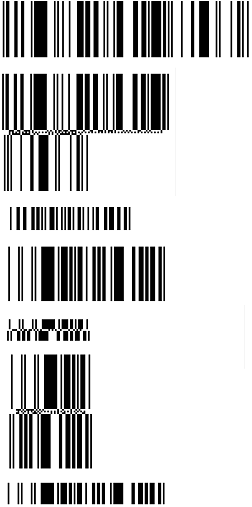
Barcode Types
There are many different types of barcode.
Barcode 2D
This is a matrix code that look like squares or rectangles that contain many small, individual dots.
Available options:
- Aztec
- Data Matrix
- PDF417
- QR Code
Aztec Code
Aztec code is built on a square grid with a bulls-eye pattern at its centre for locating the code.

Data is encoded in concentric square rings around the bulls-eye pattern. The bulls-eye is 9x9 or 13x13 pixels and one row of pixels around that encodes basic coding parameters, producing a “core” of 11x11 or 15x15 squares. Data is added in “layers”, each one containing two rings of pixels, giving a total sizes of 15x5, 19x19, 23x23, etc.
Data Matrix
Data Matrix barcode consists of black and white cells or dots arranged in either a square or rectangle pattern, also known as a matrix.

The information encoded can be text or numeric data.
PDF417
PDF417 barcode is a stacked linear barcode format. “417” signifies that each pattern in the code consists of four bars and space in a pattern that is 17 units (modules) long.

It is commonly used in transport, ID cards and inventory management.
QR Code
Quick Response (QR) code is a matrix code (or 2-dimensional barcode) created to allow contents to be decoded at high speed.

Code 128
This is a versatile, high-density, variable-length barcode that accommodates letters, number and a variety of other ASCII characters.

This type of barcode is widely used by shipping industry. This is the default selection.
Code 25
This is a simple, variable length symbology that includes numbers 0-9 and an optional check digit.
Available options: * Interleaved Code 25 * Interleaved Code 25: 2 to 1

Interleaved Code 25 is a special type of Code 25 that is self-checking and it is very compact so it does not need as much space as simple Code 25.
Code 25 is widely used for inventory and warehousing purposes and is commonly found on photo finishing envelopes, airline tickets, baggage tags, shipping label, etc.
Code 39
This is an alphanumeric code.
Available options:
- Code 39 (default)
- Code 39: 2 to 1
- Extended Code 39
- Extended Code 39: 2 to 1

Extended Code 39 is an extended version of Code 39 that includes the ASCII character set. So with this Extended Code 39, you can also code the 26 lower characters (a-z) and the special characters you have on your keyboard.
Code 39 is used in video rental stores, ID cards and labels.
EAN
European Article Numbering (EAN) barcode is used mainly in European countries.
Available options:
- EAN13 (default)
- EAN8

EAN-8 is a short form of EAN-13. This code is only used if the article is too short for the EAN-13 code. These barcodes are primarily used for marking retail items, although it can also be used for in-house applications.
GSI DataBar
These barcode family consists of seven symbols in total.
Available options:
- Expanded
- Expanded Stacked
- Limited
- Omnidirectional
- Stacked
- Stacked Omnidirectional
- Truncated
Databar are often used to label fresh foods. These barcode can hold information like an item’s batch number or expiry data, in addition to other attributes used at the point-of-sale such as the item weight.
The omnidirectional types and expanded types are intended for retail point-of-sale scanning, while the other three types are not intended for that use.
Others
When selected, several options are available.
Available options:
- Codebar
- MSI
- RM4SCC
Codebar
Codebar is a discrete general-purpose barcode with a symbology that accommodates numbers and six other frequently used characters.
It is extremely reliable, easy to scan and highly tolerant of minor printing imperfections. Therefore, it is ideal for information processing and is used by retail trader for price labelling, libraries, blood banks (labelling blood bags), photo finishing labs, overnight shippers, military supply systems and many others.
MSI
Modified Plessey (MSI) code display only numbers 0-9 of fixed length. It is primarily used to mark retail shelves forinventory control, tracking publication, coding ID cards, etc.
RM4SCC
Royal Mail 4-State Customer Code (RM4SCC) is created for automated mail sorting processes.

It usually encodes a postcode, Delivery Point Suffix (DPS), as well as a checksum character. There are strict guidelines governing the usage of these barcodes, which allow maximum readability by machines.
UPC
Universal Product Code (UPC) is a numeric code which is able to display digits 0-9. Each character consists of two lines and two spaces.
Available options:
- UPC-A (default)
- UPC-E
UPA-A code is a standard version of the UPC code and has 12 digits.

It is also known as UPC 12 and is very similar to EAN code.
UPC-E is a very short version with 8 digits, always starting with a zero.

These barcode are widely used worldwide to track trade items (such as CDs, grocery items, magazines, etc.) in stores.
Add Barcode
To add a barcode into the report, select the “Barcode” button and click onto the location in the report where the barcode is to be placed. A “Barcode Wizard” will appear.
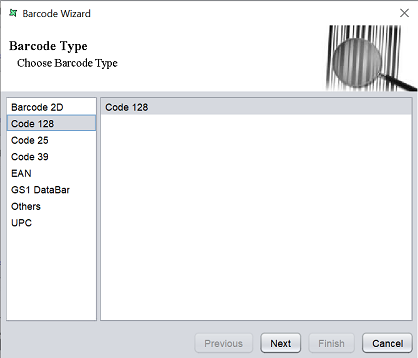
In the “Barcode Wizard”, the first page allows you to select the type of barcode to use. By default, Code 128 is selected. Select the desired type and click on the “Next” button to continue.
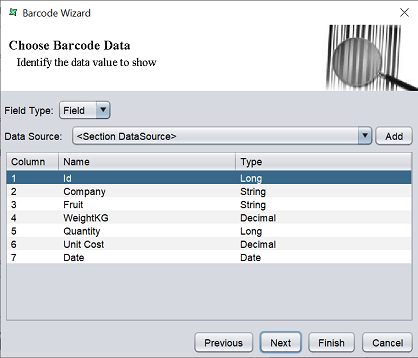
In the next page, select the desired field type from the drop-down list for the “Field Type” field. There are three options:
- Field (default)
- Literal
- Script
The Field option allows you to select a field in the datasource to create the barcode.
For this option, if no datasource is selected in the “Data Source” field, the datasource assigned to the report will be used. To change the datasource, either select one from the drop-down list or click on the “Add” button to add the desired datasource from the repository. Select the desired field in the table.
The Literal option allows you to key in the text for the barcode in the textbox.
The Script option allows you to key in the Java script in the textbox that points to the source for the barcode.
Click on the “Next” button to continue once the barcode data is setup.
In the last page, you can setup the parameters of the barcode and the preview the barcode. The parameters in this page varies from one barcode to another. Below is an example for Code 128.
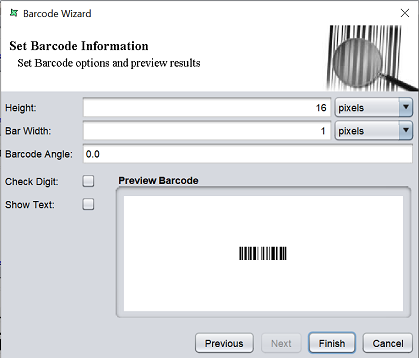
| Field | Description |
|---|---|
| Height | Defines the height of the barcode. Default value is 16 and default unit is pixel. |
| Bar Width | Defines the width of the bars or black strips in the barcode. Default value is 1 and default unit is pixel. |
| Barcode Angle | Defines the angle of the barcode to be displayed in the report. Default value is not defined, which is zero degrees. |
| Check Digit | If selected, allows you to encode the check digit in te barcode. By default, it is not selected. |
| Show Text | If selected, displays the text version of the barcode below the barcode. By default, it is not selected. |
Set the options as required and click on the “Finish” button. The barcode will appear in the report template.
Edit Barcode
To edit the barcode in the report template, double-click on the barcode and the “Properties” dialog box will appear.
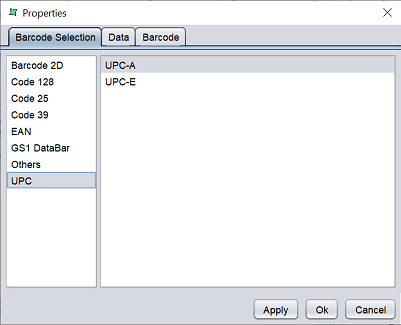
There are three tabs in this dialog box, which allows you to edit the barcode type, its data and options respectively.
Barcode Selection
The “Barcode Selection” tab allows you to edit or change the current barcode. The current selection is displayed in the panels.
If the current barcode is not the desired type, select the desired barcode type in the left panel and its option in the right panel. Click on the next tab or click on the “Apply” button to apply the change. If all changes are done, click on the “Ok” button to save the changes and exit the dialog box.
Data
The “Data” tab allows you to edit the field type, datasource or field for the barcode.
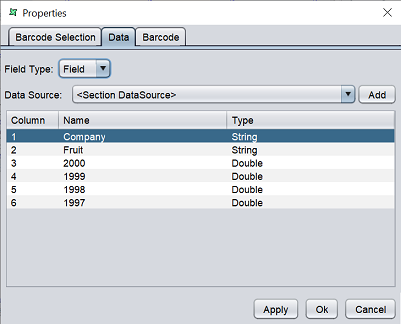
Select as desired and click on the next tab or click on the “Apply” button to apply the change. If all changes are done, click on the “Ok” button to save the changes and exit the dialog box.
Barcode
The “Barcode” tab allows to set the options for the barcode and preview the edited barcode.

Setup the barcode as desired and the barcode in the “Preview Barcode” panel will change according to the settings. Click on the “Apply” button to apply the changes or click on the “Ok” button to save the changes and exit the dialog box. To abort the action, click on the “Cancel” button.