
Cube
The ![]() Cube processor allows you to generate results of your choice by defining multi-level dimensions and multiple measures using the pre-defined functions. Some examples of such functions are sum, average, count, max and min.
Cube processor allows you to generate results of your choice by defining multi-level dimensions and multiple measures using the pre-defined functions. Some examples of such functions are sum, average, count, max and min.
Add Cube
To add a Cube processor, select the ![]() button on the menu bar and click on the location in the designer diagram. Use the Flow connector to connect the Cube and other processors together.
button on the menu bar and click on the location in the designer diagram. Use the Flow connector to connect the Cube and other processors together.
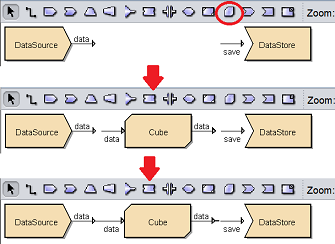
The Cube processor is present but it is not defined yet.
Edit Cube
After the Cube and other processors are connected together, you may need to edit the properties of the Sort processor.
There are two ways to access the properties of the Cube processor.
- Double-click on the Cube processor
- Right-click on the Cube processor and select the “Properties” option from the pop-up menu
Either one method will launch the Cube Wizard.
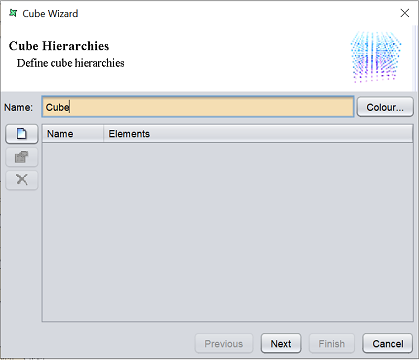
On the left of the page three buttons, such allows you to add, edit and remove the hierarchies added. The table on the right consists of the “Name” and “Element” columns, which lists the name of each hierarchy and its corresponding elements.
To add a hierarchy, click on the “Add” button. The “Add Hierarchy” dialog box will appear.

A hierarchy indicates a strict relationship between the hierarchy elements - each child can only belong to a single parent. For example, Country/State/City is a valid hierarchy because a City cannot be in more than one State, and a State cannot belong to more than one Country. Year/Month is not a valid hierarchy, because “January” can occur in many years.
Provide a name for the hierarchy and select its element from the “Schema Columns” panel. Click on the “Ok” button to save the hierarchy and close the dialog box.
The new hierarchy will appear in the table of the Cube Wizard. Click on the “Next” button once all desired hierarchies are added.
In this page, you can add the Column and Row dimensions.

The element that are added in the Column dimension windows will be displayed as the column fields in the output table. The element that are added in the Row dimensions window will be displayed as the row fields in the output table. The hierarchy column added in the first screen can be made use of in this screen as a row or column field.
Use of a hierarchy is more efficient, as the system relies on the strict definition of each child only having one parent. However an incorrect use of hierarchy, as illustrated by Year/Month above will usually yield incorrect results.
Once the Column and Row dimensions are set up, click on the “Next” button.
In this page, you can define the cube measures.
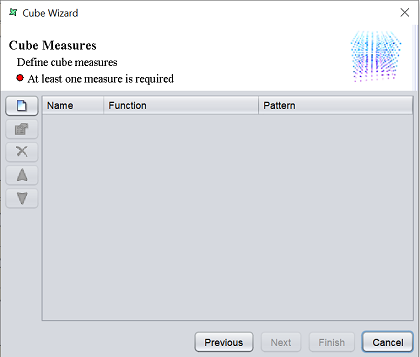
On the left of the page fivw buttons, such allows you to add, edit, remove, move up and move down the measures added. The table on the right consists of the “Name”, “Function” and “Pattern” columns.
To add a measure, click on the “Add” button. A “Add Measure” dialog box will appear. The name of te measure is given by the values of the dimensions that form the output column.
Select a field in the “Name” field and the desired function in the “Function” field from their respective drop-down lists. If the “Pattern” field is left empty, the column name will use the value in the “Name” field. You can choose your own column name by defining it in the “Pattern” field.
There are a number of substitution parametes available. Assuming the default column name is US/Oregon/Married/Count(employeeid), some samples of available substitutions are listed below:
| Parameter | Description |
|---|---|
| [blank] | US/Oregon/Married/Count(employeeid) It is backwards compatible. |
| ${*} | US/Oregon/Married/Count(employeeid) All, as before. |
| ${0} | US Extract using index. |
| -${1}-${0}-${2}- | -Oregon-US-MArried- Another index. |
| ${hierarchy} | US/Oregon/Married Without the measure. |
| ${measure} | Count(employeeid) Without the hierarchy. |
| ${hierarchy}/${measure} | US/Oregon/Married/Count(employeeid) All. |
| ${field} | employeeid Just the field name. |
| ${fn} | Count Just the measure function. |
| ${fn} of ${Field} | Count of employeeid Varying formatting. |
Note: It is important that any pattern defined should result in a unique column name for each column in the cube. This usually means that you should include the elements of the hierarchy and the measure somewhere in your pattern. Failure to ensure unique column names may prevent subsequent processor steps from accessing data from those fields with duplicate names.
Once all measures are set up, click on the “Next” button.
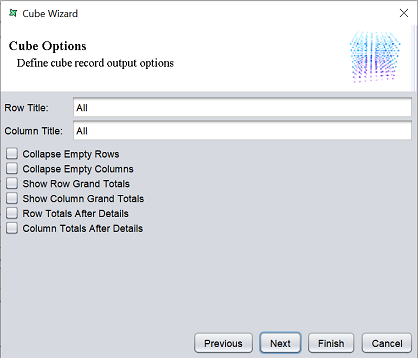
In this page, you can define the cube options.
| Fields | Description |
|---|---|
| Row Title | Title of row dimension |
| Column Title | Title of column dimension. |
| Collapse Empty Rows | If selected, remove any rows from the cube that have no records contributing to them. |
| Collapse Empty Columns | If selected, remove any columns from the cube that have no records contributing to them. |
| Show Row Grand Totals | If selected, an additional row is inserted to represent the grand totals of all rows in the same column. |
| Show Column Grand Totals | If selected, an additional column is inserted to represent the grand totals of all columns in the same row. |
| Row Totals After Details | If selected, sums the total only after the row(s) of each group of Measure(s). |
| Column Totals After Details | If selected, sums the total before the column(s) of each group of Measure(s). |
Select as desired and click on the “Next” button.
In this last page, you can manage the cube schema cache.
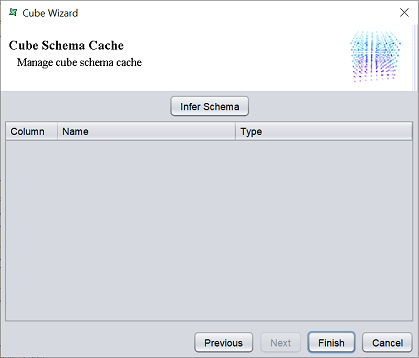
Click on the “Infer Schema” button to infer the schema. You should infer the schema after any changes to the dimension or measures, including changing the measure patterns, since all these affect the column names. Click on the “Finish” button to save the set up.
Note
In order to display the “Row Totals After Details” and “Column Totals After Details” to display when generating the Cube, the “Show Totals” must be selected. In the “Cube Axes” page, select the field in the “Column Dimensions” or “Row Dimensions” panel that the totals should be displayed. Click on the  button to display the “Edit Level” dialog box.

It is not necessary to select the field “Show Totals”.
But to display the “Show Column Grand Totals” and “Show Row Grand Totals” along with the “Row/Column Totals After Details”, the “Show Totals” field must be selected.
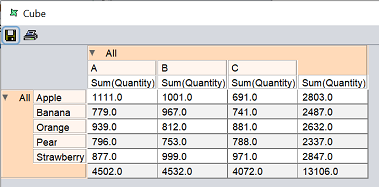
To view the cube table, right-click on the Cube processor to display the pop-up menu and select the “View Cube” option.
Delete Cube
To remove the Cube processor, simply select the Cube processor and click on the “delete” key on your keyboard. Alternatively, right-click on the Cube processor to display the pop-up menu and select “Delete Graphic” option.
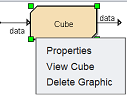
Pop-up Menu
To access the pop-up menu of the Cube processor, right-click on the processor.
There are three functions in the pop-up menu.
| Function | Description |
|---|---|
| Properties | Launches the Cube Wizard that allows you to edit the properties of the Sort processor. |
| View Cube | Launches another window to display the cube table. |
| Delete Graphic | Deletes the Cube processor. |