
Text Datasource
A text datasource is a datasource that allows access to data from a text file
To use the DataSource Wizard, right-click on the folder where the text datasource is to be created. The list of available actions will appear. Select the “Add” option, then the “Datasource” from the sub-options that appear.
The DataSource Wizard will appear. For text datasource, there are four steps:
- Select datasource type
- Define datasource details
- Define schema
- Define security option
Select Datasource Type
In the first DataSource Wizard page, select “Text” from the list of available options, then click on the “Next” button.

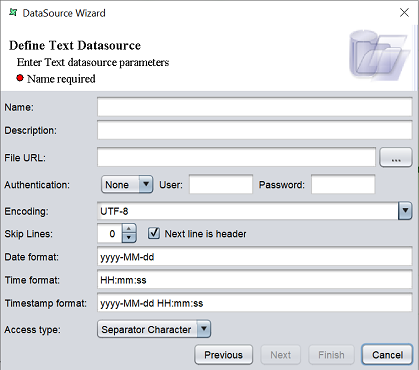
Define Datasource Details
In this second page, the details of the text datasource need to be defined.
| Field | Description | Mandatory |
|---|---|---|
| Name | Name of text datasource. | Yes |
| Description | Brief description of text datasource. | No |
| File URL | Defines the location of the text file. | Yes |
| Browse | When clicked, allows user to browse to the location of the text file. | No |
| Authentication | Defines if the text file needs authentication. Available options: - None (default) - Basic - Digest |
Yes |
| User | If “Authentication” selects “None”, this field may not be required. Otherwise, this field need to be filled. |
Depends on “Authentication” field |
| Password | If “Authentication” selects “None”, this field may not be required. Otherwise, this field need to be filled. |
Depends on “Authentication” field |
| Encoding | Defines the encoding method of data from the drop-down list. Default is UFT-8. |
Yes |
| Skip Lines | Defines the number of lines to be skipped. Default value is 0. |
Yes |
| Next line is header | If selected (default), the next line is defined as the header. | No |
| Date Format | Defines the format of date data type. Default is “yyy-MM-dd”. |
No |
| Time Format | Defines the format of time data type. Default is “HH:mm:ss”. |
No |
| Timestamp Format | Defines the format of timestamp data type. Default is “yyyy-MM-dd HH:mm:ss”. |
No |
| Access type | Defines the access type. Available options: - Separator Character (default) - Fixed With - Regular Expression |
Yes |
The mandatory fields must be filled, else an error message will appear in the page with a red dot and the “Next” button will not be enabled.

Fill in the fields as required and click on the “Next” button.
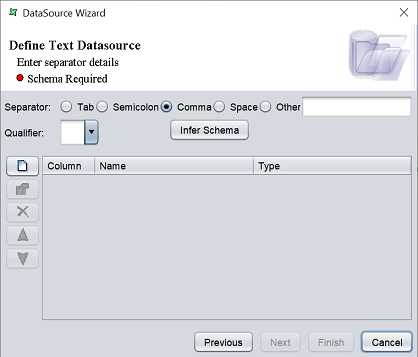
Define Schema
In the next page, the access method and schema of the text datasource need to be defined.
Access Method
Depending on the selection in the “Access Type” field from the previous page, different fields may appear.
| Access Type | Description |
|---|---|
| Separator Character | Defines the separator character and the qualifier to be used.  The “Separator” field allows you to select the character that separates one character from another. The “Qualifier” field allows you to define the start and stop of a text (e.g., a string). |
| Fixed With | No fields. |
| Regular Expression | Defines the regular and start-stop expressions to be used.  |
Select or key in the desired information as required.
Schema
There are two ways to define the schema:
- Click on the “Infer Schema” button
- Define the fields for the schema one by one using the buttons on the left
To add a field, click on the  “Add” button at the left of the page. The “Add Column” dialog box will appear.
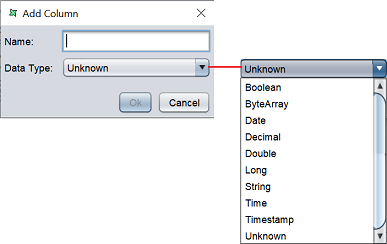
Key in the name of the field in the “Name” field and select the data type from the drop-down list in the “Data Type” field. Click on the “Ok” button to add the column.
Repeat the same process until all desired fields as added.
The order of the fields are according to the sequence they are added. To re-order the fields, select the desired field, then click on the  “Move Up” or
  “Move Down” buttons to move the field to the desired position.
You can also edit the field by selecting the desired field, then clicking on the  “Edit” button. The “Edit Column” dialog box will appear.
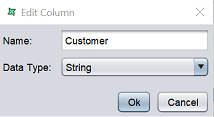
Edit the information as required and click on the “Ok” button to save the change.
If a field is added by mistake, you can remove the field by selecting it, then click on the  “Delete” button.
After all required fields are added, click on the “Next” button to continue. Alternatively, if you wish to use the default security options, click on the “Finish” button to complete the process.
Security Option
The last page in the wizard for the text datasource allows you to set the security options for the datasource.

There are three options.
| Type | Description |
|---|---|
| Read Only | When selected and saved, the next time a user opens this datasource, the user will not be able to edit any details of the datasource (such as name, description and column names). |
| Hide Details | When selected and saved, the next time when this datasource is opened, the user will only be able to see the name and description of the datasource. |
| Encrypted | This is to be used with either Read Only or Hide Details options or both. Checking the checkbox will prompt the user to enter a password, then re-enter to confirm the password (both password must be the same). After this is done, if another user would like to edit any selections, he will need to enter the password. |
By default, none of the options are selected. Select the options are desired. More than one option can be selected. If “Encrypted” is selected, provide a password in the pop-up dialog box. Click on the “Finish” button to complete the process.
The new datasource will appear in the repository on the left.
You can change the security option of the datasource through the DataSource Wizard by clicking on the “Properties” icon at the Top Row in the Workspace after the datasource is selected. The third page in the DataSource Wizard allows you to change the security options.